Neeuro: NeeuroOS SenzeBand SDK (1.0.0)
Download OpenAPI specification:
 Welcome to the NeeuroOS SDK Developer Guide. This guide provides general information about setting up and configuring the NeeuroOS SDK.
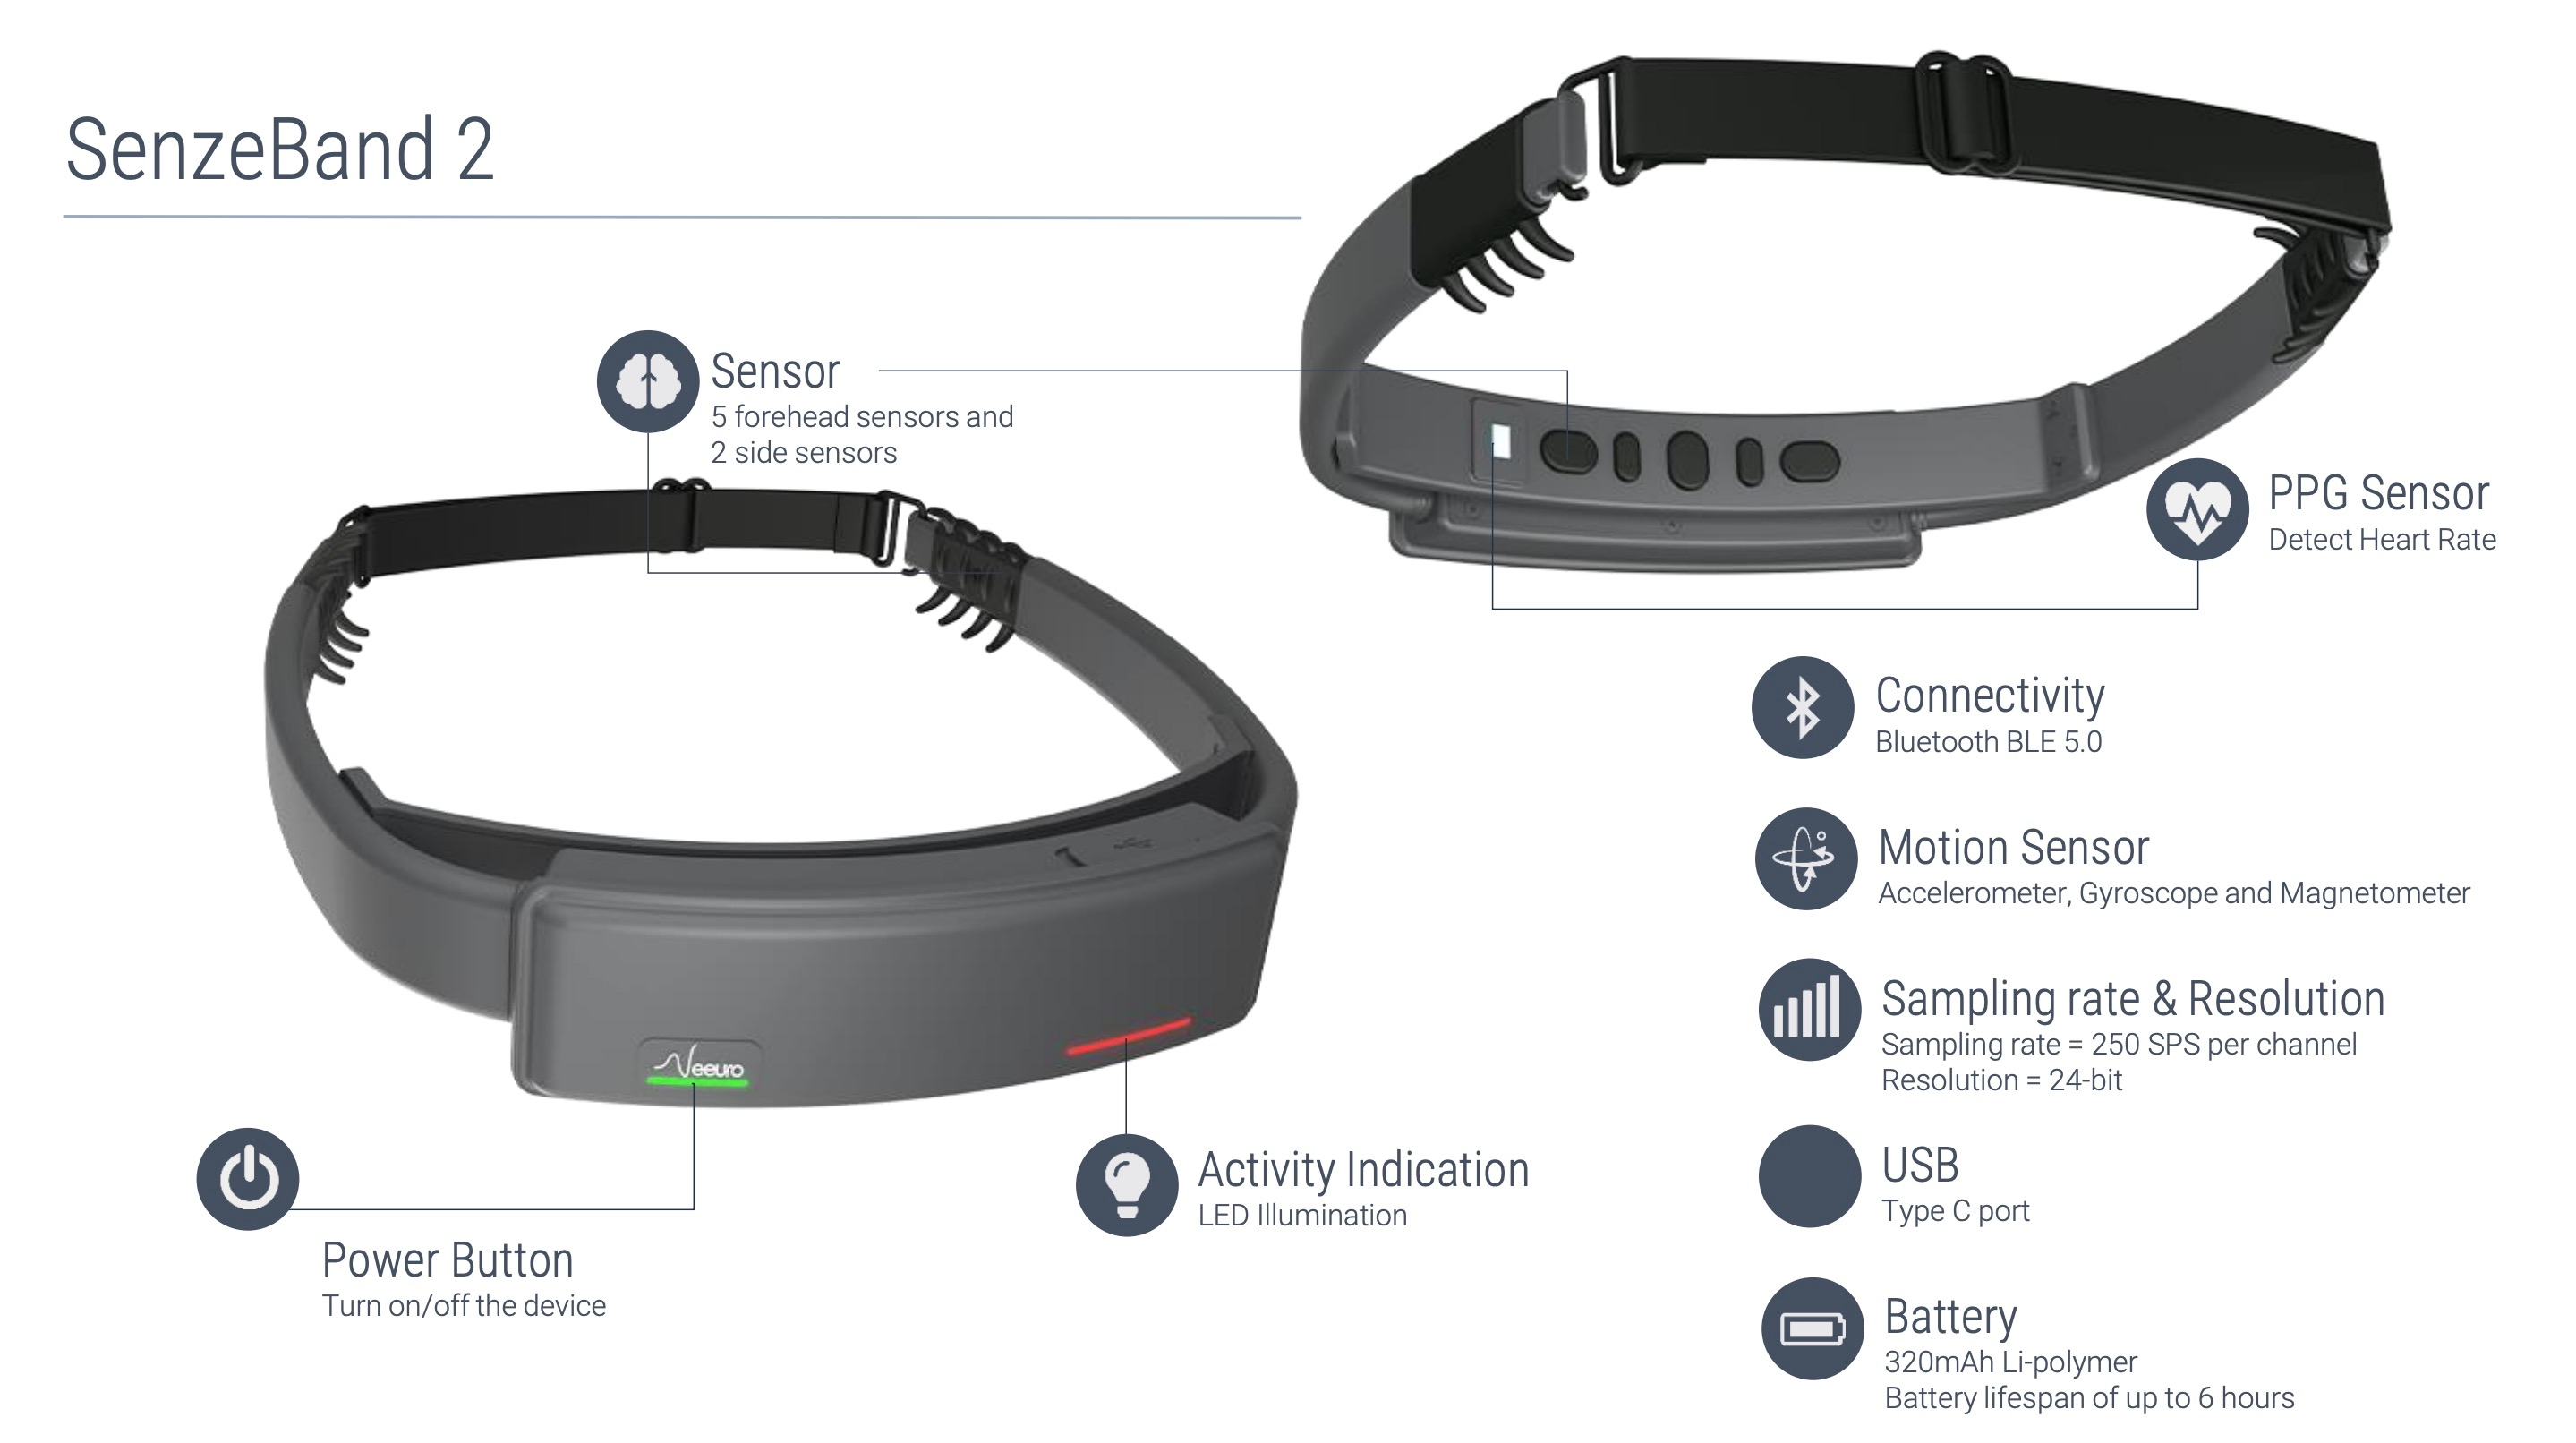
An SDK (Software Development Kit) is a set of platform-specific building tools for developers. The NeeuroOS SDK allows you to access the SenzeBand 2 and develop your own applications using the Neeuro SenzeBand's EEG technology.
Each package will have a platform specific sample project with code with comments on how to use the SDK.
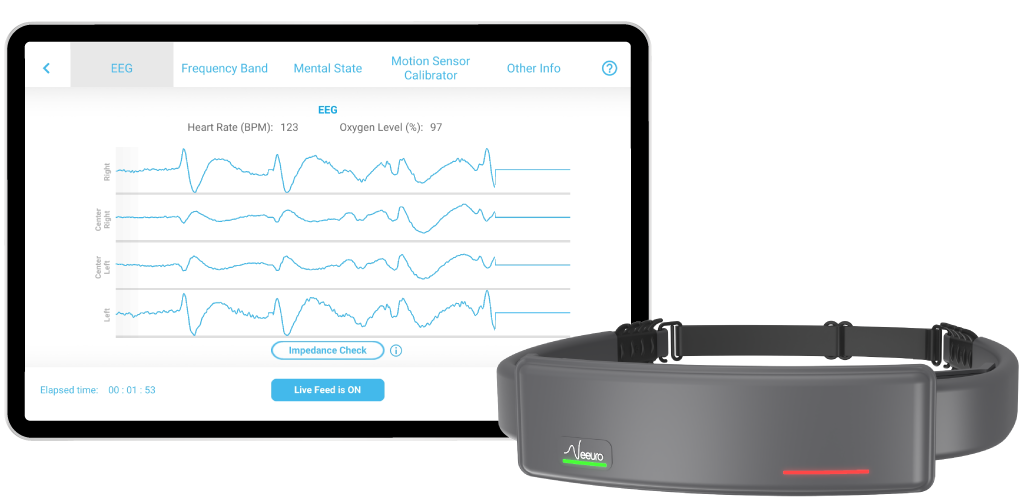
In the Neeuro SenzeBand SDK Standard version, the SDK will analyze the data recieved from the SenzeBand and provide the following output for use in your application:
- Mental state - attention classification
- Mental state - relaxation classification
- Mental state - workload classification
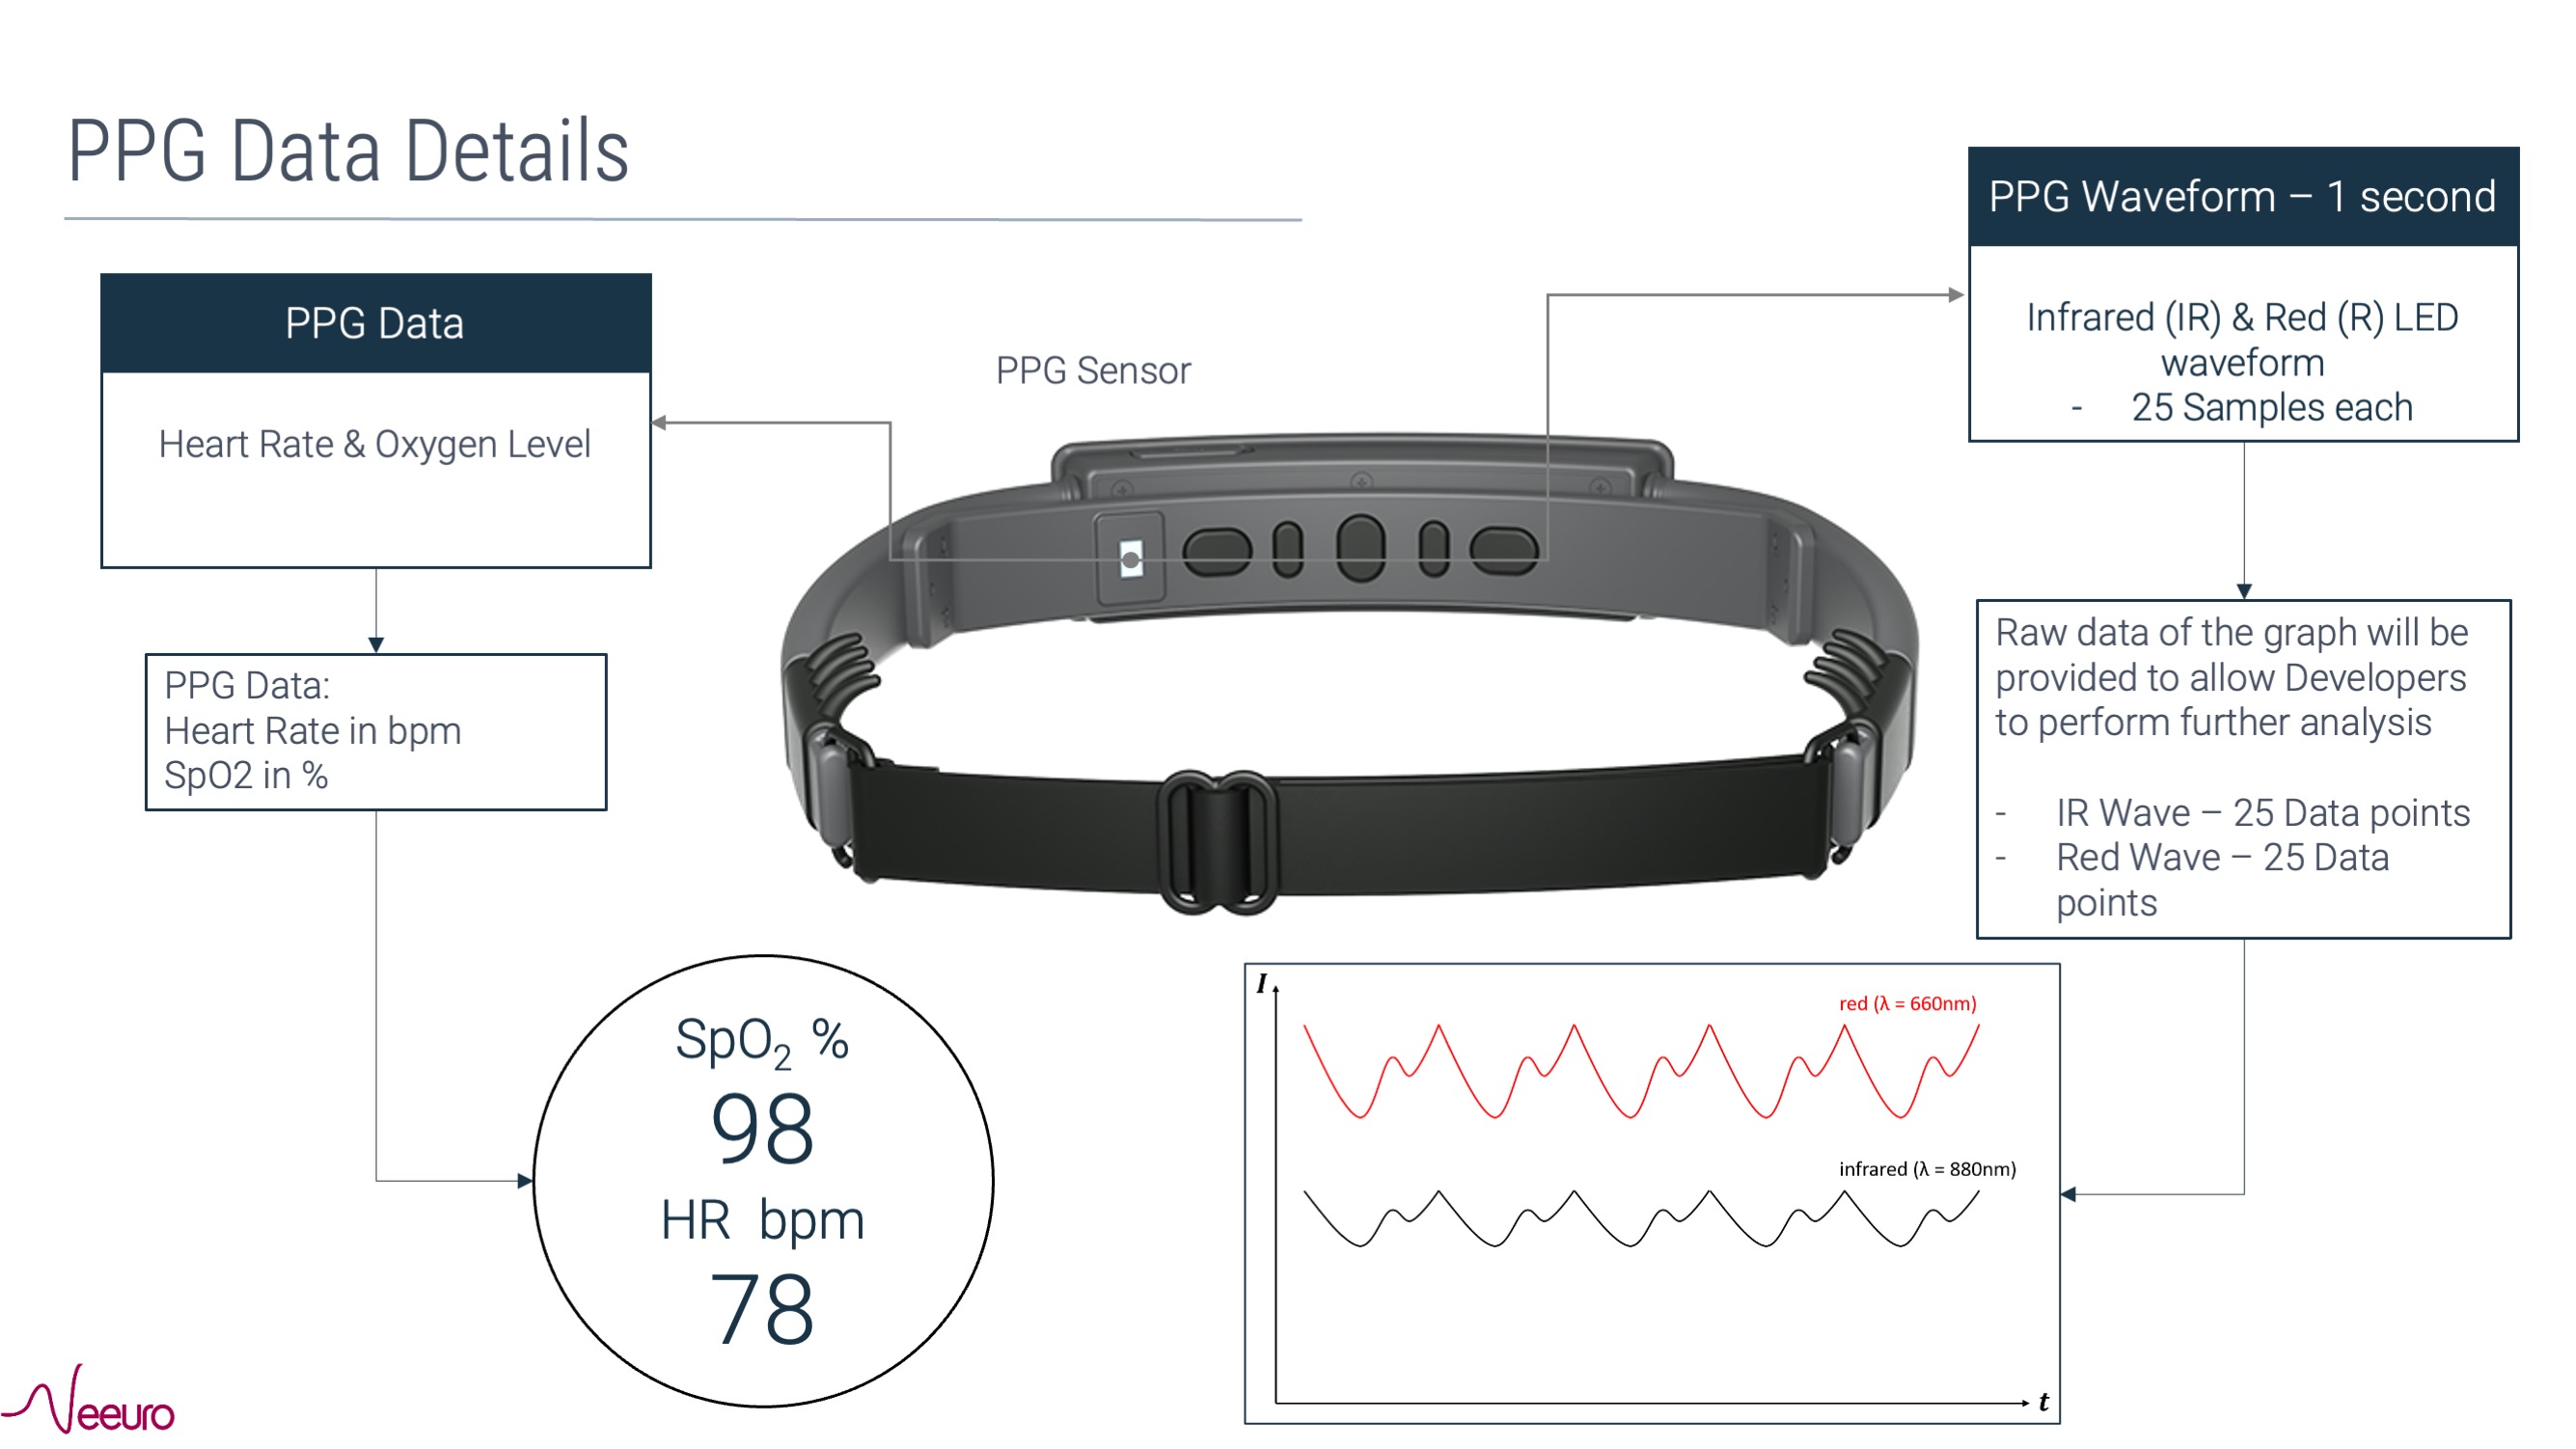
- Oxygen level (SPO2) and heart rate
- Accelerometer values - X, Y, Z axes (9-axis motion sensor readings)
- Battery level
- Channel signal status - (T/F) strong EEG signal detected on 4 channels
- Signal ready status - (T/F) sufficient strong EEG signal received for signal processing for Mental States
- Connection status - (T/F) Good connection on BLE, no data lost
- Frequency band readings
- Raw and filtered EEG (electroencephalogram) data
- Raw PPG (photoplethysmography) data
General requirements
Bluetooth requirements:
- SenzeBand 1 - Bluetooth 4.0
- SenzeBand 2 - Bluetooth 5.0
Native Android requirements
Minimum device Android:
- Android 8
Native iOS requirements
Minimum device iOS:
- iOS 11.0 Minimum Xcode version:
- Xcode 14
Native Windows requirements
- Bluetooth connection capability (can use Bluetooth dongle)
Unity requirements
Minimum device OS:
- Android 5.0 (Lollipop, API level 21)
- iOS 8
Minimum Unity version:
Additional requirements for Android build
- Android SDK at least API level 26 (preferably latest version)
- Gradle 7.5.1 or later
Additional requirements for iOS build
- Xcode 14 or later
Additional requirements for Windows build
- Bluetooth connection capability (can use Bluetooth dongle)
Unsupported devices:
- iPad 2
- Samsung Tab A (2016) 7-inch
- Some computers' Bluetooth hardware may not be able to support the data transfer rate
- Refer to Device Compatibility for more information
| Language | Platform and Operating systems |
|---|---|
| Java | Native Android |
| Objective C | Native iOS |
| C# | Native Windows, Unity on Android, iOS, Windows |
Thank you for your interest. To get started ensure that you have SenzeBand 2. Then, fill up this form. We will provide you with a developer's code and access to the NeeuroOS.
Your Developer Code is a unique ID that is given when you register as a Developer with Neeuro. Please contact support@neeuro.com if you have not received your Developer Code.
In order to use the SENZEBAND-SDK-STANDARD functions, the app has to use the Developer Code to authenticate with Neeuro's servers. Internet connection is needed. Every successful authentication will give a period of time for the app to use the SDK functions.
Depending on which platform your SDK package is for, navigate to that section and follow the instructions on setting up and building the NeeuroOS SDK. Then, use that platform's quick-start guide to begin development.
Is there a trial period for NeeuroOS?
We offer 1 month free trial for NeeuroOS. Licensing Fee is chargeable after the trial period. To find out more, please contact us at contact@neeuro.com.
Can the SenzeBand 2 be incorporated in a cap or headgear like protective helmets or ARs/VRs?
Yes, the SenzeBand 2 is designed to be flexible and worn with headgears. However, it will still depend on the design of the headgear and whether the SenzeBand can fit properly. For more information, please contact us at contact@neeuro.com.
- SenzeBand information: MAC address
- Check the connectivity of the electrodes and head
- Battery level and charging status
- Event Evoke to send marker into EEG data package
- This is to provide synchronization for SB2 and software during data recording.
- The behavioural experiment software can be programmed to send command into SB2 through BT5.0 connection every time you need to mark something relevant in your experiment (like the subject being asked to close his/her eyes, the presentation of an image or a sound, etc.). The EEG data package will have synchronous samples of the EEG signal from the electrodes and the recorded event marker log (elapsed time) so they are perfectly aligned.
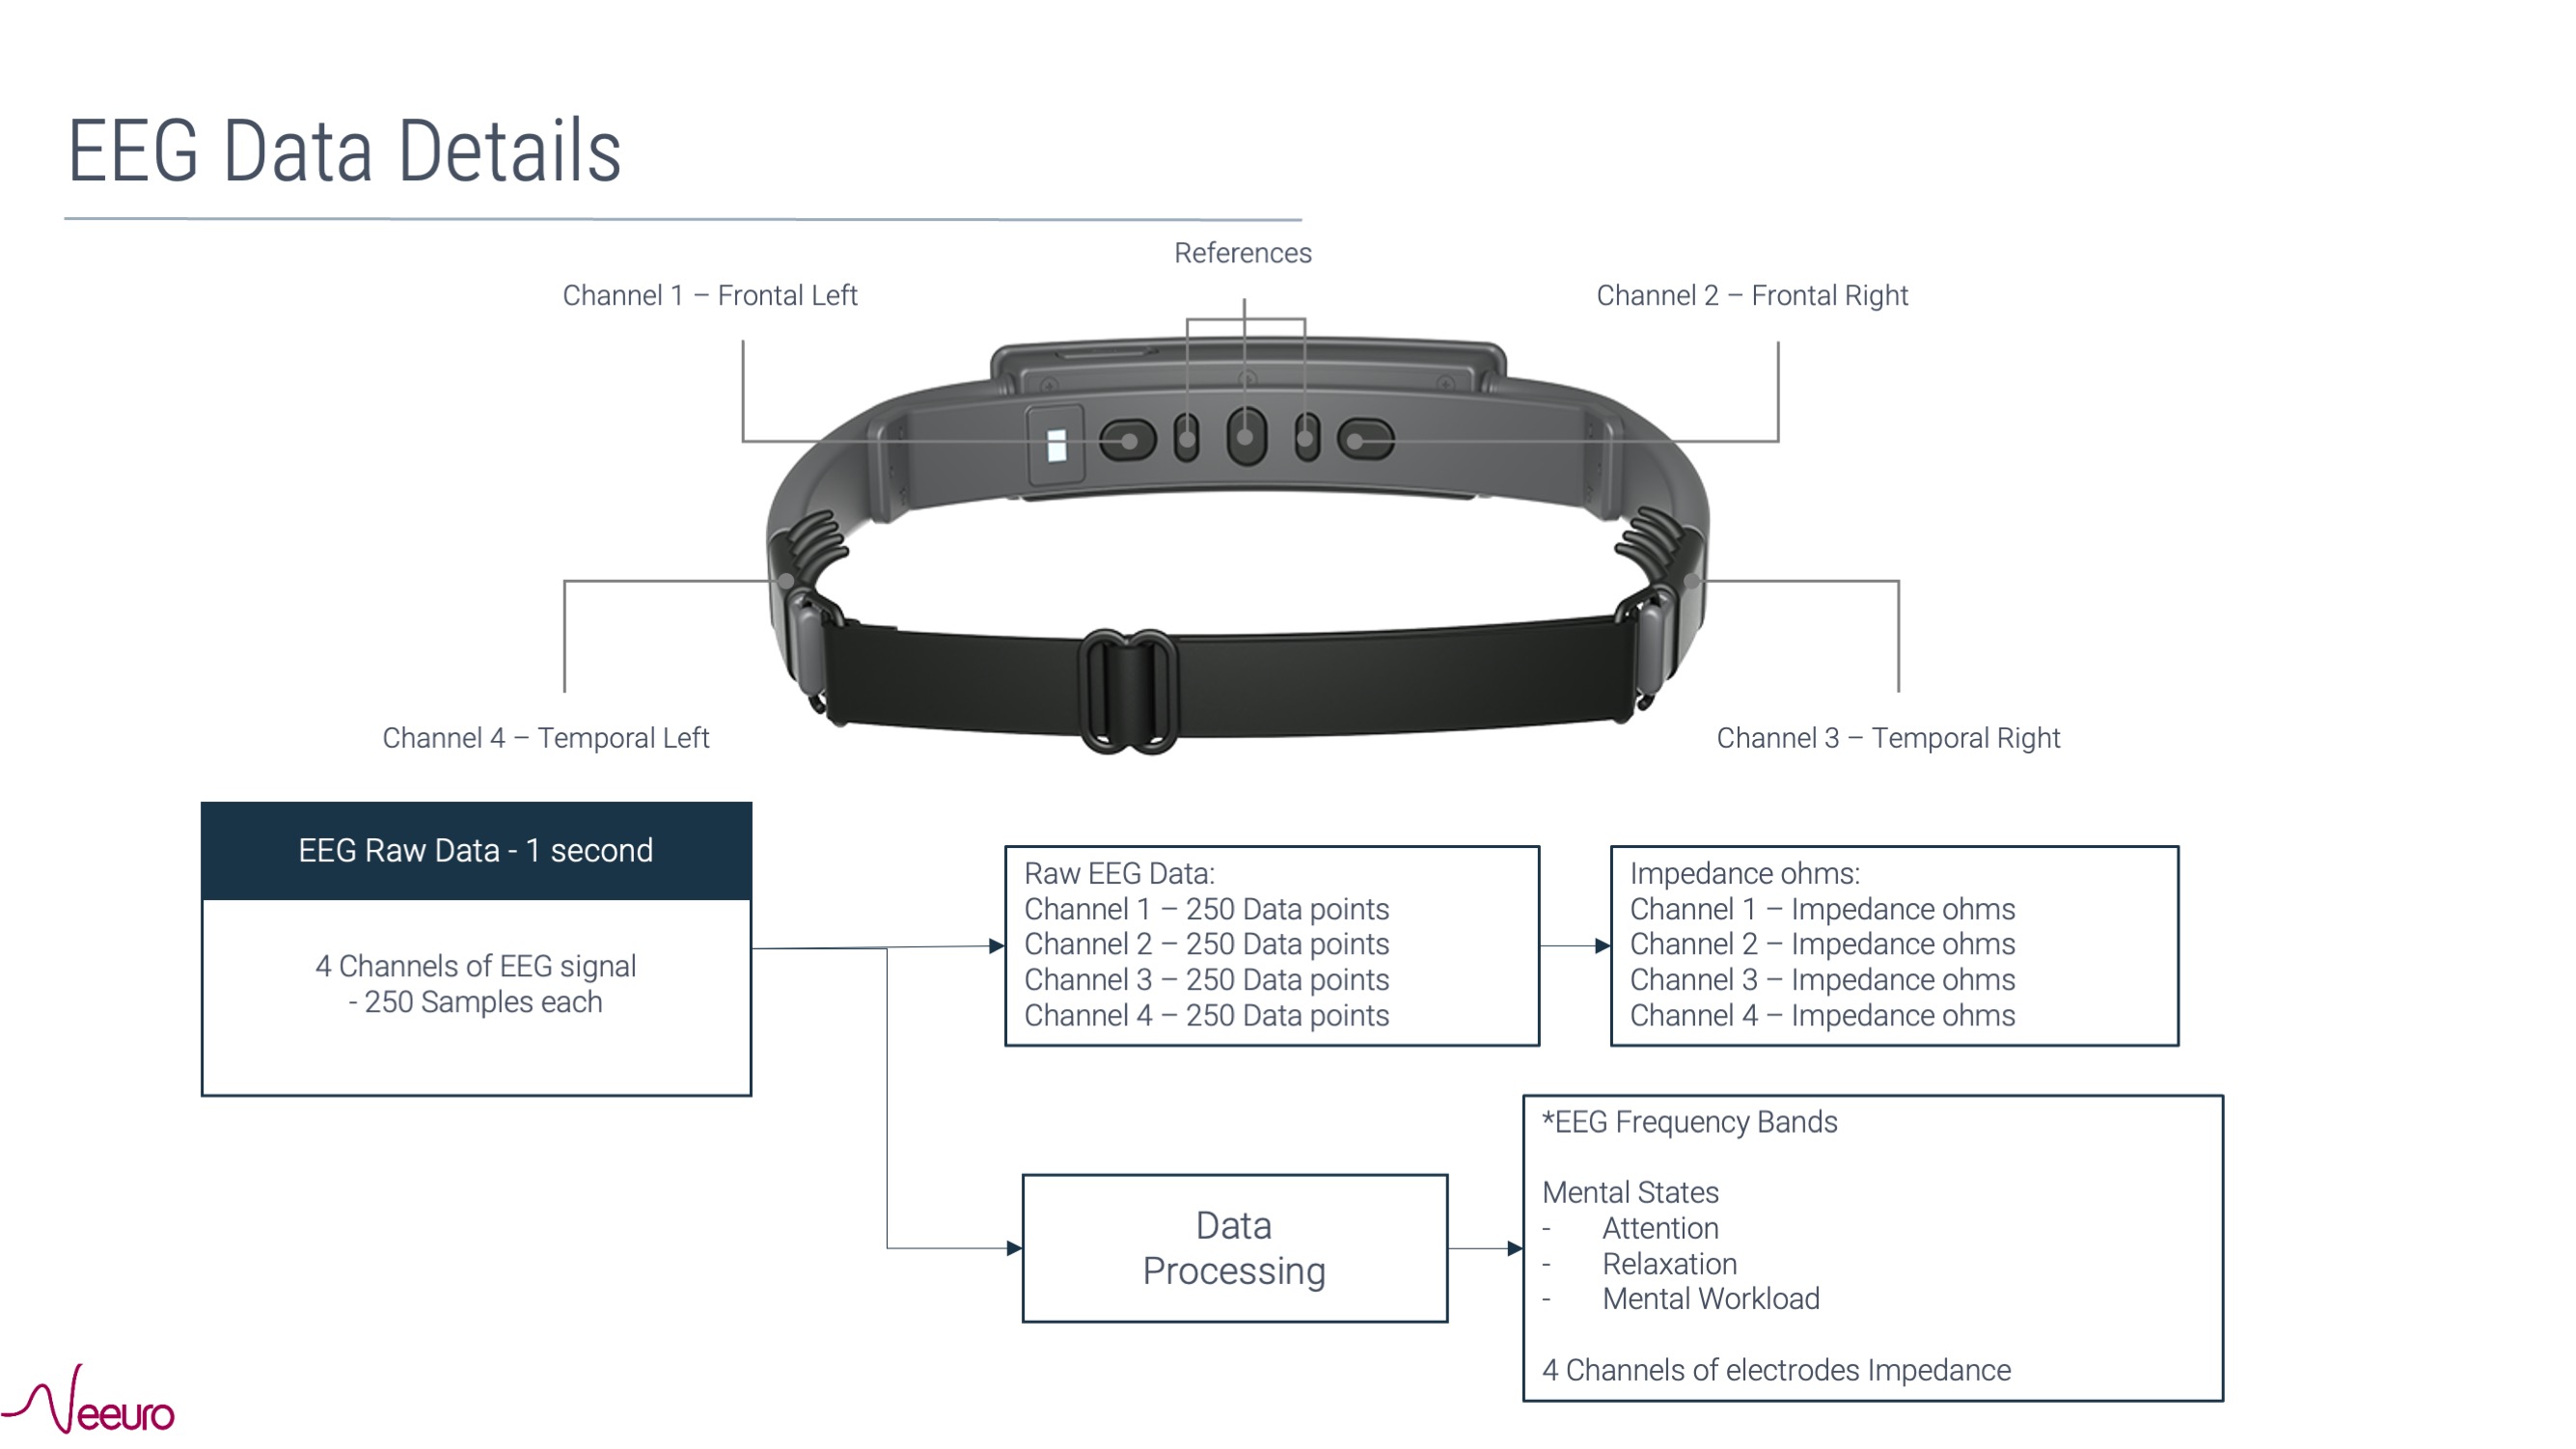
EEG Frequency Bands
| Frequency Band | Frequency Range | Brain States |
|---|---|---|
| Delta | 1-4 Hz | Sleep, repair, unawareness, deep-unconsciousness |
| Theta | 4-8 Hz | Creativity, intuition, daydreaming |
Alpha
|
8-12 Hz
|
Alertness and peacefulness, readiness, meditation, deep relaxation |
Beta
|
12-30 Hz
|
Focus, thinking, sustained attention, alertness, excitement |
| Gamma | 30-40 Hz | Learning, cognitive processing, problem solving tasks |
- A 9-axis IMU (inertial measurement unit) adds information from a 3-axis magnetometer to the gyroscope and accelerometer. The magnetometer measures magnetic fields, delivering a fixed point of reference (Earth's magnetic field). This data can be fused with the gyroscope and accelerometer data to deliver absolute heading: Not only how many degrees heading have changed, but its relation to magnetic north. In the same way, 9-axis devices also measure attitude (yaw, pitch, roll), or absolute orientation against a frame of reference.
- Drones, for example, can orient themselves to travel in a certain cardinal direction to follow the sun over the hills, or search an area more effectively.
- The accelerometer values come at 1Hz, ie. 1 sample in data packet every second.
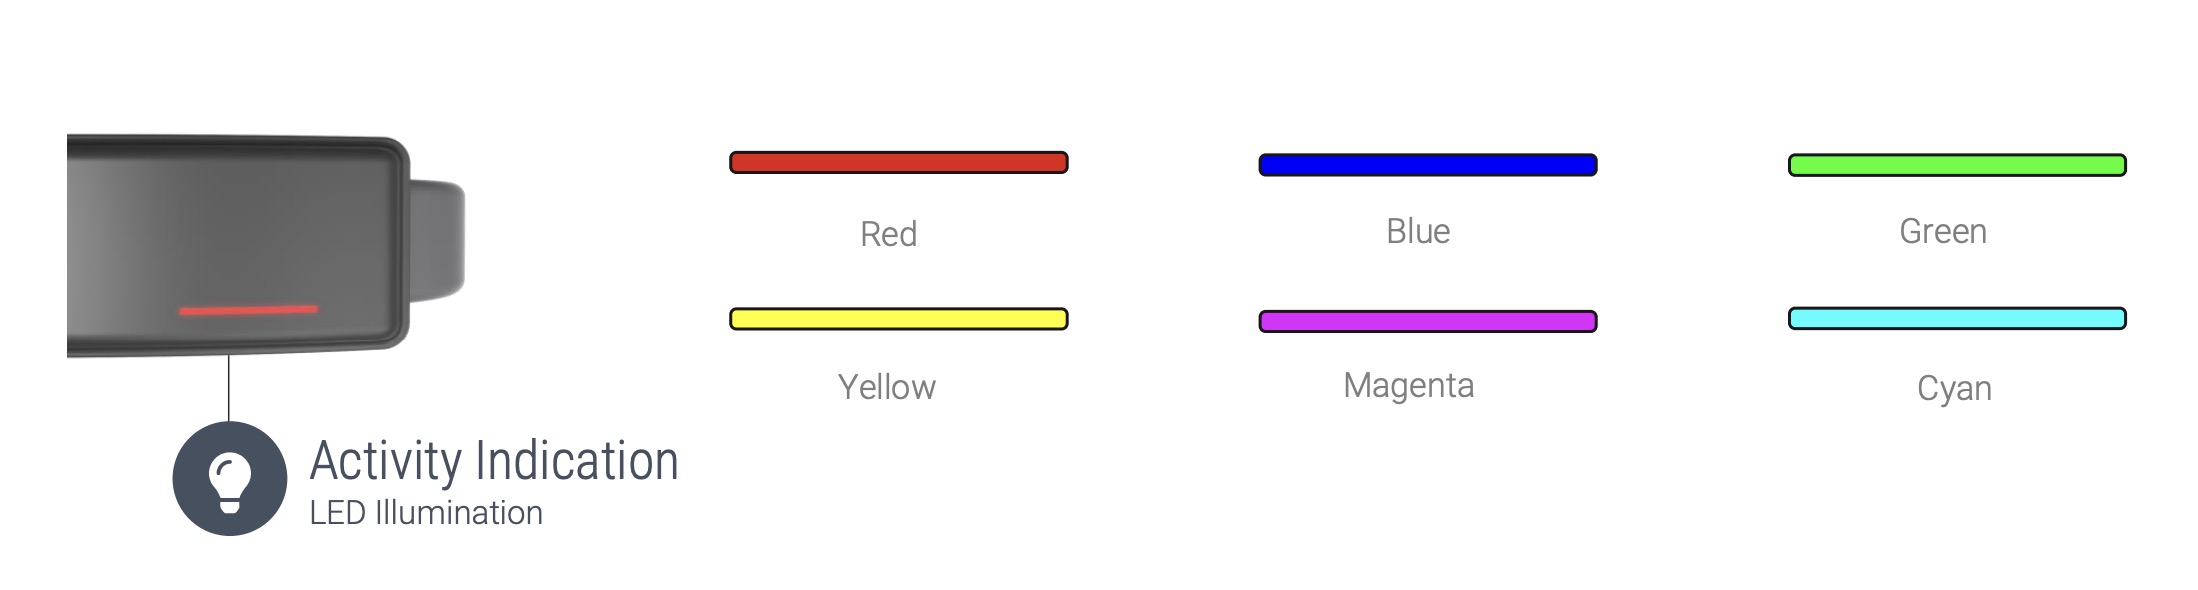
The activity LED indicator is programmable using the NeeuroOS with the following programmable colours.
- Colour: Red, Blue, Green, Yellow, Magenta and Cyan
- Frequency time range to ON/OFF the LED light: 0 to 60000ms (60secs)
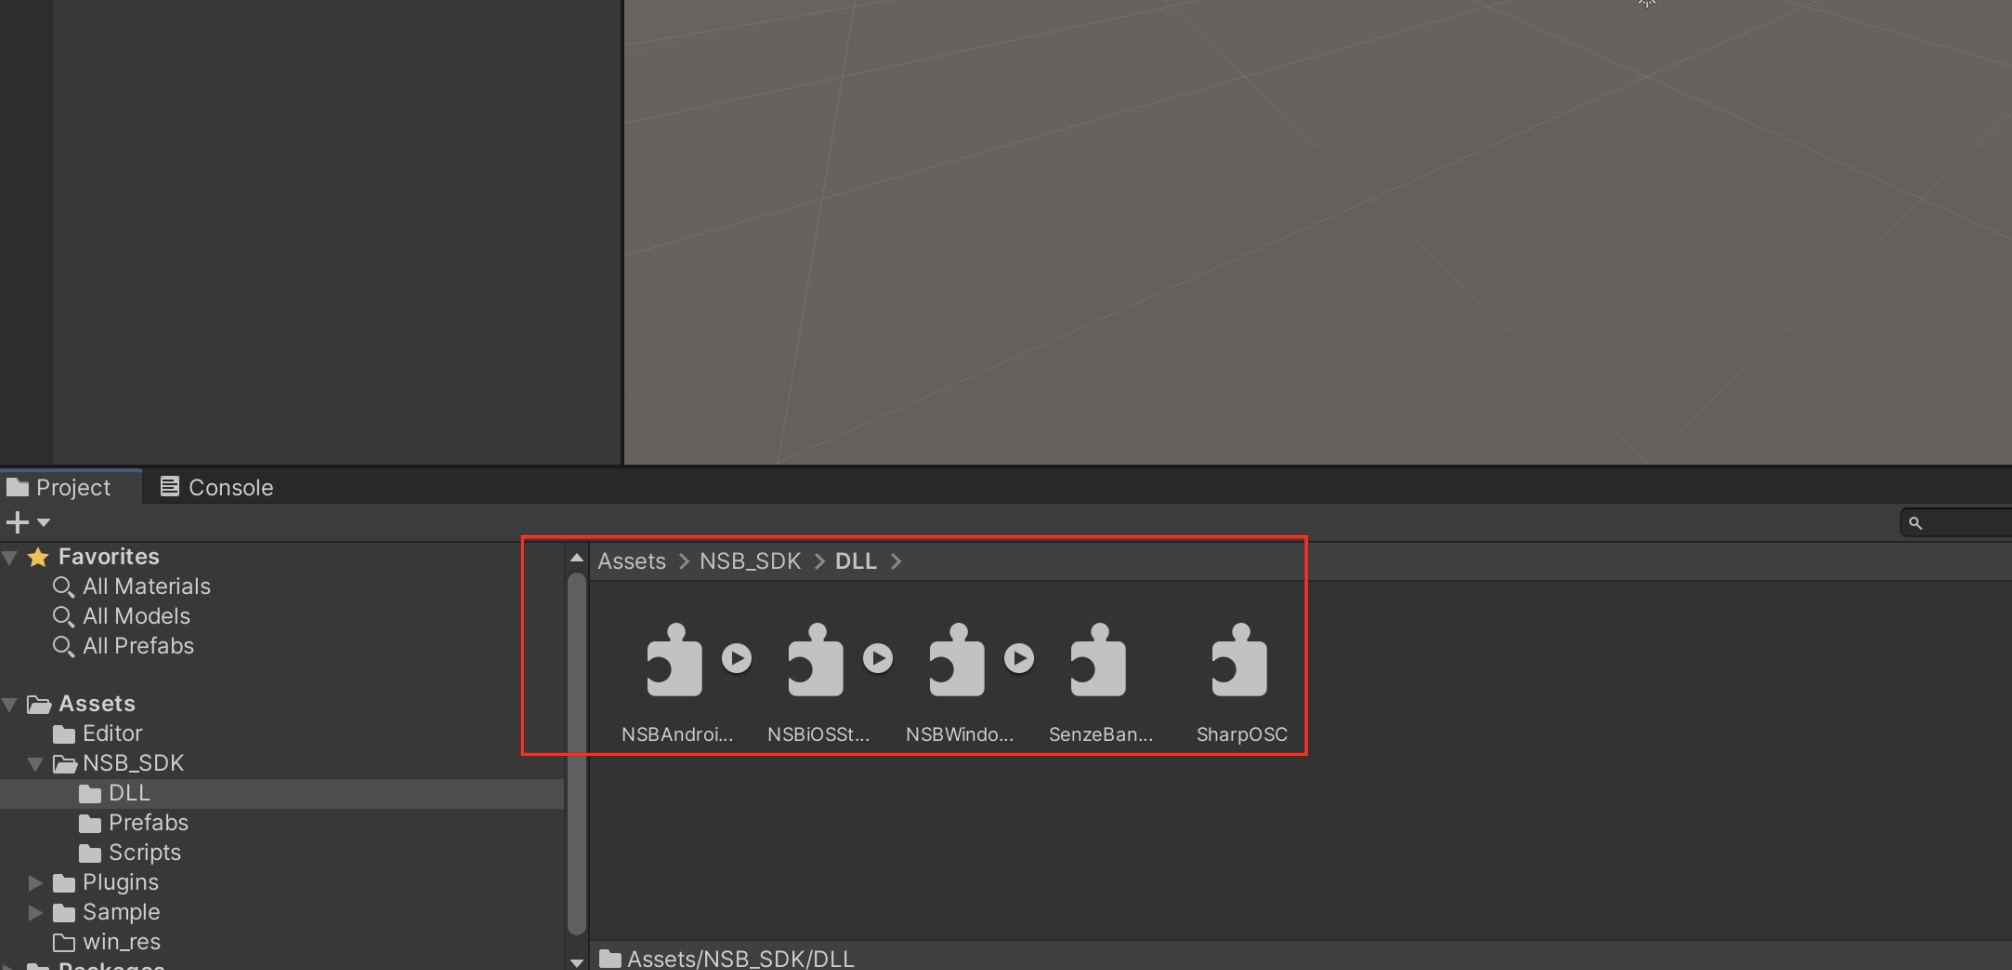
Unzip the SDK folder and make sure all these files are inside.

Open the Android project in Android Studio to run the application.
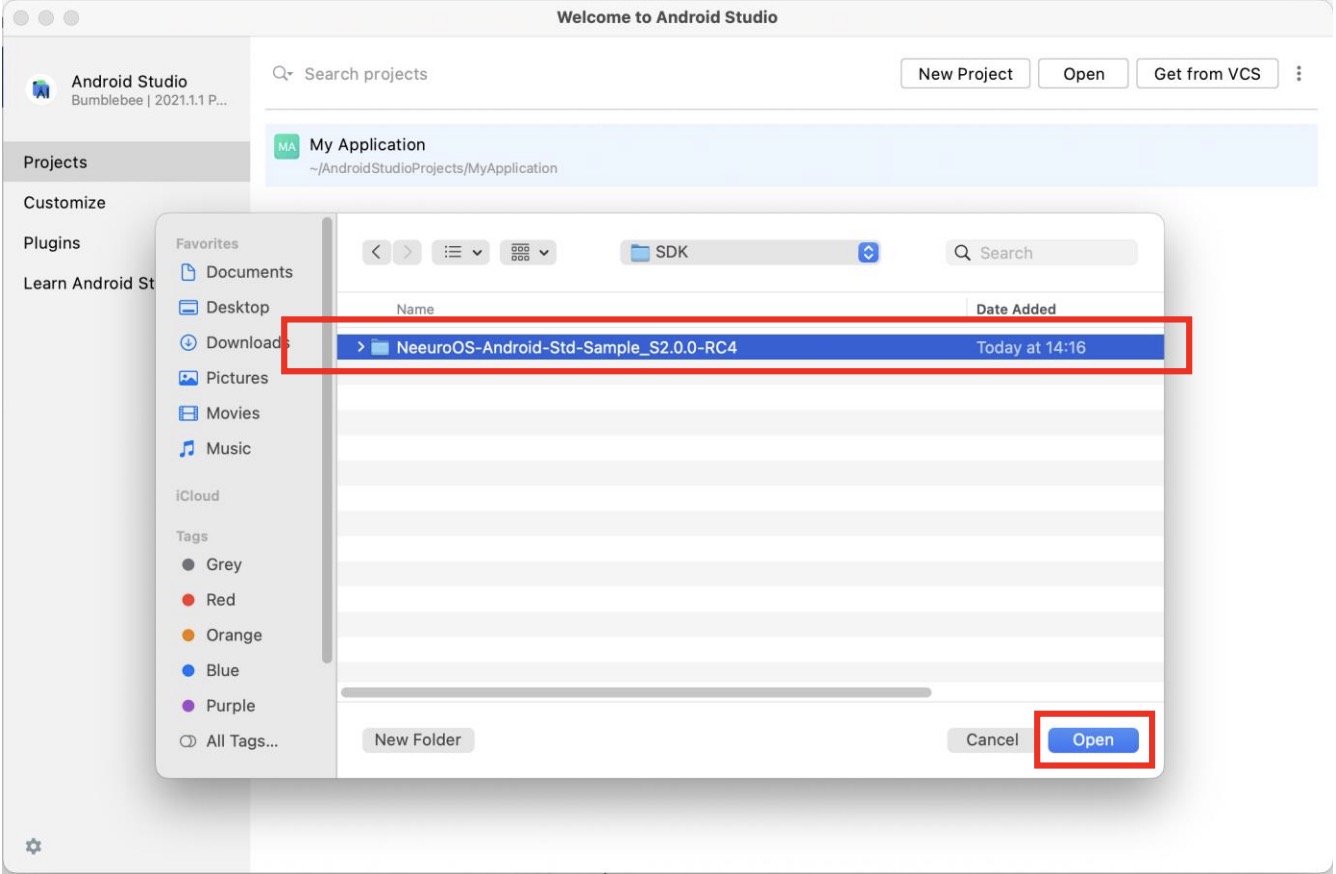
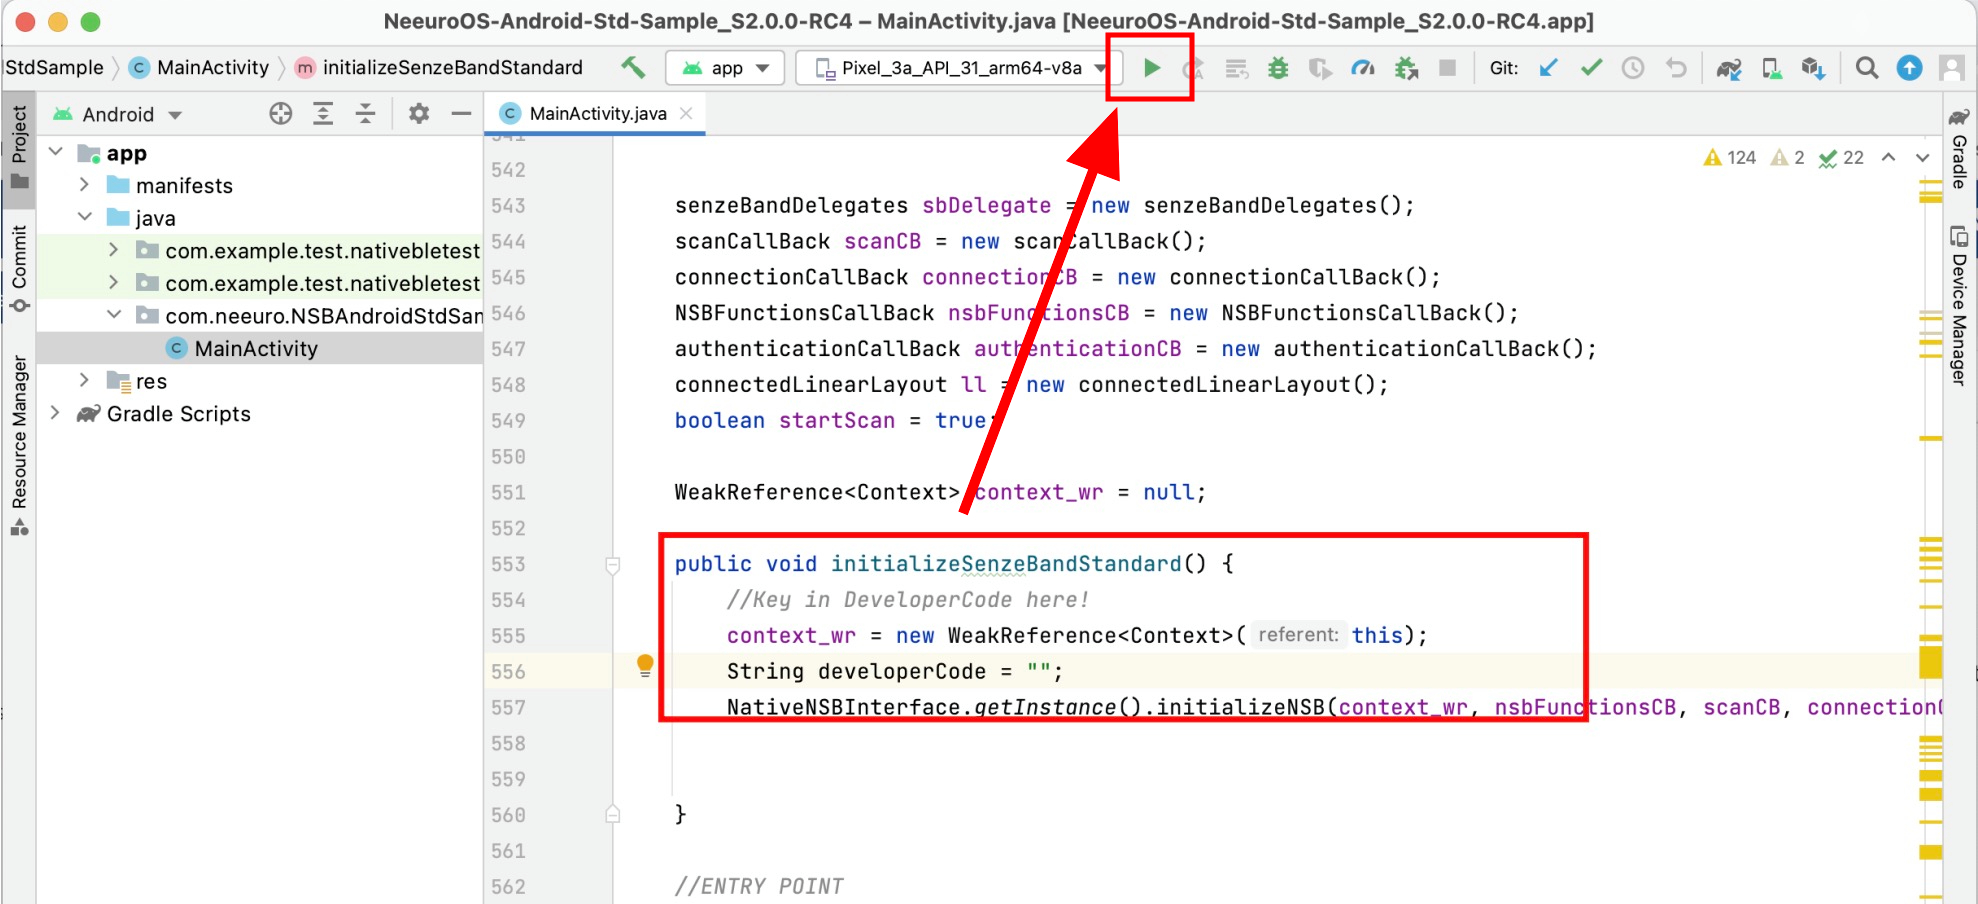
Input your Developer Code in the initializeSenzeBandStandard function.
Then, run the app.
This section will walk you through how to develop your own app using the Neeuro SenzeBand (NSB) Android Standard SDK.
Development using the Neeuro SenzeBand (NSB) Android Standard SDK can be done in the following stages:
- Initialisation
- Scanning
- Connecting
- Authenticating
- Impedance Check and Calibration
- Using the SenzeBand
- Disconnecting
- Writing to Files
- Having set up and built the NeeuroOS SDK,
MainActivity.javawill be the main script for working with the SDK. - Add the following line to start of the file
MainActivity.java. This class contains the commands required to scan for and connect to SenzeBands.
import com.neeuro.NativeNSBPlugin.NativeNSBInterface;
- Enter Developer Code in
initializeSenzeBandStandard()
  public void initializeSenzeBandStandard() {
    //Key in DeveloperCode here!
    context_wr = new WeakReference<Context>(this);
    String developerCode = "";
    NativeNSBInterface.getInstance().initializeNSB(context_wr, nsbFunctionsCB, scanCB, connectionCB, sbDelegate, authenticationCB, developerCode);
  }
- In order to scan for the SenzeBand, use function
startStopScanningto start the scan. deviceFoundCBfromscanCallBacklogs any SenzeBands in the vicinity, and adds a button to the SDK indicating the device that has been found
- There are three callbacks that will trigger once you attempt to connect to a SenzeBand device. This is called implement the connectionCallBackInterface.
connectionSucceed- this is triggered the moment the plugin confirms that SenzeBand connection is successful.connectionBroken- this is triggered when SenzeBand connection is broken or disconnected either via switching OFF the SenzeBand device, switching OFF Bluetooth, or whendisconnectBT()is called.connectionFail- this is triggered when the app fails to connect successfully to the SenzeBand.
- To connect to a SenzeBand device, call connectBT(String) passing the address String of a given scanned device
- Once the SenzeBand has been successfully connected, connectionSucceed will be called.
- For the Standard SDK, you'll need an internet connection to Authenticate your developer code with Neeuro's servers. Call authenticateUser() to attempt authentication.
- Once authentication is done, two functions are called via callbacks:
getAuthenticationStatus()- sends back authentication status from SenzeBand plugin. The moment authentication result returns success/verified, a countdown will start for the validity period of authentication.getAuthenticationResult()- sends back authentication result(success or fail) from
getAuthenticationValidityPeriodsends back the validity period of the authentication- Note that if authentication fails, you will not be able to receive any data from the SenzeBand.
- Impedance Check helps to verify if the signal quality from the 4 contact points/electrodes are good. Example, if there is makeup or some other impurities on the skin, the impedance values will be much higher due to the contribution of more resistance between the electrodes and skin surface, the EEG signals will not be good/accurate. Good impedance range is below 800k Ohms.
- We recommend to do an Impedance Check/Signal Quality Check after SenzeBand connection before using the SenzeBand.
- To do impedance check, call
acLeadoffin your program. Switching to AC mode will stop SenzeBand from receiving EEG and start on checking signal quality. Advise the user to adjust SenzeBand and wipe off residue on skin to get better contact until all channel signals are green. Once done, switch back to DC mode by callingdcLeadoff. By default, SenzeBand is in DC mode after a successful connection. - Switching AC mode and DC mode can take a moment before plugin can verify and actually switch modes.
- If user thinks that the Acceleration and Orientation data is not accurate, we can perform calibration to improve the accuracy. To initiate calibration, call
startCal. To stop calibration, callstopCal.
- After you've connected the SenzeBand, you need to first enable it. You can do this by calling
start()for EEG data orstartPPG()for PPG data. This allows data from the SenzeBand to be sent over to the app. - There are several different types of data you can grab from the SenzeBand. For each type of data, there is a callback that comes with it with a respective interface, such as NSBFunctionsCallBackInterface, or EEGStandardDelegateInterface.
- You can call
stop()for EEG data orstopPPG()for PPG data to stop the SenzeBand from sending data.
- Call
disconnectBTto disconnect the SenzeBand. - The callback
connectionBrokenwill be called.
To start writing to files, open the sample project in Android Studio.
Observe that the CSV or EDF writer code is accessible in MainActivity.java as this will be used to write to files.
If not present, implement the above as follows:

Now, open the SDK and press the
Startbutton to start recording.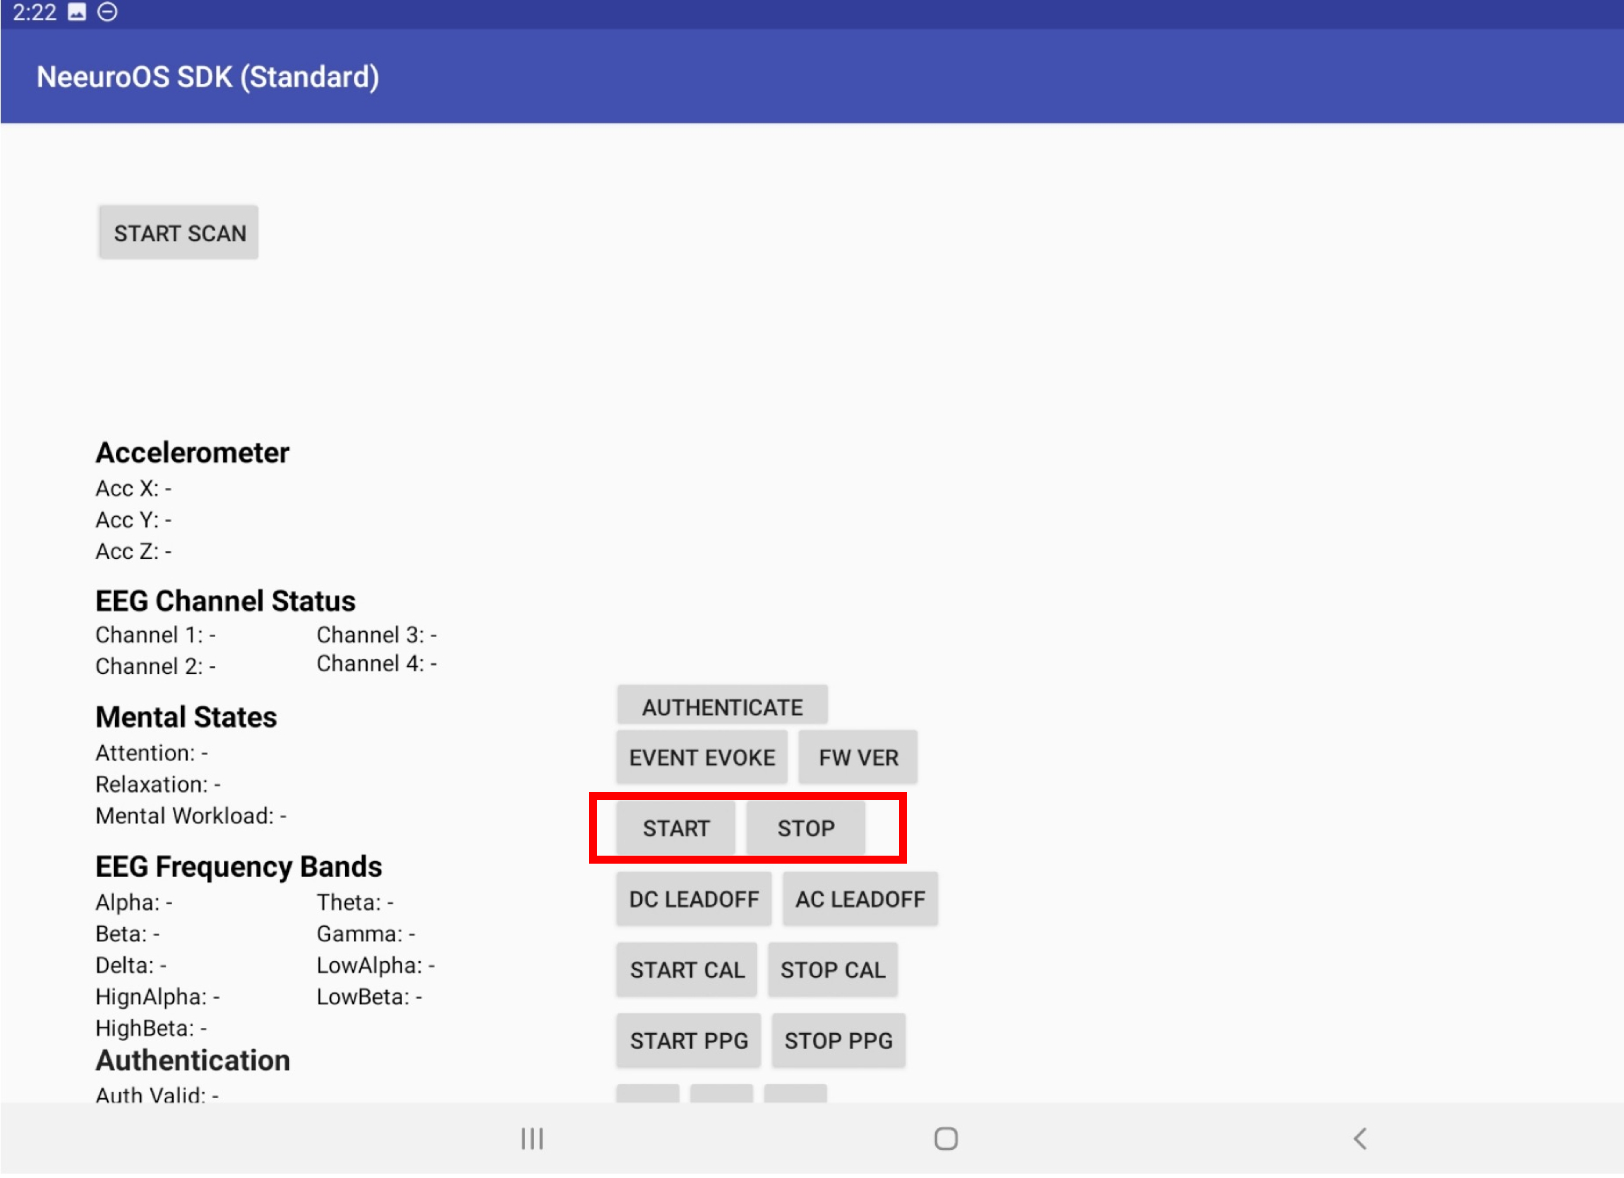
The
Stopbutton stops recording, saving data automatically to a CSV or EDF file at a default location, stated when saving is complete.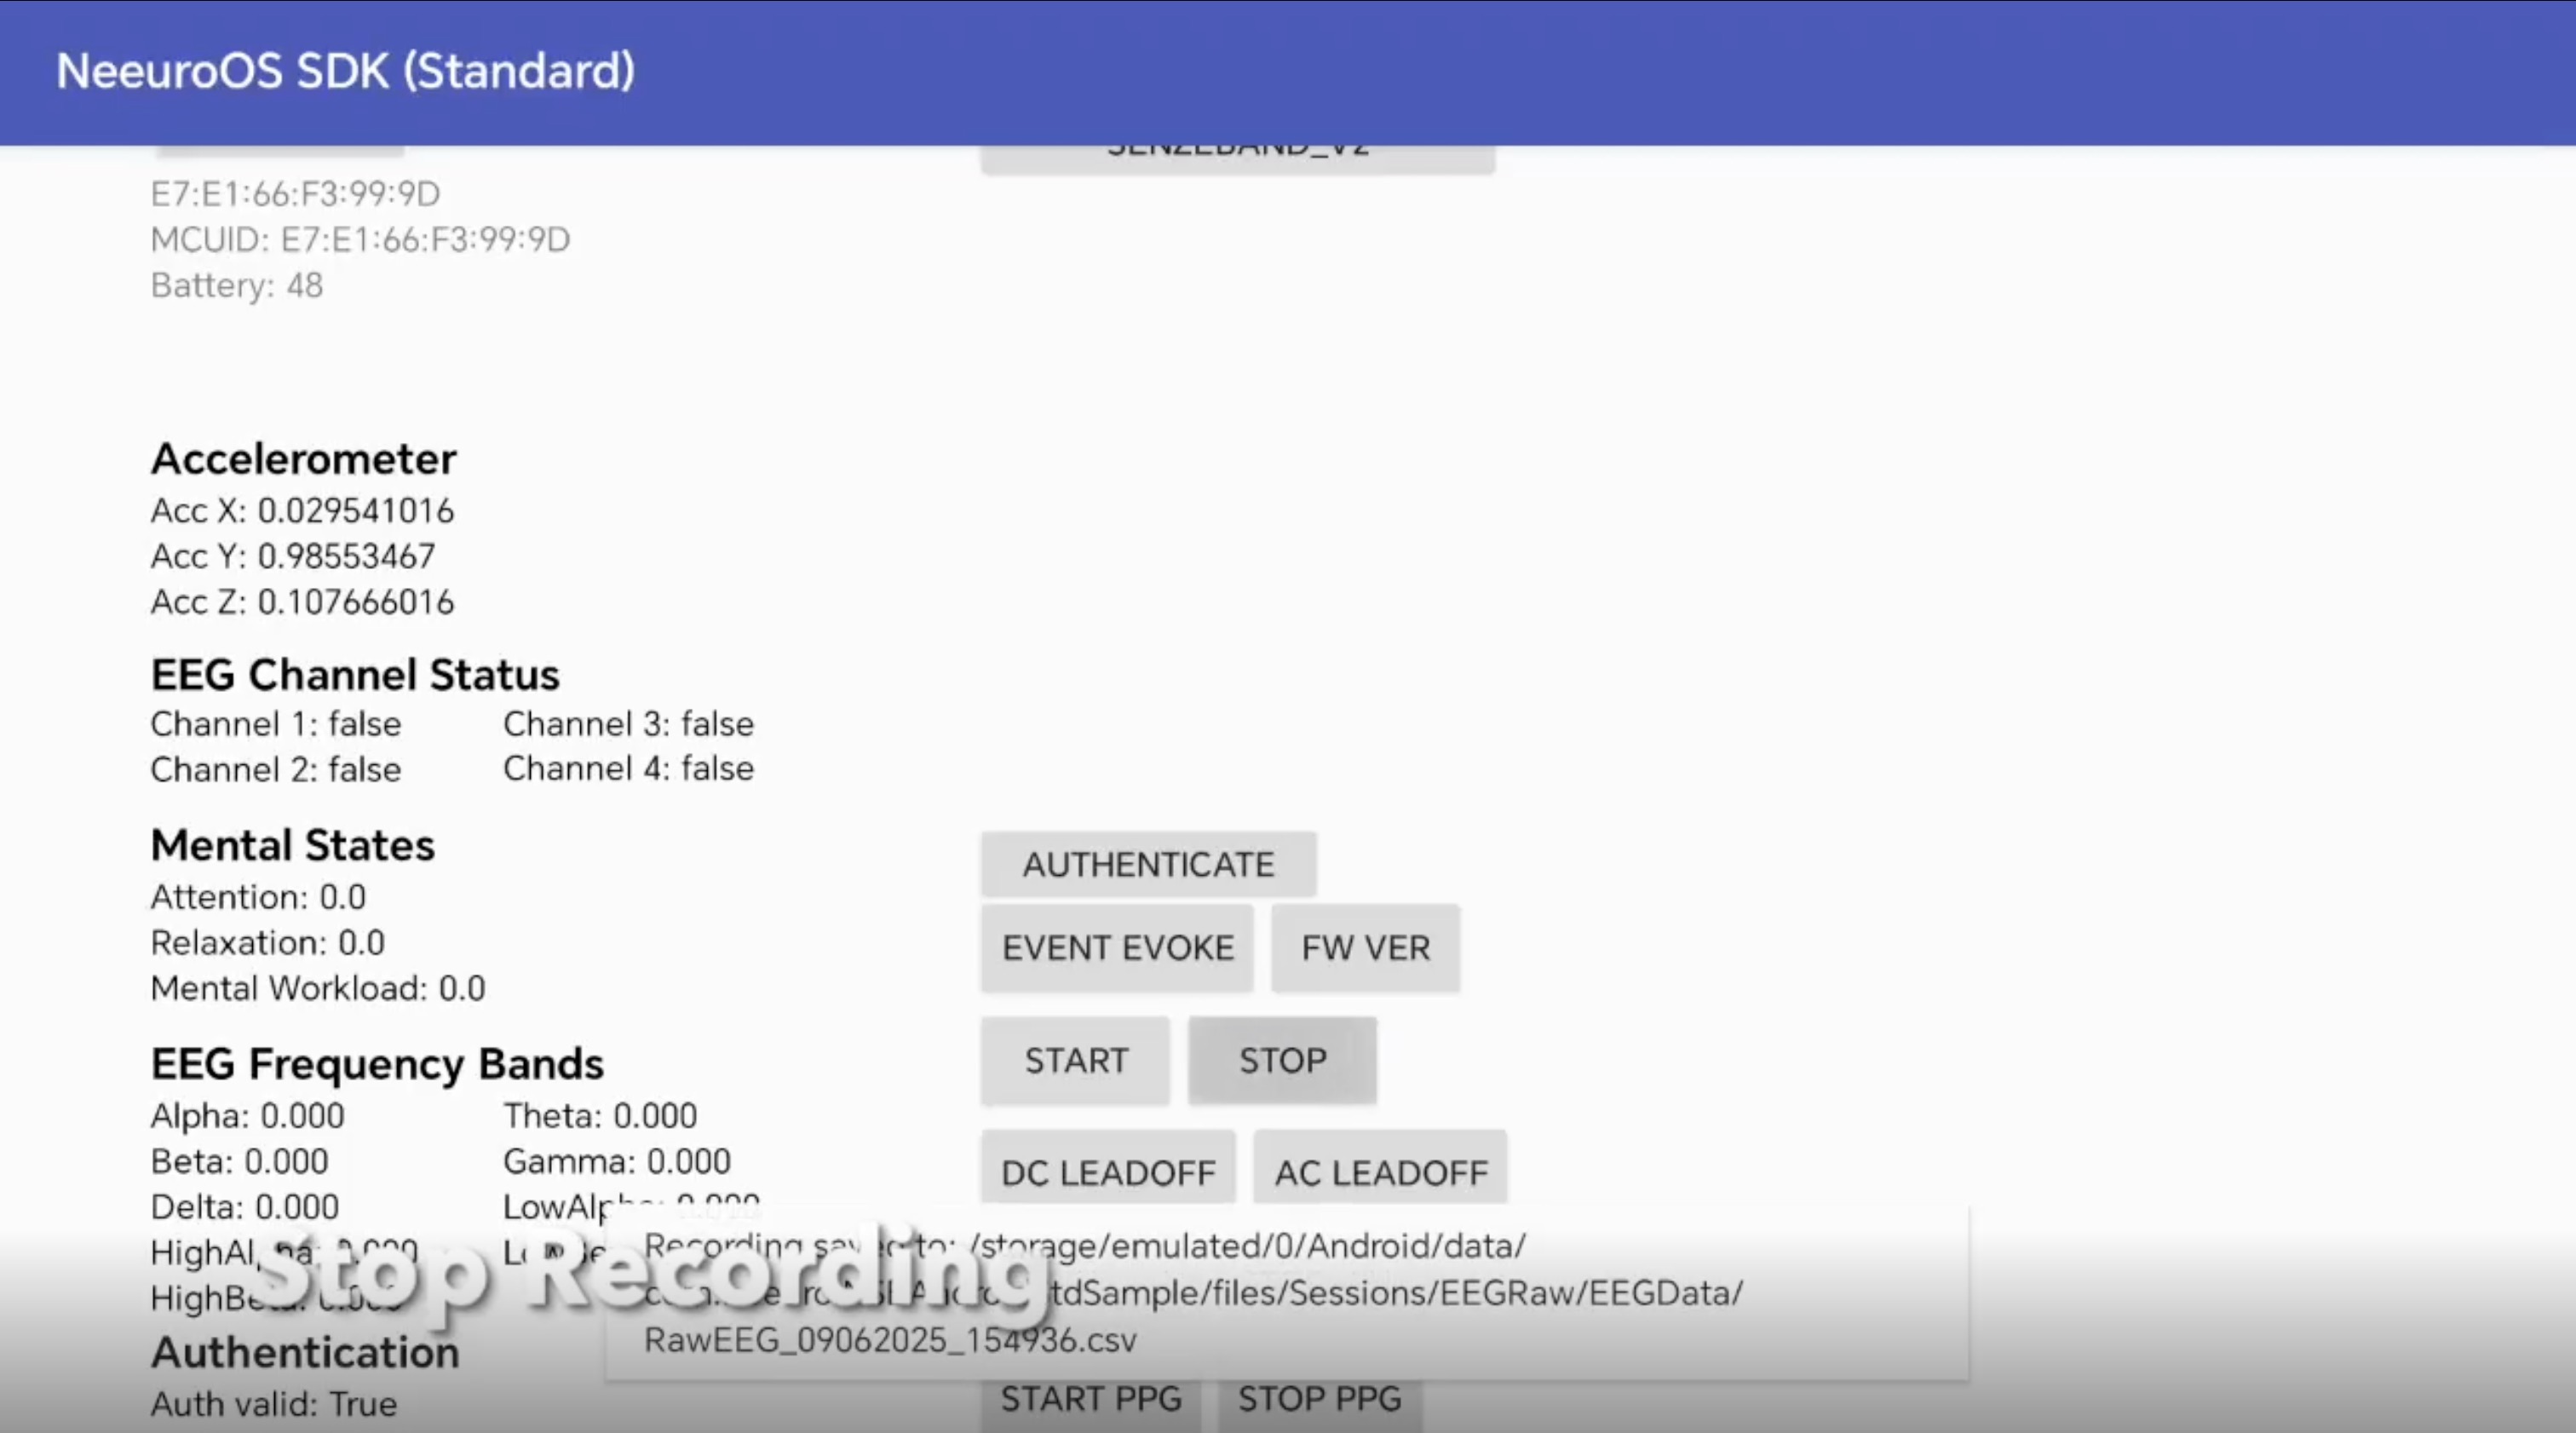
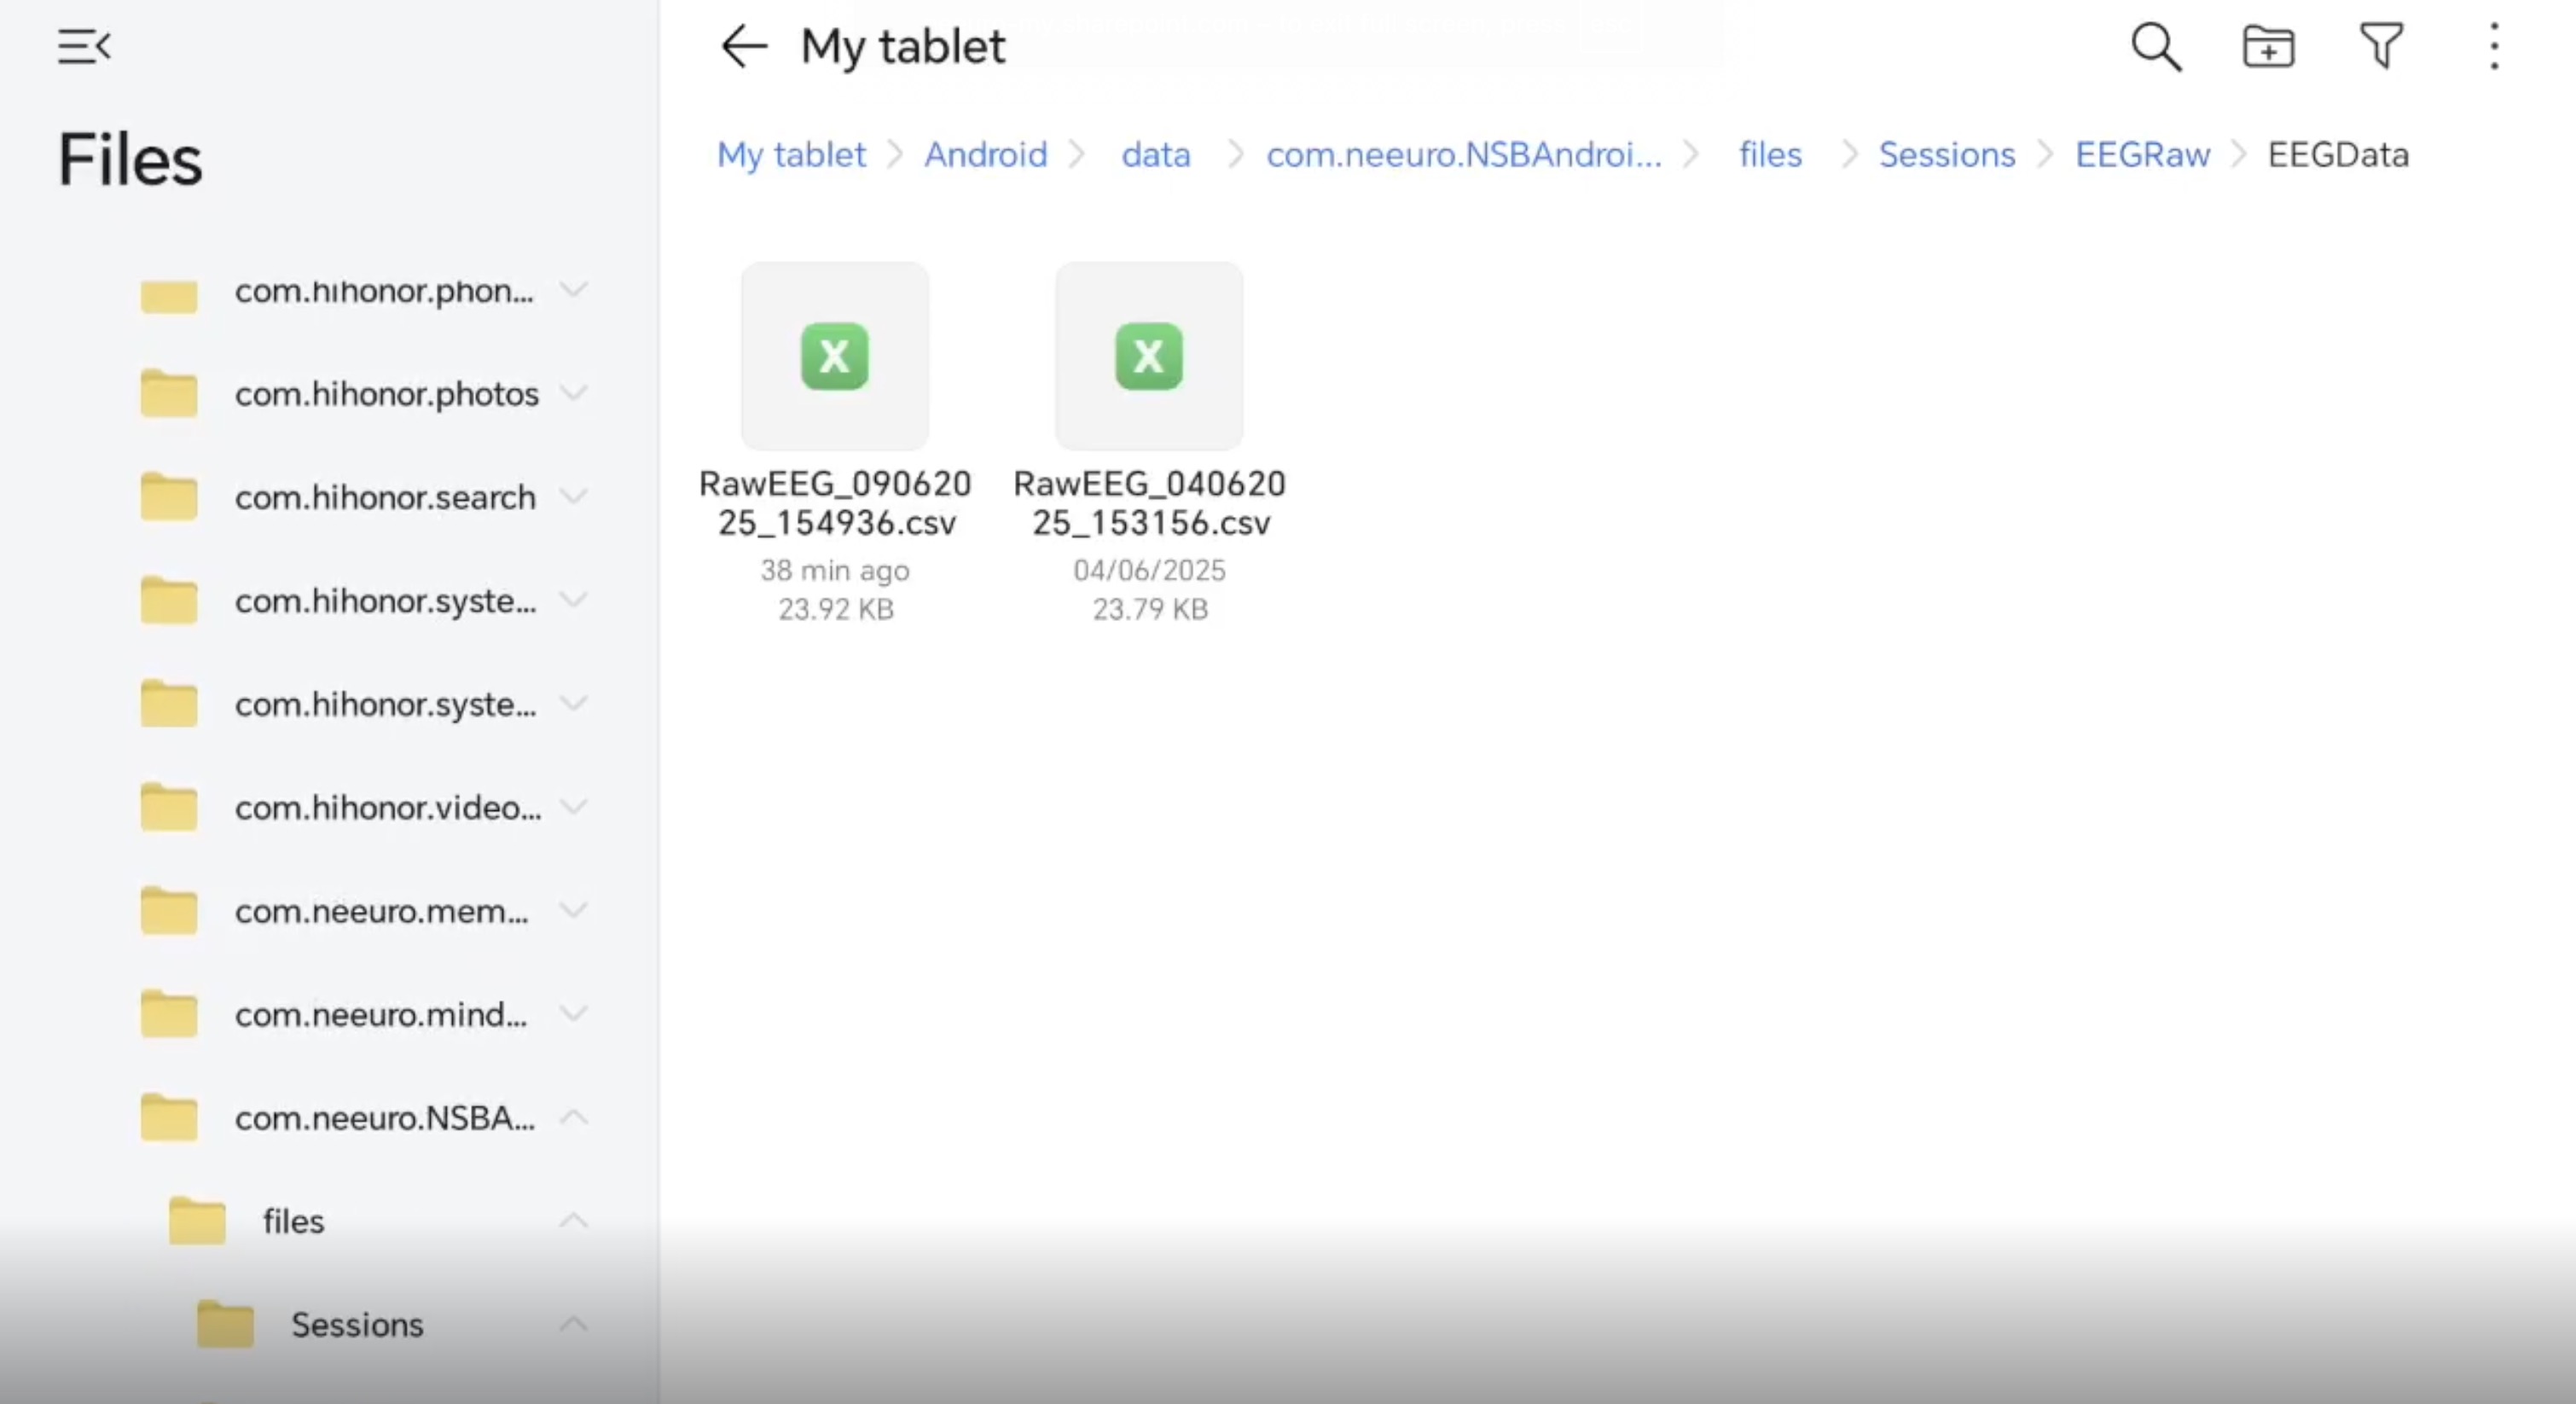
View the file by accessing the location necessary in the Files app.
The NativeNSBInterface has functions built into it that you can call in your application.
void authenticateUser ()
Name: authenticateUser
Parameters: None
Output: None
Definition: Authenticate SDK with developer code provided in initializeNSB method call
void cancelConnection (String address)
Name: cancelConnection
Parameters: String representing hardware address of BluetoothDevice.
Output: None
Definition: Cancel connect Bluetooth Device
void connectBT (String address)
Name: connectBT
Parameters: String representing hardware address of BluetoothDevice.
Output: None
Definition: Connect Bluetooth Device
void connection_ReturnInUIThread (boolean returnInUIThreadIn)
Name: connection_ReturnInUIThread
Parameters: Boolean representing flag to set for returning connection data in the UI Thread.
Output: None
Definition: If this is set to false, once connection data has been received, you will immediately receive it via {NativeNSBInterface$connectionCallBackInterface}. If this is set to true, once connection data has been received, you will receive it via {NativeNSBInterface$connectionCallBackInterface} on the UI thread.
void disconnectBT (String address)
Name: disconnectBT
Parameters: String representing hardware address of BluetoothDevice.
Output: None
Definition: Disconnect Bluetooth Device
long getAuthenticationValidityPeriod ()
Name: getAuthenticationValidityPeriod
Parameters: None
Output: None
Definition: Returns authentication validity period in milliseconds
void grabInputCommand (String command)
Name: grabInputCommand
Parameters: String representing a command
Output: None
Definition: Processes a command
Only the following are command Strings:
- COMMAND_AC_LEADOFF
- COMMAND_DC_LEADOFF
- COMMAND_LIGHT_RED
- COMMAND_LIGHT_GREEN
- COMMAND_LIGHT_BLUE
- COMMAND_LIGHT_CYAN
- COMMAND_LIGHT_MAGENTA
- COMMAND_LIGHT_YELLOW
- COMMAND_STOP_RGB
- COMMAND_CMD_FA - Evoke event
- COMMAND_FW_VER - Get firmware version
- COMMAND_CAL_START - Calibration start
- COMMAND_CAL_STOP - Calibration stop
- COMMAND_START start - Sending eeg data
- COMMAND_STOP stop - Sending eeg data
- COMMAND_PPG_START - Start sending ppg data
- COMMAND_PPG_STOP - Stop sending ppg data
To reduce the need of typing out NativeNSBInterface.getInstance().grabInputCommand(command), the following functions have also been defined respectively:
  public void dcLeadoff(View view)
  {
      NativeNSBInterface.getInstance().grabInputCommand("COMMAND_DC_LEADOFF");
  }
  public void acLeadoff(View view)
  {
      NativeNSBInterface.getInstance().grabInputCommand("COMMAND_AC_LEADOFF");
  }

  public void startCal(View view)
  {
      NativeNSBInterface.getInstance().grabInputCommand("COMMAND_CAL_START");
  }
  public void stopCal(View view)
  {
      NativeNSBInterface.getInstance().grabInputCommand("COMMAND_CAL_STOP");
  }

  public void startPPG(View view)
  {
      NativeNSBInterface.getInstance().grabInputCommand("COMMAND_PPG_START");
  }
  public void stopPPG(View view)
  {
      NativeNSBInterface.getInstance().grabInputCommand("COMMAND_PPG_STOP");
  }
  public void start(View view)
  {
      NativeNSBInterface.getInstance().grabInputCommand("COMMAND_START");
      startRecording();
  }
  public void stop(View view)
  {
      NativeNSBInterface.getInstance().grabInputCommand("COMMAND_STOP");
      stopRecording();
  }

  public void fa(View view)
  {
      NativeNSBInterface.getInstance().grabInputCommand("COMMAND_CMD_FA");
  }
  public void fwVer(View view)
  {
      NativeNSBInterface.getInstance().grabInputCommand("COMMAND_FW_VER");
  }

  public void lightRed(View view)
  {
      NativeNSBInterface.getInstance().grabInputCommand("COMMAND_LIGHT_RED");
  }
  public void lightGreen(View view)
  {
      NativeNSBInterface.getInstance().grabInputCommand("COMMAND_LIGHT_GREEN");
  }
  public void lightBlue(View view)
  {
      NativeNSBInterface.getInstance().grabInputCommand("COMMAND_LIGHT_BLUE");
  }
  public void lightCyan(View view)
  {
      NativeNSBInterface.getInstance().grabInputCommand("COMMAND_LIGHT_CYAN");
  }
  public void lightMagenta(View view)
  {
      NativeNSBInterface.getInstance().grabInputCommand("COMMAND_LIGHT_MAGENTA");
  }
  public void lightYellow(View view)
  {
      NativeNSBInterface.getInstance().grabInputCommand("COMMAND_LIGHT_YELLOW");
  }
  public void stopRGB(View view)
  {
      NativeNSBInterface.getInstance().grabInputCommand("COMMAND_STOP_RGB");
  }
void initializeNSB (WeakReference <Context> app, NSBFunctionsCallBackInterface nsbInterfaceIn, scanCallBackInterface scanInterfaceIn, connectionCallBackInterface connectionInterfaceIn, EEGDelegateInterface senzeBandInterfaceIn, deviceAuthenticationInterface authenInterfaceIn, String developerCode)
Name: initializeNSB
Parameters:
- app: Android Activity or Service
- nsbInterfaceIn: Interface that handles initialization and any change of state with bluetooth
- scanInterfaceIn: Interface that handles scanning
- connectionInterfaceIn: Interface to handle connection
- senzeBandInterfaceIn: Interface to handle data received from the SenzeBand
- authenInterfaceIn: Interface to handle authentication
- developerCode: Developer Code
Output: None
Definition: Initialises the SDK
void startStopEEG ()
Name: startStopEEG
Parameters: Boolean representing whether to start receiving data
Output: None
Definition: Start or stop receiving EEG data
void startStopScanning ()
Name: startStopScanning
Parameters: Boolean representing whether to start receiving data
Output: None
Definition: Start or stop receiving Bluetooth scanning
The following interfaces need to be implemented and passed in to recieve event data from the SDK:
- EEGStandardDelegateInterface
- connectionCallBackInterface
- scanCallBackInterface
- NSBFunctionsCallBackInterface
- deviceAuthenticationInterface
  @Override
  public void EEG_GetFWVER(String s) {
      Log.i("EEG", "EEG_GetFWVER - " + s);
  }
Name: EEG_GetFWVER
Parameters: String representing the firmware version
Output: None
Definition: Logs the EEG's firmware version
  @Override
  public void EEG_GetEvoke(int i) {
      Log.i(TAG, "EEG_GetEvoke: " + i);
  }
Name: EEG_GetEvoke
Parameters: Int representing time in milliseconds of last event from first eeg data transmission.
Output: None
Definition: Logs the event evoke
  @Override
  public void EEG_GetRawDataFloat(readFloatArray readFloatArray) {
  }
Name: EEG_GetRawDataFloat
Parameters: readFloatArray representing raw EEG data
Output: None
Definition: Retrieves raw EEG data from a readFloatArray
  @Override
  public void EEG_GetRawDataFloat(float[] floats) {
  }
Name: EEG_GetRawDataFloat
Parameters: Array of Float values representing raw EEG data
Output: None
Definition: Retrieves raw EEG data from an Array of Float values
  @Override
  public void EEG_GetFilteredData(readFloatArray readFloatArray) {
  }
Name: EEG_GetFilteredData
Parameters: readFloatArray representing filtered EEG data
Output: None
Definition: Retrieves filtered EEG data from a readFloatArray
  @Override
  public void EEG_GetFilteredData(float[] floats) {
  }
Name: EEG_GetFilteredData
Parameters: Array of Float values representing filtered EEG data
Output: None
Definition: Retrieves filtered EEG data from an Array of Float values
  @Override
  public void PPG_GetRawData(readIntArray readIntArray) {
      PPG_GetRawData(readIntArray.data);
  }
Name: PPG_GetRawData
Parameters: readIntArray representing raw PPG data
Output: None
Definition: Retrieves raw PPG data from a readIntArray
  @Override
  public void PPG_GetRawData(int[] ints) {
      String ppg = "";
      if(ints.length > 0) ppg += "IR:" + ints[0];
      if(ints.length > 1) ppg += " RED:" + ints[1];
      Log.i("PPG", "Received PPGData - " + ppg);
  }
Name: PPG_GetRawData
Parameters: Array of Int values representing raw PPG data
Output: None
Definition: Retrieves raw PPG data from an Array of Int values
  private String printArray(int[] array){
      StringBuffer result = new StringBuffer();
      for (int i = 0; i < array.length; i++) {
          if(i > 0)
              result.append(" ");
          result.append(array[i]);
      }
      return result.toString();
  }
Name: printArray
Parameters: Array of Int values
Output: String representing the input array
Definition: Prints an Array of Int values as a String
  @Override
  public void EEG_GetImpedance(readFloatArray readFloatArray) {
  }
Name: EEG_GetImpedance
Parameters: readFloatArray representing impedance values of each channel in kOhms
Output: None
Definition: Retrieves impedance of SenzeBand from a readFloatArray
  @Override
  public void EEG_GetImpedance(float[] floats) {
  }
Name: EEG_GetImpedance
Parameters: Array of Float values representing impedance values of each channel in kOhms
Output: None
Definition: Retrieves impedance of SenzeBand from an Array of Float values
  @Override
  public void EEG_GetDirection(String s) {
      Log.i("EEG", "EEG_GetDirection - " + s);
  }
Name: EEG_GetDirection
Parameters: String representing direction of SenzeBand
Output: None
Definition: Logs current direction of SenzeBand
  @Override
  public void GetSPO2AndHeartRate(readIntArray readIntArray) {
      GetSPO2AndHeartRate(readIntArray.data);
  }
Name: GetSPO2AndHeartRate
Parameters: readIntArray representing SPO2 and heart rate
Output: None
Definition: Retrieves SPO2 and heart rate of SenzeBand from a readIntArray
  @Override
  public void GetSPO2AndHeartRate(int[] ints) {

      String result = "";
      if(ints.length > 0) result += "SPO2:" + ints[0];
      if(ints.length > 1) result += " HeartRate:" + ints[1];
      if(ints.length > 2) result += " HeartRateDetect:" + ints[2];
      Log.i("EEG", "GetSPO2AndHeartRate - " + result);

  }
Name: GetSPO2AndHeartRate
Parameters: Array of Int values representing SPO2 and heart rate
Output: None
Definition: Retrieves SPO2 and heart rate of SenzeBand from an Array of Int values
  @Override
  public void EEG_GetCalibrationParameters(readFloatArray readFloatArray) {
      EEG_GetCalibrationParameters(readFloatArray.data);
  }
Name: EEG_GetCalibrationParameters
Parameters: readFloatArray representing calibration parameters
Output: None
Definition: Retrieves calibration parameters of SenzeBand from a readFloatArray
  @Override
  public void EEG_GetCalibrationParameters(float[] floats) {
      Log.i("EEG", "EEG_GetCalibrationParameters - xGain:" + floats[0] + " yGain:" + floats[1] + " zGain" + floats[2]);
  }
Name: EEG_GetCalibrationParameters
Parameters: Array of Float values representing calibration parameters
Output: None
Definition: Logs calibration parameters of SenzeBand from an Array of Float values
  @Override
  public void GetSenzeBandVersion(String s) {
      Log.i("EEG", "GetSenzeBandVersion: " + s);
  }
Name: GetSenzeBandVersion
Parameters: String representing SenzeBand version
Output: None
Definition: Logs version of SenzeBand
  public void EEG_GetAttention(float result) {
      Attention = (TextView) findViewById(R.id.Attn);
      Attention.setText("Attention: " + clamp(result, 0.0f, 1.0f));
  }
Name: EEG_GetAttention
Parameters: Float representing attention level detected by SenzeBand
Output: None
Definition: Sets Attention to the attention level detected by SenzeBand
  public void EEG_GetRelaxation(float result) {
      Relaxation = (TextView) findViewById(R.id.Rlxt);
      Relaxation.setText("Relaxation: " + clamp(result, 0.0f, 1.0f));
  }
Name: EEG_GetRelaxation
Parameters: Float representing relaxation level detected by SenzeBand
Output: None
Definition: Sets Relaxation to the relaxation level detected by SenzeBand
  public void EEG_GetMentalWorkload(float result) {
      MentalWorkload = (TextView) findViewById(R.id.Mworkload);
      MentalWorkload.setText("Mental Workload: " + clamp(result, 0.0f, 1.0f));
  }
Name: EEG_GetMentalWorkload
Parameters: Float representing mental workload level detected by SenzeBand
Output: None
Definition: Sets MentalWorkload to the mental workload level detected by SenzeBand
  public void EEG_GetRawData(int[] data) {
      if (data.length == EEGSIZEPERSAMPLE)
          System.arraycopy(data, 0, rawEEG, 0, EEGSIZEPERSAMPLE);
  }
Name: EEG_GetRawData
Parameters: Array of Int values representing raw EEG data
Output: None
Definition: Callback where raw EEG data is retrieved from an Array of Int values
  public void EEG_GetRawData(readIntArray result) {
      String eeg = "";
      for (int i : result.data) {
          eeg += i + " ";
      }
      Log.i("EEG", "Received EEGData: " + eeg);
  }
Name: EEG_GetRawData
Parameters: readIntArray representing raw EEG data
Output: None
Definition: Callback where raw EEG data is retrieved from readIntArray
  public void EEG_GetEnvironmentData(String data) {
  }
Name: EEG_GetEnvironmentData
Parameters: String representing EEG environment data
Output: None
Definition: Retrieves EEG environment data from readIntArray
  private void printABDT(float[][] floats){
      for (int i = 0; i < 4; i++) {
          String row = "";
          for (int j = 0; j < 9; j++) {
              row += floats[i][j] + " ";
          }
          Log.i("EEG", "Channel " + (i+1) + ": " + row);
      }

  }
Name: printABDT
Parameters: 2D Array of Float values representing Alpha, LowAlpha, HighAlpha, Beta, LowBeta, HighBeta Delta, Theta, Gamma values
Output: None
Definition: Logs ABDT values
  @Override
  public void EEG_GetABDTRaw(float[][] floats) {

      updateABDTView(floats, 10000000);
      Log.i("EEG", "EEG_GetABDTRaw");
      printABDT(floats);

  }
Name: EEG_GetABDTRaw
Parameters: 2D Array of Float values representing raw Alpha, LowAlpha, HighAlpha, Beta, LowBeta, HighBeta Delta, Theta, Gamma values
Output: None
Definition: Logs raw ABDT values
  private String formatABDTValue(float n){
      if(n < -0.001){
          return String.format("%7.3E", n);
      } else {
          return String.format("%.3f", n);
      }
  }
Name: formatABDTValue
Parameters: Float representing an Alpha, LowAlpha, HighAlpha, Beta, LowBeta, HighBeta Delta, Theta,or Gamma value
Output: String representing formatted ABDT value
Definition: Formats ABDT value
  private void updateABDTView(float[][] result, float max){
      Delta = (TextView) findViewById(R.id.eeg_delta);
      Delta.setText("Delta: " + formatABDTValue(clamp(result[2][0], 0.0f, max)));
      Theta = (TextView) findViewById(R.id.eeg_theta);
      Theta.setText("Theta: " + formatABDTValue(clamp(result[2][1], 0.0f, max)));
      Alpha = (TextView) findViewById(R.id.eeg_alpha);
      Alpha.setText("Alpha: " + formatABDTValue(clamp(result[2][2], 0.0f, max)));
      Beta = (TextView) findViewById(R.id.eeg_beta);
      Beta.setText("Beta: " + formatABDTValue(clamp(result[2][3], 0.0f, max)));
      Gamma = (TextView) findViewById(R.id.eeg_gamma);
      Gamma.setText("Gamma: " + formatABDTValue(clamp(result[2][4], 0.0f, max)));

      LowAlpha = (TextView) findViewById(R.id.eeg_low_alpha);
      LowAlpha.setText("LowAlpha: " + formatABDTValue(clamp(result[2][5], 0.0f, max)));
      HighAlpha = (TextView) findViewById(R.id.eeg_high_alpha);
      HighAlpha.setText("HighAlpha: " + formatABDTValue(clamp(result[2][6], 0.0f, max)));
      LowBeta = (TextView) findViewById(R.id.eeg_low_beta);
      LowBeta.setText("LowBeta: " + formatABDTValue(clamp(result[2][7], 0.0f, max)));
      HighBeta = (TextView) findViewById(R.id.eeg_high_beta);
      HighBeta.setText("HighBeta: " + formatABDTValue(clamp(result[2][8], 0.0f, max)));
  }
Name: updateABDTView
Parameters: 2D Array of Float values representing ABDT values, Float representing maximum ABDT value
Output: None
Definition: Sets the values of Alpha, LowAlpha, HighAlpha, Beta, LowBeta, HighBeta Delta, Theta, Gamma
  @Override
  public void EEG_GetABDTRaw(readFloatArray readFloatArray) {
  }
Name: EEG_GetABDTRaw
Parameters: readFloatArray representing raw ABDT values
Output: None
Definition: Retrieves raw ABDT values
  @Override
  public void EEG_GetABDTNorm(float[][] result) {
      updateABDTView(result, 1);
  }
Name: EEG_GetABDTNorm
Parameters: 2D Array of Float values representing normalised ABDT values
Output: None
Definition: Updates ABDT values based on input 2D Array of Float values
  @Override
  public void EEG_GetABDTNorm(readFloatArray readFloatArray) {
  }
Name: EEG_GetABDTNorm
Parameters: readFloatArray representing normalised ABDT values
Output: None
Definition: Retrieves normalised ABDT values
  @Override
  public void EEG_GetABDT(float[][] result) {
  }
Name: EEG_GetABDT
Parameters: 2D Array of Float values representing ABDT values
Output: None
Definition: Retrieves ABDT values from 2D Array of Float values
  public void EEG_GetABDT(readFloatArray result) {
  }
Name: EEG_GetABDT
Parameters: readFloatArray representing ABDT values
Output: None
Definition: Retrieves ABDT values from readFloatArray
  public void EEG_GetSignalReadyStatus(boolean result) {
  }
Name: EEG_GetSignalReadyStatus
Parameters: Boolean representing whether SenzeBand is ready to accept input signals
Output: None
Definition: Determines whether SenzeBand is ready to accept input signals
  public void EEG_GetBattery(String result) {
      String[] tmpdataList = result.split(">");
      if(tmpdataList.length > 1){
          if(tmpdataList[1].equals("00000001"))
          {
              batteryText.setText("Battery: " + tmpdataList[0]);
          }
          else if(tmpdataList[1].equals("00010000"))
          {
              batteryText.setText("Battery: " + "Charging");
          }
          else if (tmpdataList[1].equals("00010001"))
          {
              batteryText.setText("Battery: " + "Full");
          }
      }else{
          batteryText.setText("Battery left: " + result);
      }
  }
Name: EEG_GetBattery
Parameters: String representing battery level
Output: None
Definition: Sets batteryText to current battery level
  @Override
  public void EEG_ChannelStatus(boolean[] b) {
      EEG_1 = (TextView) findViewById(R.id.EEG1);
      EEG_1.setText(String.format("Channel 1: %b", b[0]));
      EEG_2 = (TextView) findViewById(R.id.EEG2);
      EEG_2.setText(String.format("Channel 2: %b", b[1]));
      EEG_3 = (TextView) findViewById(R.id.EEG3);
      EEG_3.setText(String.format("Channel 3: %b", b[2]));
      EEG_4 = (TextView) findViewById(R.id.EEG4);
      EEG_4.setText(String.format("Channel 4: %b", b[3]));
  }
Name: EEG_ChannelStatus
Parameters: Array of Boolean values representing status of each EEG channel
Output: None
Definition: Sets each EEG channel to their current status from Array of Boolean values
  @Override
  public void EEG_ChannelStatus(readBoolArray res) {
      EEG_1 = (TextView) findViewById(R.id.EEG1);
      EEG_1.setText(String.format("Channel 1: %b", res.data[0]));
      EEG_2 = (TextView) findViewById(R.id.EEG2);
      EEG_2.setText(String.format("Channel 2: %b", res.data[1]));
      EEG_3 = (TextView) findViewById(R.id.EEG3);
      EEG_3.setText(String.format("Channel 3: %b", res.data[2]));
      EEG_4 = (TextView) findViewById(R.id.EEG4);
      EEG_4.setText(String.format("Channel 4: %b", res.data[3]));
  }
Name: EEG_ChannelStatus
Parameters: readBoolArray representing status of each EEG channel
Output: None
Definition: Sets each EEG channel to their current status from readBoolArray
  public void EEG_GetMCUID(final String result) {
      TimerTask tasknew = new TimerTask() {
          @Override
          public void run() {
              if (mcuIDText != null) {

                  runOnUiThread(new Runnable() {
                      @Override
                      public void run() {
                          mcuIDText.setText("MCUID: " + result);
                      }
                  });
              }
          }
      };
      Timer timer = new Timer();

      // scheduling the task at interval
      timer.schedule(tasknew, 3000);
  }
Name: EEG_GetMCUID
Parameters: String representing MCUID of SenzeBand
Output: None
Definition: Sets MCUID of SenzeBand and sets a timer to schedule a new task
  public void EEG_GetAccXYZ(float[] result) {
      Log.i(TAG, "NativeNSBInterface EEG_GetAccXYZ result.length="+result.length+" :" + result[0] + " " + result[1] + " " + result[2] + " "  + result[3] + " " + result[4] + " " + result[5]);
      Xacc = (TextView) findViewById(R.id.Xvalue);
      Xacc.setText("Acc X: " + result[0]);
      Yacc = (TextView) findViewById(R.id.Yvalue);
      Yacc.setText("Acc Y: " + result[1]);
      Zacc = (TextView) findViewById(R.id.Zvalue);
      Zacc.setText("Acc Z: " + result[2]);
  }
Name: EEG_GetAccXYZ
Parameters: Array of Float values representing acceleration of SenzeBand
Output: None
Definition: Sets Xacc, Yacc and Zacc to the current acceleration of the SenzeBand from an Array of Float values
  public void EEG_GetAccXYZ(readFloatArray result) {
      Log.i(TAG, "NativeNSBInterface EEG_GetAccXYZ readFloatArray");
  }
Name: EEG_GetAccXYZ
Parameters: readFloatArray representing acceleration of SenzeBand
Output: None
Definition: Logs acceleration of SenzeBand
  public void EEG_GetConnectionStatus(boolean result) {
      Log.i(TAG, "Get connection status " + result);
  }
Name: EEG_GetConnectionStatus
Parameters: Boolean representing EEG connection status
Output: None
Definition: Logs EEG connection status of SenzeBand
  public void pumpMcuIDTextView(TextView tv) {
      mcuIDText = tv;
  }
Name: pumpMcuIDTextView
Parameters: TextView representing MCUID
Output: None
Definition: Sets mcuIDText to MCUID of SenzeBand
  public void pumpBatteryTextView(TextView tv) {
      batteryText = tv;
  }
Name: pumpMcuIDTextView
Parameters: TextView representing battery level
Output: None
Definition: Sets batteryText to battery level of SenzeBand
   public void connectionSucceed(String address) {
      Log.e(TAG, "Connection succeed!");

      createLayout(address);
      offSB.setTag(address);

      TimerTask tasknew = new TimerTask() {
          @Override
          public void run() {
              NativeNSBInterface.getInstance().startStopEEG(true);
          }
      };
      Timer timer = new Timer();

      // scheduling the task at interval
      timer.schedule(tasknew,3000);
  }
Name: connectionSucceed
Parameters: String representing the address of the Neeuro device
Output: None
Definition: Creates a timer and runs it while EEG signals are being recorded
   public void connectionFail(String s, String s1) {
      Log.e(TAG, "Connection fail! " + s1);
  }
Name: connectionFail
Parameters: String, String representing why the connection failed
Output: None
Definition: Logs the connection failure and its reason
   public void connectionBroken(String s) {
      Log.e(TAG, "connection broken " + s);

      clearLayout();
  }
Name: connectionBroken
Parameters: String representing why the connection broke
Output: None
Definition: Logs the connection breakage and its reason
   public void errorLog(String s) {
      Log.e(TAG, "connectionCB error Log " + s);
  }
Name: errorLog
Parameters: String representing the error produced
Output: None
Definition: Logs the errors that have occurred
   public void deviceFoundCB(String address, String name) {
      Log.i(TAG, "One Neeuro device found! address=" + address + " name=" + name);
      addButton(address + " " + name);
  }
Name: deviceFoundCB
Parameters: String representing the address of the Neeuro device, and String representing the name of the device
Output: None
Definition: Logs the address and name of a scanned Neeuro device
  public void scanReset() {
      Log.i(TAG, "Scan reset ");
      clearAllButtons();
  }
Name: scanReset
Parameters: None
Output: None
Definition: Resets the scanner by clearing all previously scanned devices from its list
  public void errorLog(String s) {
      Log.e(TAG, "Scan errorLog " + s);
  }
Name: errorLog
Parameters: String representing the error produced
Output: None
Definition: Logs the errors that have occurred
  public void initializedFinished() {
      Log.e(TAG, "Initialized Finished!");

      NativeNSBInterface.getInstance().connection_ReturnInUIThread(true);
      NativeNSBInterface.getInstance().EEG_ReturnInUIThread(true);
      NativeNSBInterface.getInstance().EEG_ReturnRawDataInUIThread(false);
  }
Name: initializedFinished
Parameters: None
Output: None
Definition: Logs the fact that initialisation is complete
  public void bluetoothStatusCallBack(boolean btStatus) {
      Log.i(TAG, "Bluetooth status is " + btStatus);
  }
Name: bluetoothStatusCallBack
Parameters: Boolean representing the Bluetooth status
Output: None
Definition: Logs the Bluetooth status of the currently connected SenzeBand
  public void errorLog(String s) {
      Log.e(TAG, "NSBCB errorLog " + s);
  }
Name: errorLog
Parameters: String representing the error produced
Output: None
Definition: Logs the errors that have occurred
  @Override
  public void getAuthenticationResult(boolean result) {
      valid = result;
      //if(authenticationText != null)
      //    authenticationText.setText("Auth status: " + status + " " + valid);

      TextView authText = findViewById(R.id.authValid);
      authText.setText("Auth valid: " + (result ? "True" : "False"));
  }
Name: getAuthenticationResult
Parameters: Boolean representing the result of authentication
Output: None
Definition: Sets the value of authText to display whether authentication is successful
  @Override
  public void getAuthenticationStatus(String var1) {
      status = var1;
      //if(authenticationText != null)
      //    authenticationText.setText("Auth status: " + status);

      final long duration = NativeNSBInterface.getInstance().getAuthenticationValidityPeriod();

      authStatus.setText("Auth status: " + var1);
      authTime.setText("Auth Time: " + duration / 1000);

      if (authCheck == null)
          authCheck = new CountDownTimer(duration, 1000) {
              @Override
              public void onTick(long l) {
                  runOnUiThread(new Runnable() {
                      @Override
                      public void run() {
                          authTime.setText("Auth Time: " + NativeNSBInterface.getInstance().getAuthenticationValidityPeriod() / 1000);

                      }
                  });
              }

              @Override
              public void onFinish() {
                  NativeNSBInterface.getInstance().authenticateUser();
                  authCheck = null;
              }
          };

      authCheck.start();
  }
Name: getAuthenticationStatus
Parameters: String representing the authentication status
Output: None
Definition: Sets the value of authStatus to display the current authentication status, and the value of authTime to display the remaining time for the current authentication period
  public void pumpAuthenticationTextView(TextView tv) {
      authenticationText = tv;
  }
Name: pumpAuthenticationTextView
Parameters: TextView representing the authentication text
Output: None
Definition: Sets the value of authenticationText to be the current authentication text
Unzip the SDK folder and make sure all these files are inside.
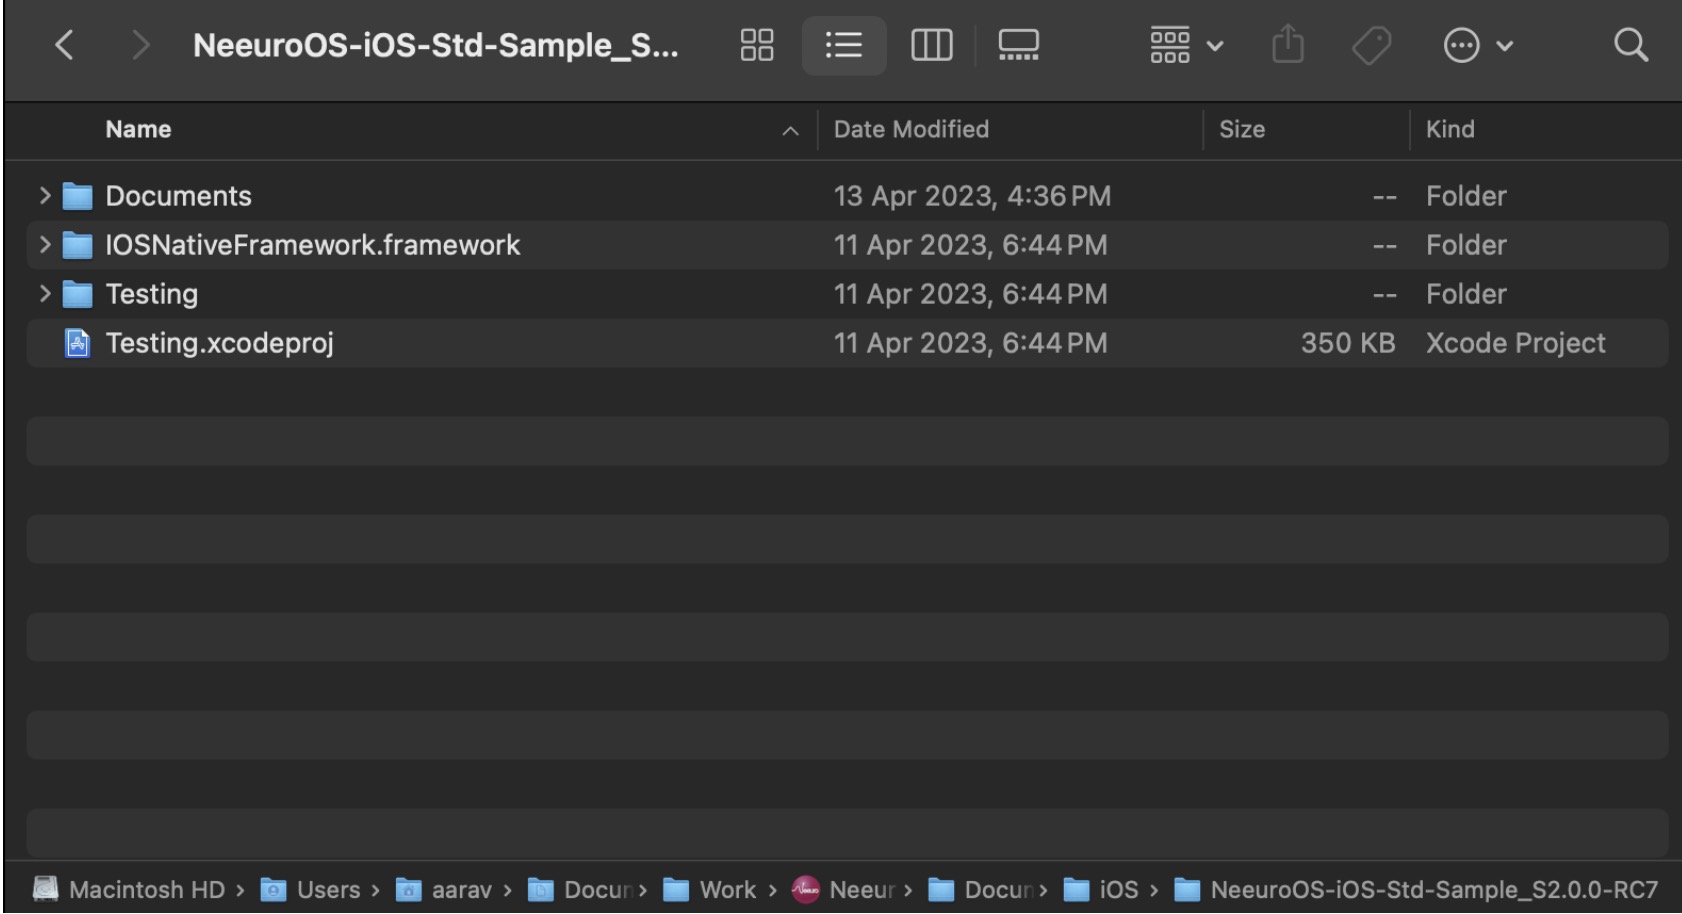
Testing.xcodeproj is a sample Xcode project. It contains a SenzeBand control panel scene to show what the Neeuro SenzeBand can do. It contains code with comments on how to use the SDK.
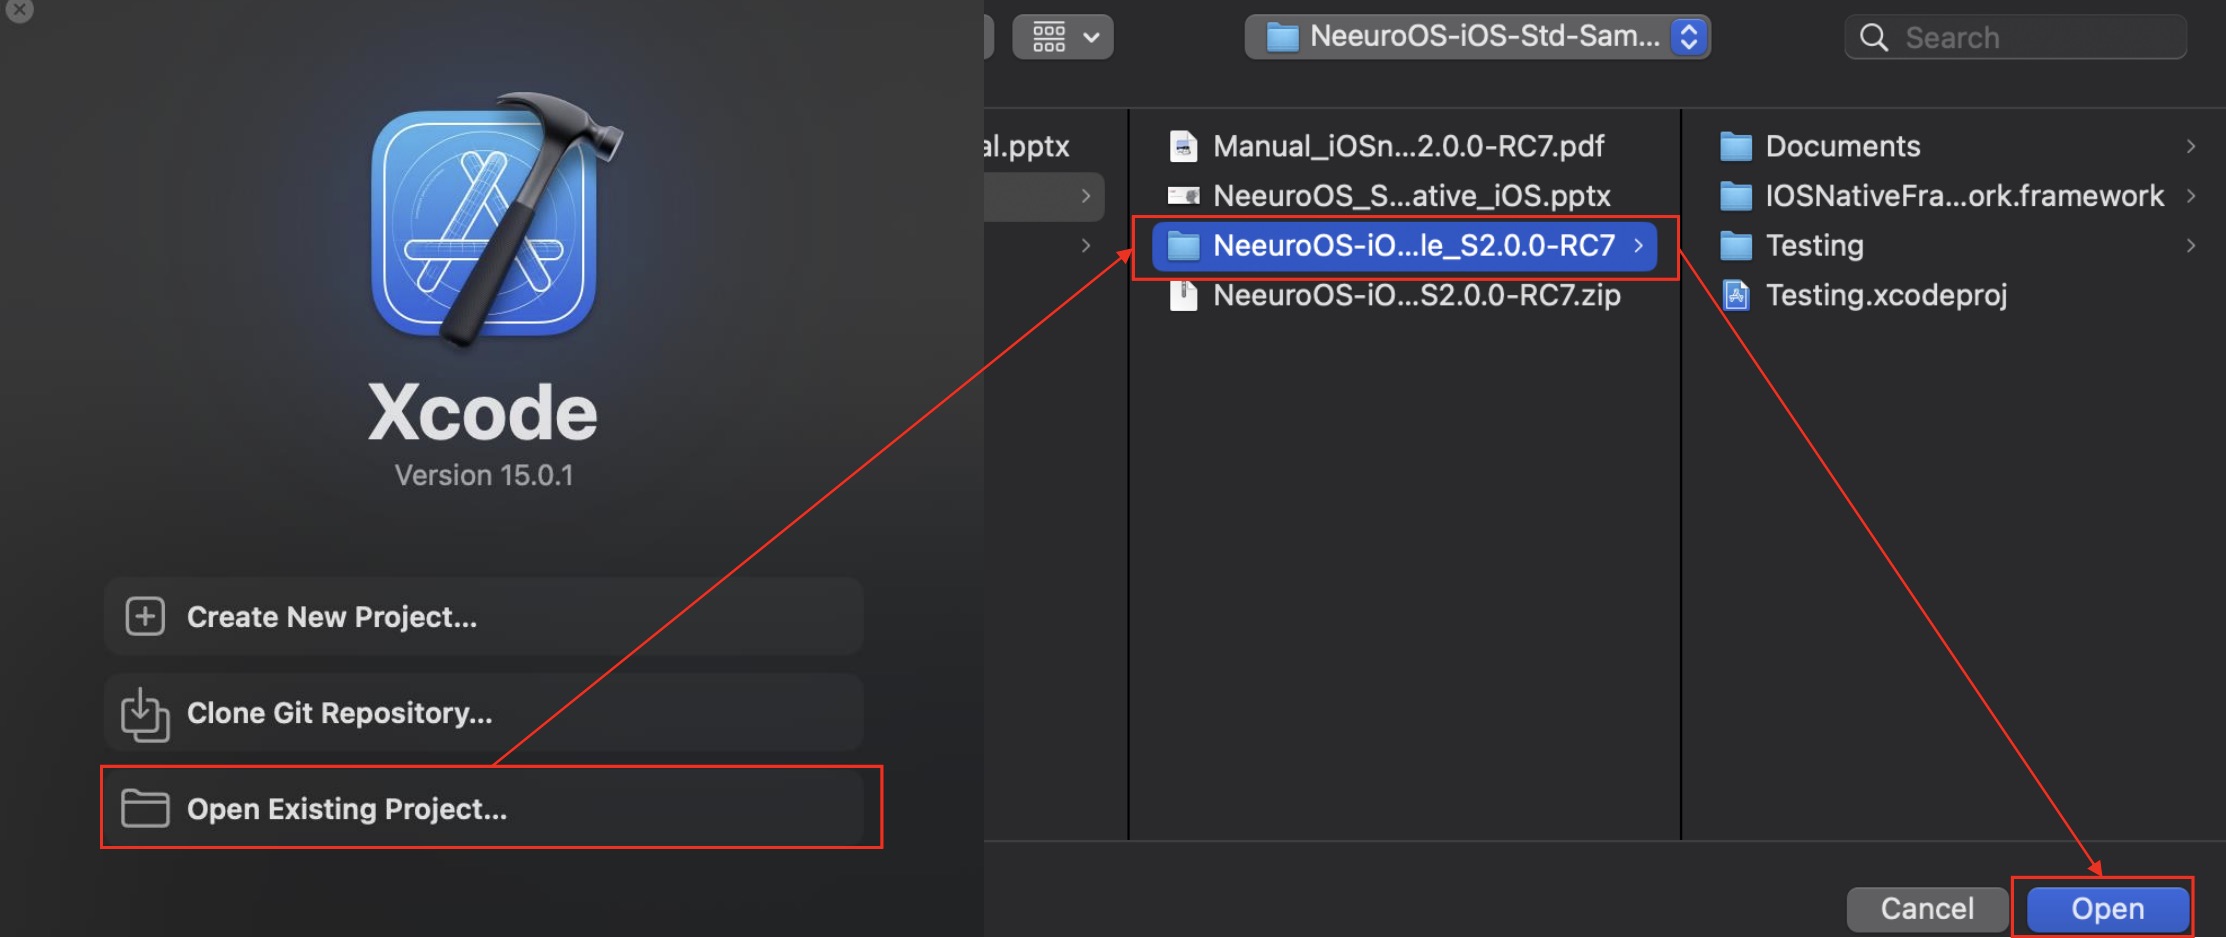
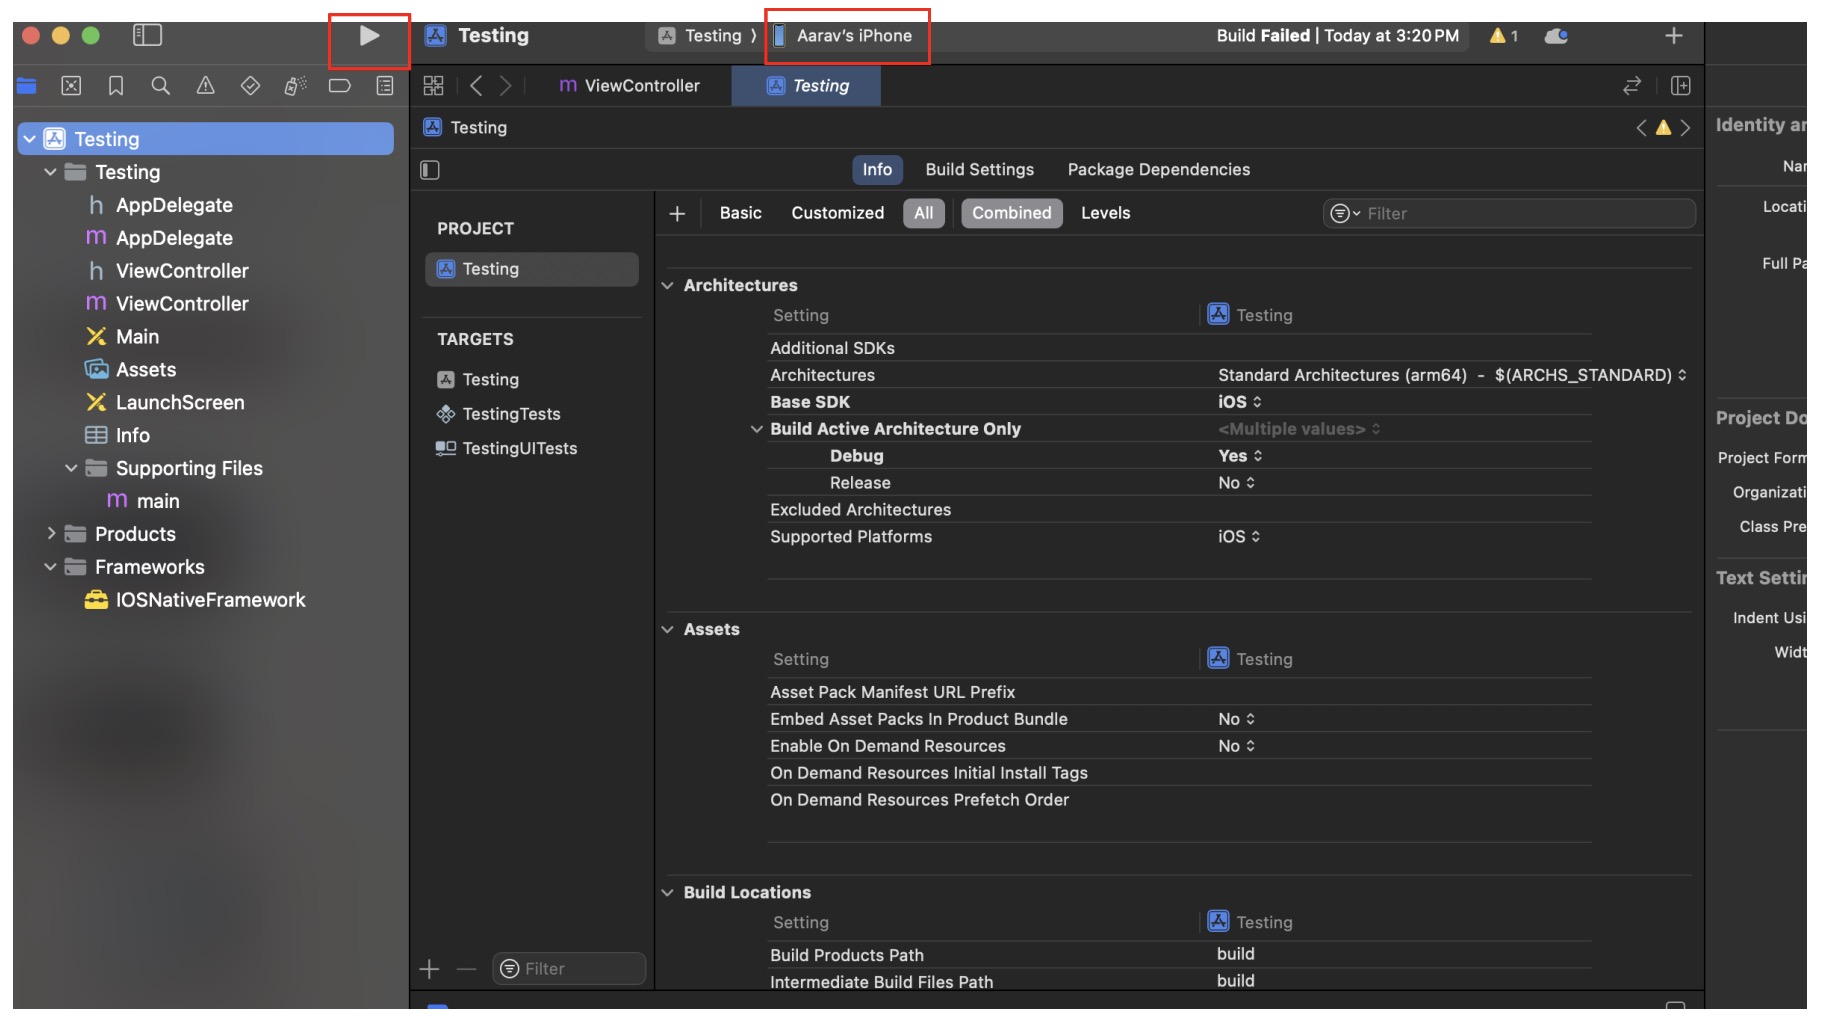
Open your Xcode project. This can be an existing one, or the sample one we provide.
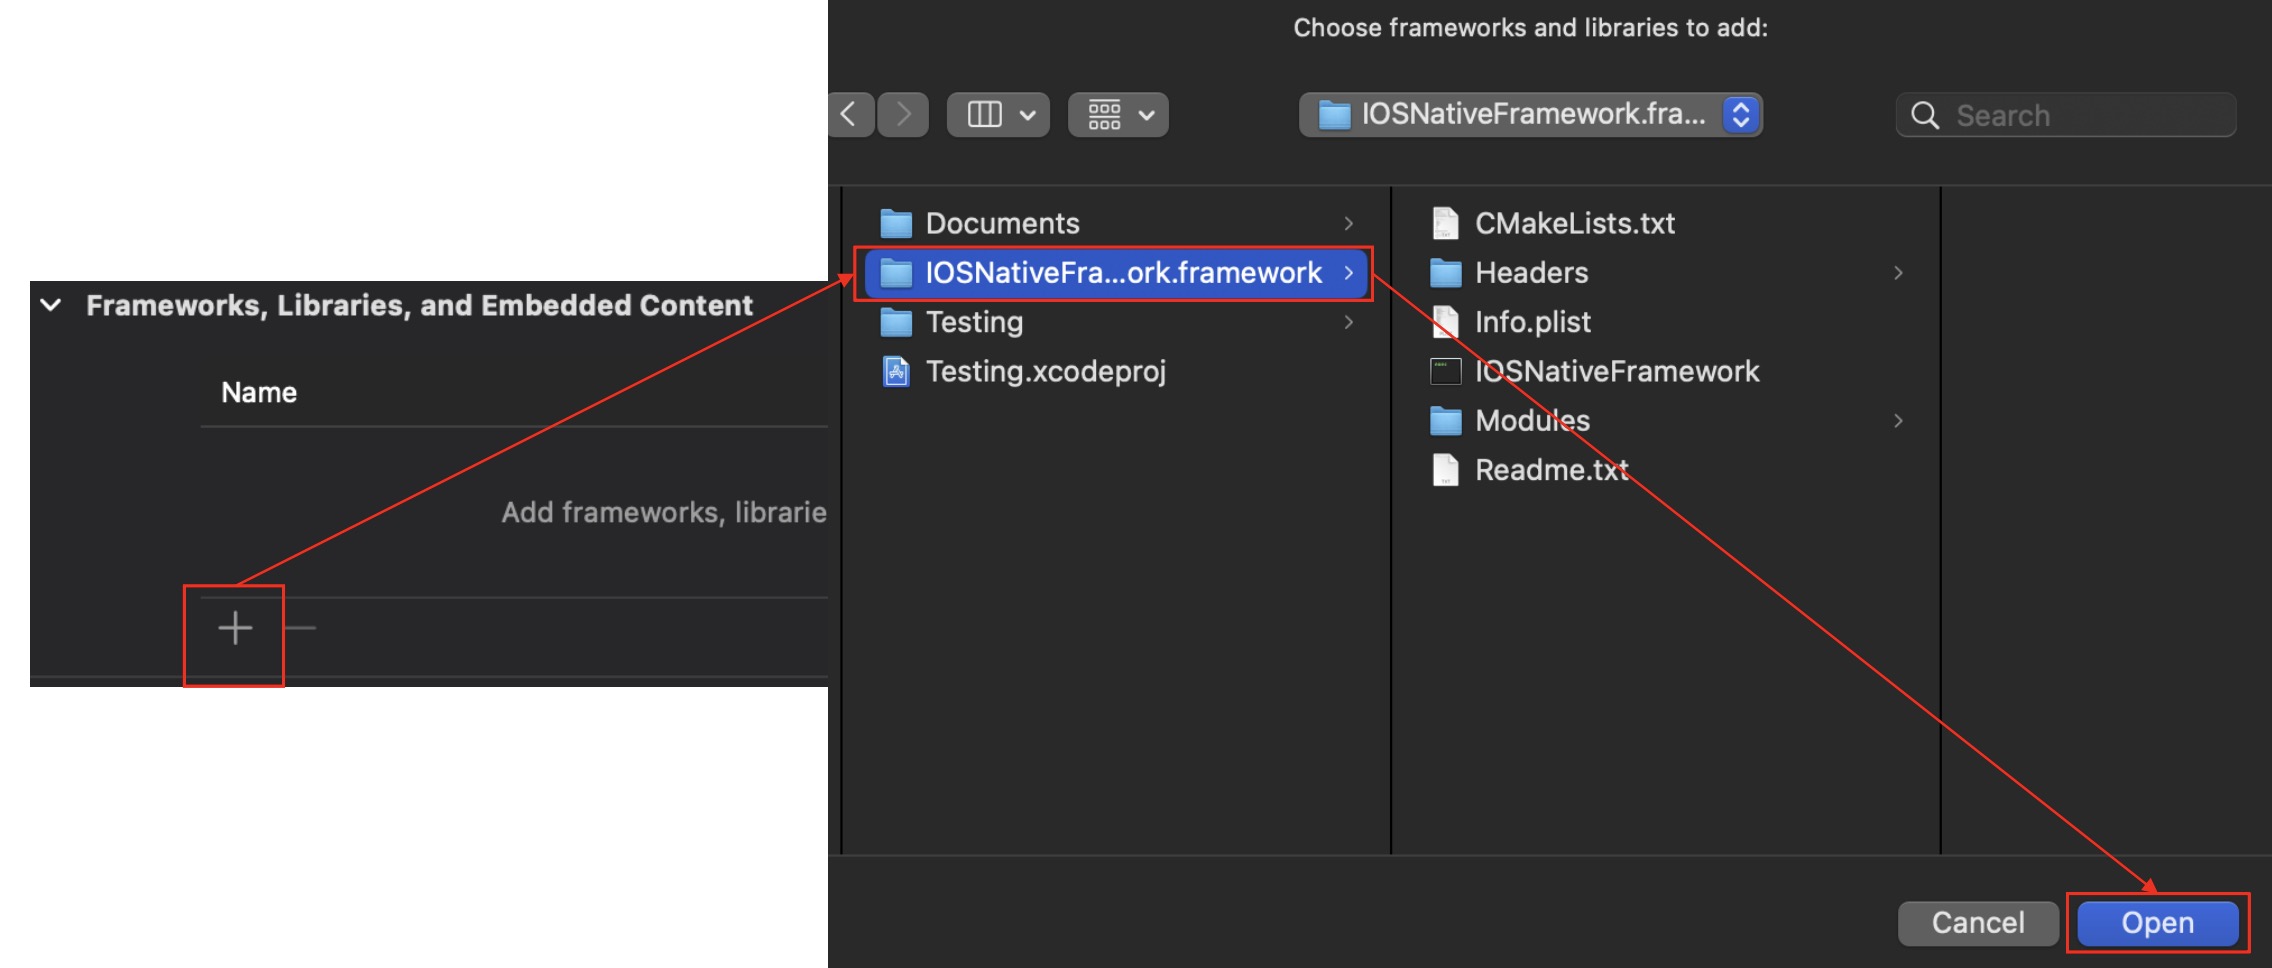
Under General > Frameworks, Libraries and Embedded Content, add in the framework IOSNativeFramework.framework
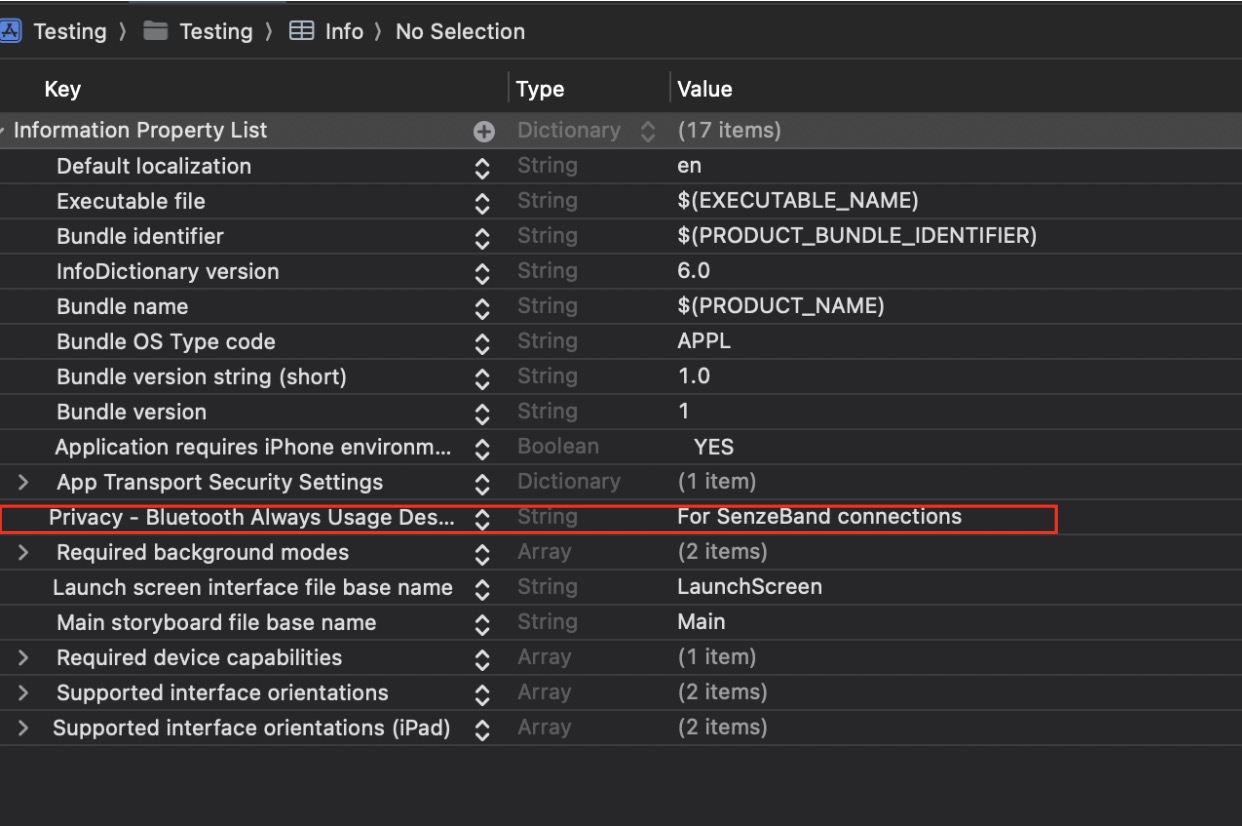
Under Info.plist, ensure that the following key value pair is added: "NSBluetoothAlwaysUsageDescription" or "Privacy - Bluetooth Always Usage Description" - "For SenzeBand Connections"
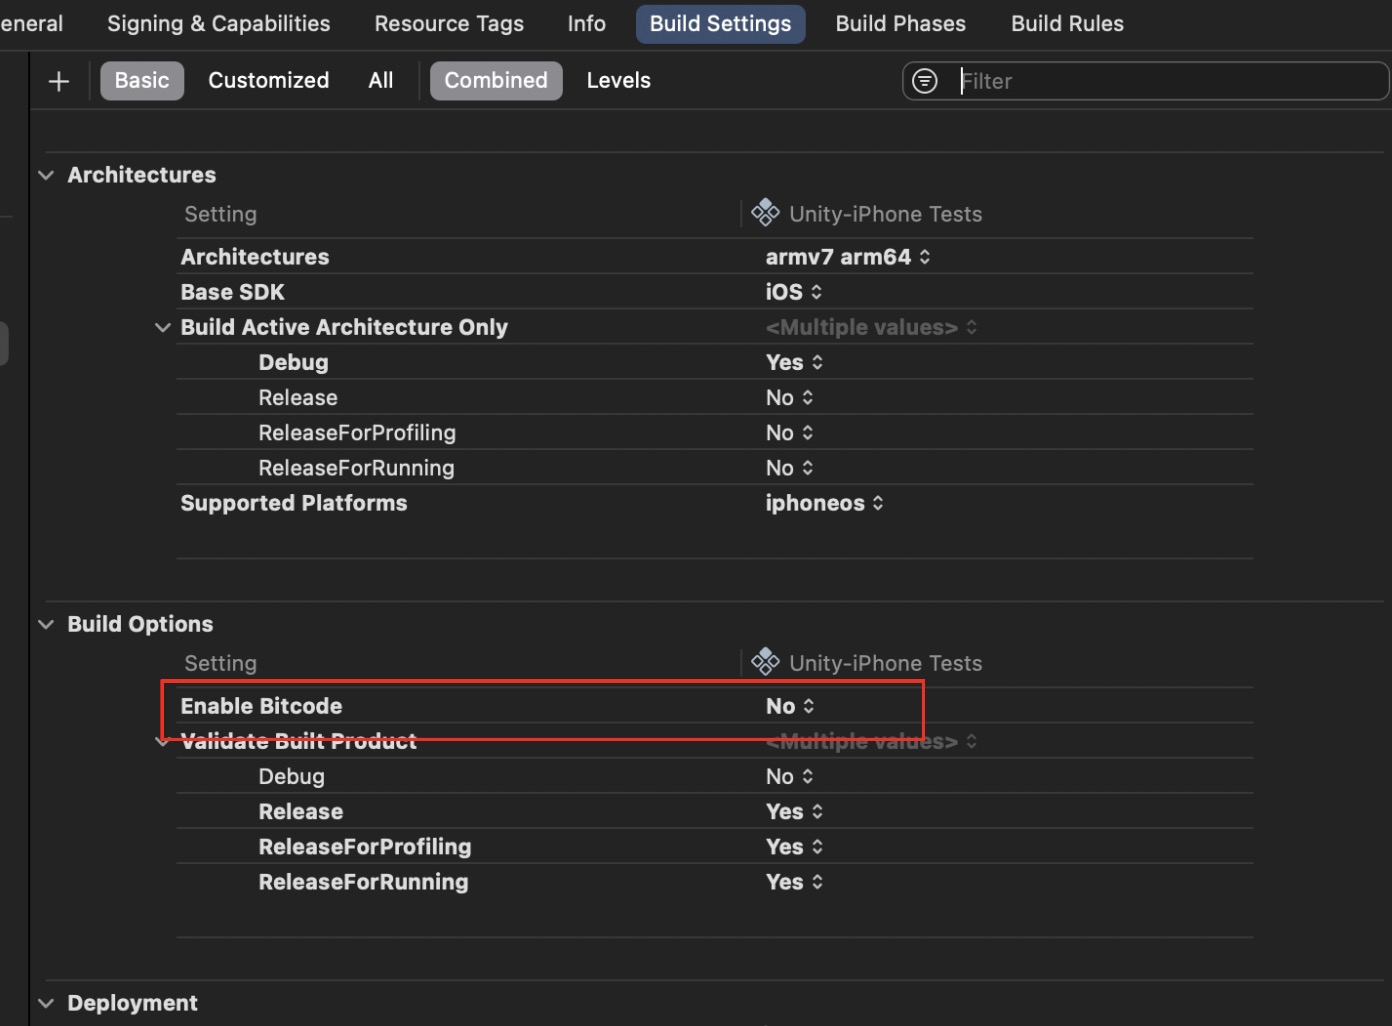
Under Build Settings, search for "Bitcode" > User-Defined> Enable Bitcode = "No"
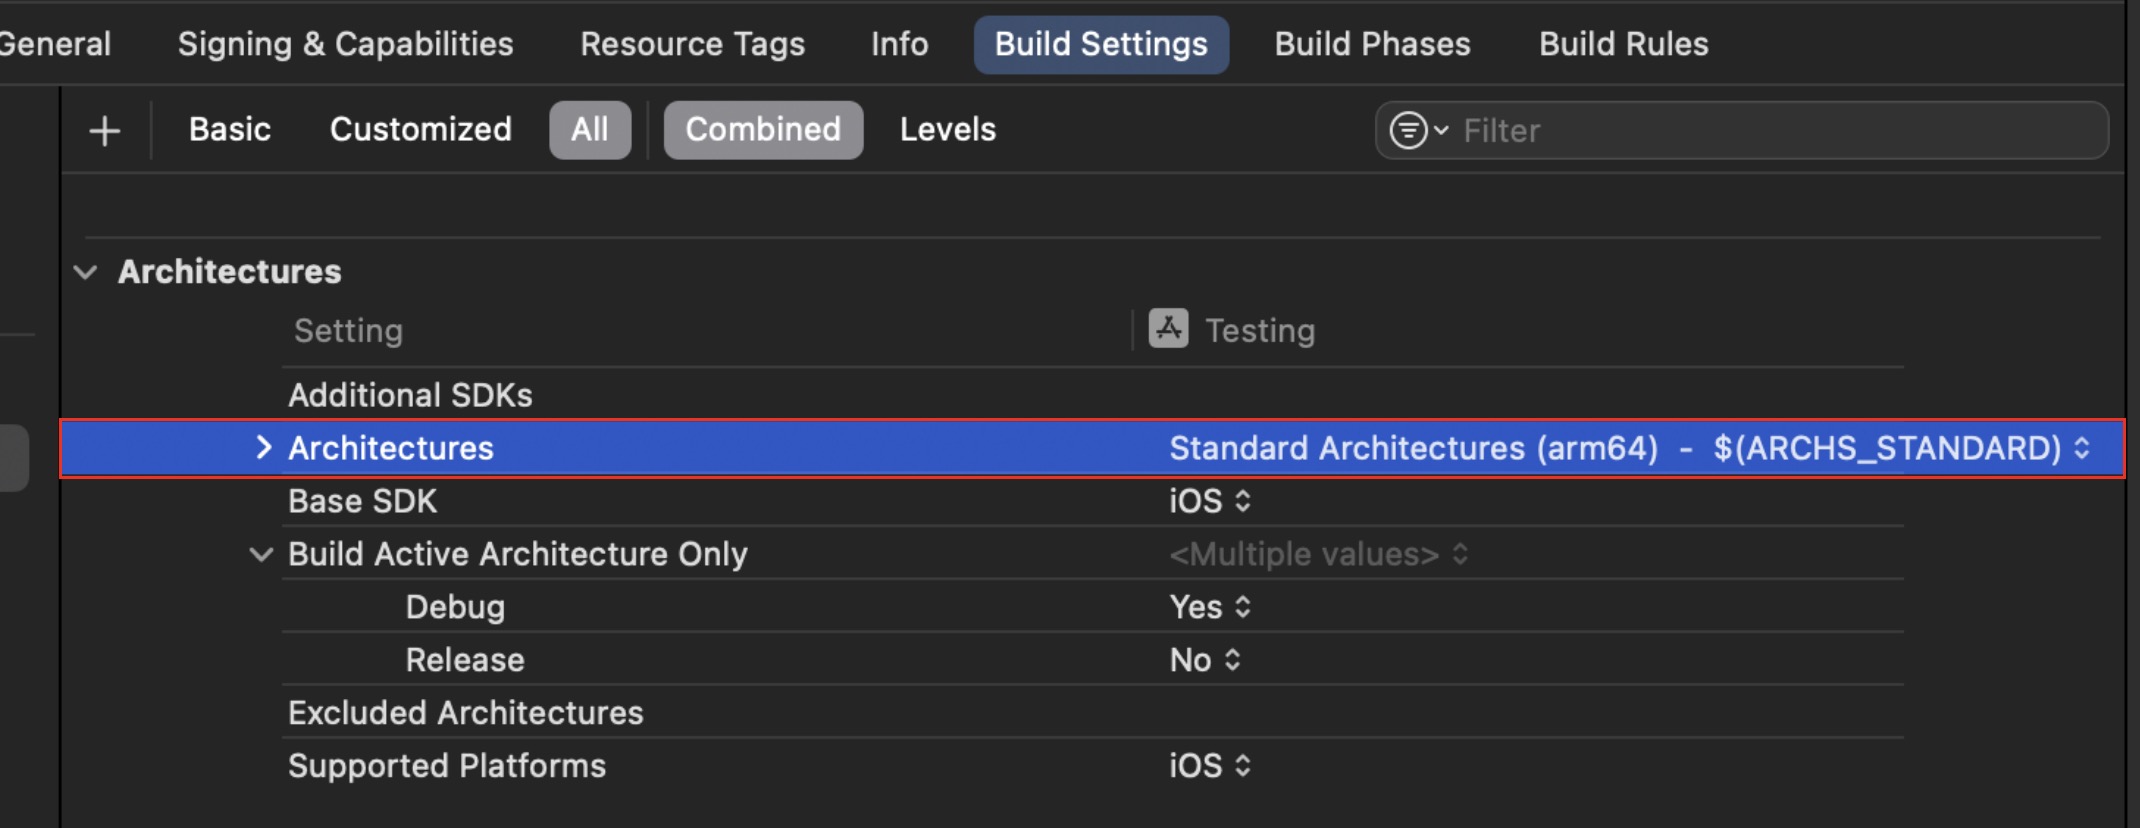
Under Build Settings > Architectures, Set "Standard architectures" or "arm64 armv7" by default.
Under Build Settings -> Valid Architectures, make sure these "arm64 armv7 armv7s arm64e" architectures are there.

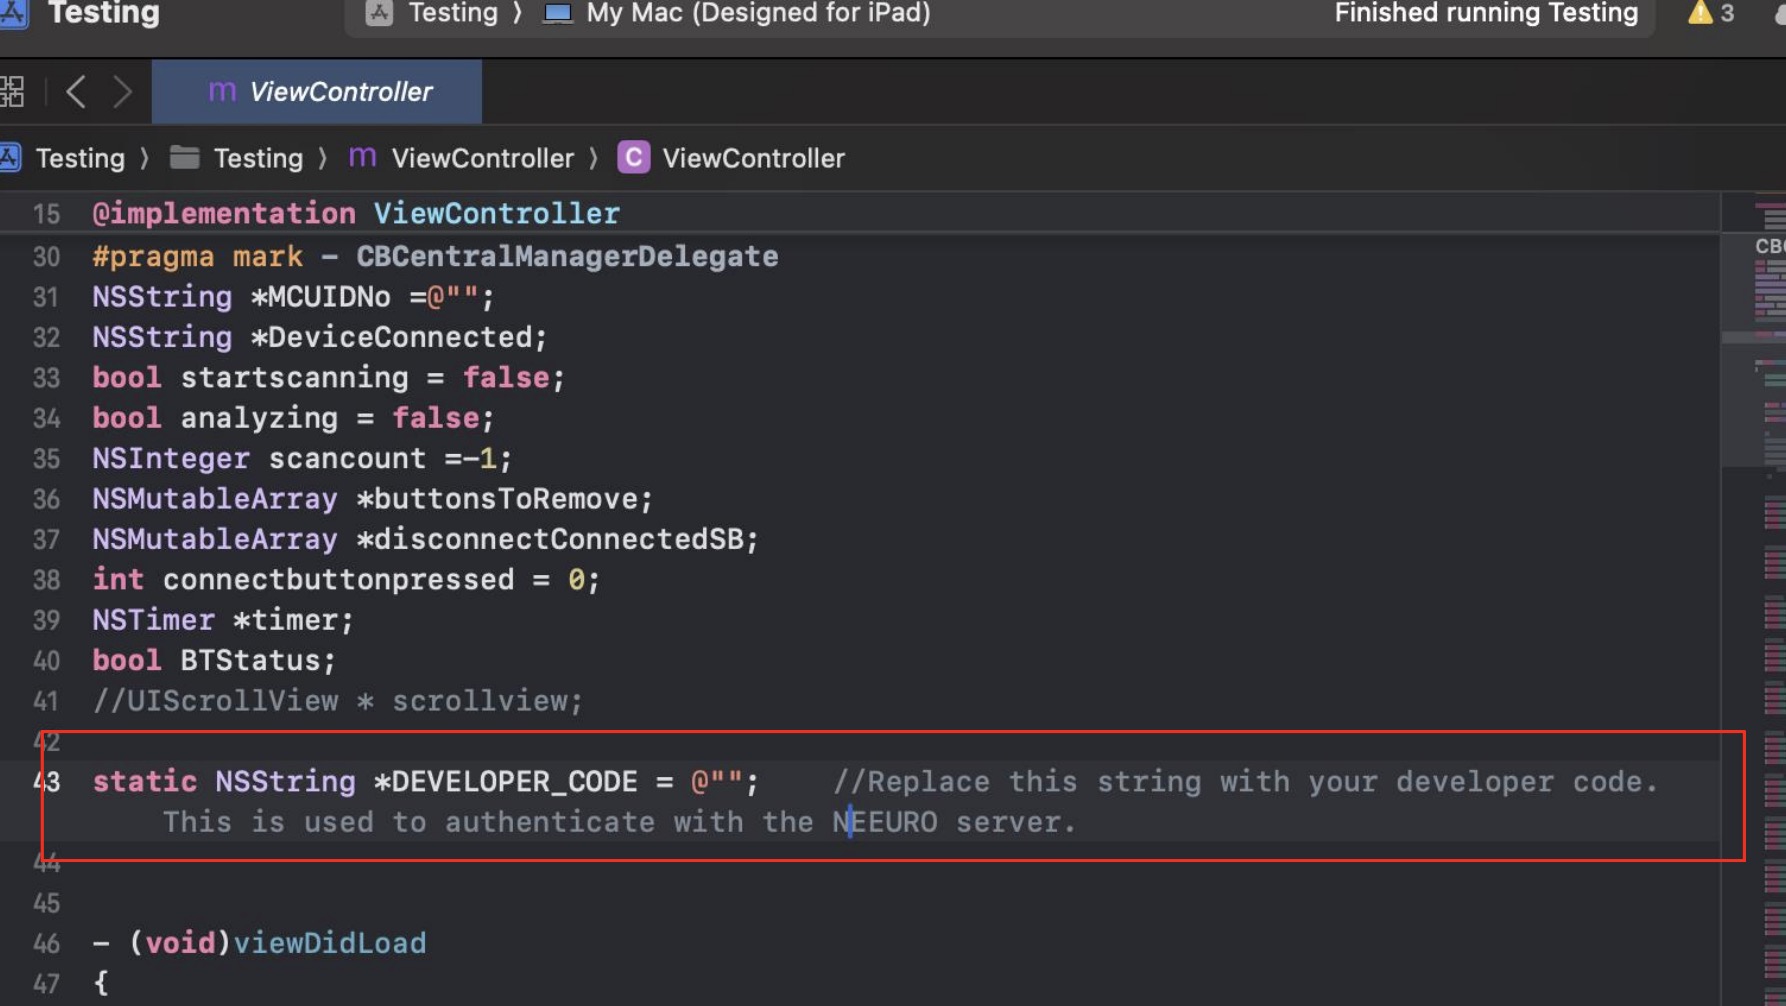
In the parent View Controller's implementation, (ViewController.m), enter your developer code.
Build and Run on Xcode, and the connected iOS devices.
This section will walk you through how to develop your own app using the Neeuro SenzeBand (NSB) iOS Standard SDK. It makes use of the commands in the IOSSDK command glossary.
- Having set up and built the NeeuroOS SDK, ViewController.m will be the main script for working with the SDK. It can be found in the 'Testing' folder.
- In the ViewController header file,
ViewController.h, add the following line of code:
#import <IOSNativeFramework/IOSSDK.h>
- To implement IOSDelegate protocol, add the following line of code to
ViewController.h:
@interface ViewController : UIViewController <IOSDelegate> ;
- In the ViewController implementation file,
ViewController.m, implement the delegate methods appropriately by editing their code.
  @implementation ViewController
  //Example
  - (void) BT_BTStatus:(bool) BTStatus
  {
  //Add in function code here
  }
Examples of possible definitions for the methods can be viewed under the
Development using the Neeuro SenzeBand (NSB) iOS Standard SDK can be done in the following stages:
- Initialisation
- Scanning
- Connecting
- Authenticating
- Impedance Check and Calibration
- Using the SenzeBand
- Disconnecting
- Writing to Files
- ViewController.m is our main control script for accessing and implementing the delegate methods.
- Use nitializeBT is with your developr code to start initialisation.
- Once initialisation has been completed, you are now free to use the functions inside ViewController.m.
- To scan for the SenzeBand, make use of
startStopScanningto start the scan. - Then,
use initializeBTwith your developer code to use Bluetooth to find the respective SenzeBand. - The list of all scanned SenzeBands in the vicinity can be found in the list
DisplayBTScanList.m.
- To connect to a SenzeBand,
ConnectDeviceconnects the Neeuro device with the bluetoothID to the app. - Once the SenzeBand has been successfully connected, you are able to use your SenzeBand with the app.
- Similarly, to disconnect from the SenzeBand, the use the
DisconnectDevicemethod.
- A SenzeBand needs to be authenticated to be used with the SDK.
authenticateUserauthenticates the user via the developer code that is passed in from initialize.- To display the valid time left for the authentication, you can make use of the function
getAuthenticationValidityInMilliseconds. - Note that if authentication fails, you will not be able to receive any data from the SenzeBand.
- Impedance Check helps to verify if the signal quality from the 4 contact points/electrodes are good. Example, if there is makeup or some other impurities on the skin, the impedance values will be much higher due to the contribution of more resistance between the electrodes and skin surface, the EEG signals will not be good/accurate. Good impedance range is below 800k Ohms.
- We recommend to do an Impedance Check/Signal Quality Check after SenzeBand connection before using the SenzeBand.
- Impedance check can be done through running the function
SB_EEG_GetImpedance. - If there is high impedance between the SenzeBand and the subject, readings may not be accurate, so a wet towel can be used to increase lubrication between the two surfaces.
- After you've connected the SenzeBand, you need to first enable it. You can do this by calling
EEG_Start, allowing data from the SenzeBand to be sent over to your app. - There are several different types of data you can grab from the SenzeBand. To stop collecting the data,
EEG_Stopcan be run, which stops the app from grabbing data from the SenzeBand. - To start data analysis with the data collected, make use of the function StartStopAnalyze in ViewController.m.
- Call
DisconnectDevicewith the BluetoothID of the currently connected SenzeBand to disconnect it. - Actions can be done based on connection of the SenzeBand through the application of if statements.
To start writing to files, open the SDK and press the
Startbutton to start recording.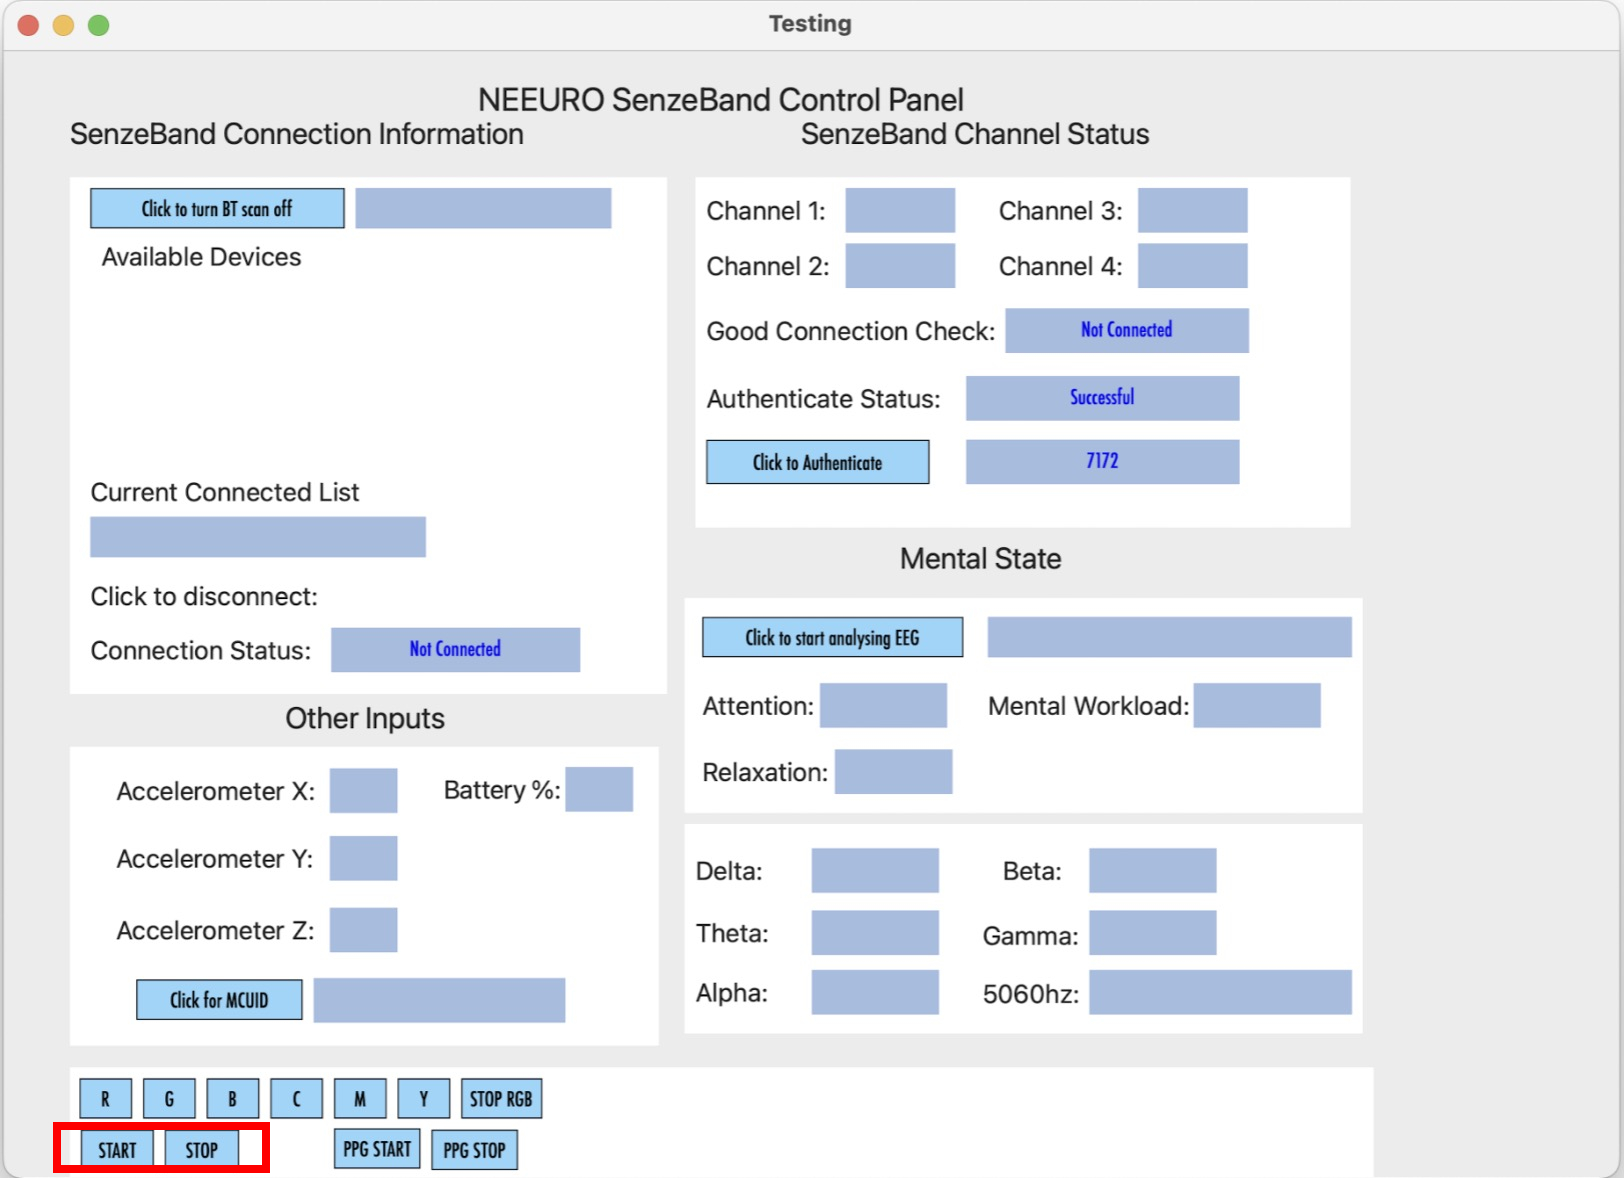
The
Stopbutton stops recording, saving data automatically to a CSV or EDF file at a default location, stated when saving is complete.View the file by accessing the location necessary in the Files app.
  /*!
  Send command to SenzeBand

  @param command A command String
      COMMAND_AC_LEADOFF
      COMMAND_DC_LEADOFF
      COMMAND_LIGHT_RED
      COMMAND_LIGHT_GREEN
      COMMAND_LIGHT_BLUE
      COMMAND_LIGHT_CYAN
      COMMAND_LIGHT_MAGENTA
      COMMAND_LIGHT_YELLOW
      COMMAND_STOP_RGB
      COMMAND_CMD_FA - Evoke event
      COMMAND_FW_VER - Get firmware version
      COMMAND_CAL_START - Calibration start
      COMMAND_CAL_STOP - Calibration stop
      COMMAND_START start - Sending eeg data
      COMMAND_STOP stop - Sending eeg data
      COMMAND_PPG_START - Start sending ppg data
      COMMAND_PPG_STOP - Stop sending ppg data
  */
  - (void) grabInputCommand:(NSString *) command;
Name: grabInputCommand
Parameters: String representing a command, one of the above
Output: None
Definition: Sends a command to the SenzeBand
(NSString *) getVersion;
Name: getVersion;
Parameters: None
Output: String representing SDK version
Definition: Returns current SDK version
- (void) DisplayBTStatus:(bool) BTStatus;
Name: DisplayBTStatus;
Parameters: Boolean representing Bluetooth status
Output: None
Definition: Displays Bluetooth status
- (void) DisplayBTScanList:(NSMutableArray*) NameList;
Name: DisplayBTScanList;
Parameters: Mutable array representing SenzeBands found from scanning
Output: None
Definition: Displays the list of available SenzeBand devices found from scanning
- (void) DisplayBTConnectedList:(NSString *) NameList;
Name: DisplayBTConnectedList;
Parameters: Mutable array representing connected SenzeBands
Output: None
Definition: Displays the list of connected SenzeBands
- (void) DisplayBTConnectionStatus:(bool) NameList;
Name: DisplayBTConnectionStatus;
Parameters: Boolean representing strength of connection of SenzeBand
Output: None
Definition: Displays whether the user's SenzeBand is worn properly
- (void) DisplaySB_EEG_GetAttention:(float) Value;
Name: DisplaySB_EEG_GetAttention;
Parameters: Float representing level of attention
Output: None
Definition: Displays whether the user's attention level
- (void) DisplaySB_EEG_GetRelaxation:(float) Value;
Name: DisplaySB_EEG_GetRelaxation;
Parameters: Float representing level of relaxation
Output: None
Definition: Displays whether the user's relaxation level
- (void) DisplaySB_batteryLevelUpdate:(NSString *) NameList;
Name: DisplaySB_batteryLevelUpdate;
Parameters: String representing new battery level
Output: None
Definition: Displays the SenzeBand's current battery level
- (void) DisplaySB_EEG_GetAccXYZ:(float[]) XYZ;
Name: DisplaySB_EEG_GetAccXYZ;
Parameters: Array of Float values representing accelerometer force values, 3 floats for SenzeBand V1 and 6 floats for SenzeBandV2
Output: None
Definition: Displays the accelerometer force values
- (void) DisplaySB_EEG_GetDirection:(NSString*) direction;
Name: DisplaySB_EEG_GetDirection;
Parameters: String representing direction SenzeBand is facing, e.g "", "N", "E", "S", "W", "NE", "SE", "NW", "SW"
Output: None
Definition: Displays the direction SenzeBand is facing
- (void) DisplaySB_EEG_grabSenzeBandMCUID:(NSString *) NameList;
Name: DisplaySB_EEG_grabSenzeBandMCUID;
Parameters: String representing MCUID of currently connected SenzeBand
Output: None
Definition: Displays the SenzeBand's MCUID value
- (void) DisplaySB_EEG_GetChannelStatus:(bool[4]) Value;
Name: DisplaySB_EEG_GetChannelStatus;
Parameters: Array of Boolean values representing the status of each SenzeBand electrode
Output: None
Definition: Displays the channel status of the SenzeBand
- (void) DisplaySB_EEG_GoodConnectionCheck:(bool) Value;
Name: DisplaySB_EEG_GoodConnectionCheck;
Parameters: Boolean representing the status of the EEG Bluetooth connection
Output: None
Definition: Displays the Bluetooth connection value as True if connection is good, False if the connection is bad
- (void) DisplaySB_EEG_GetMentalWorkload:(float) Value;
Name: DisplaySB_EEG_GetMentalWorkload;
Parameters: Float representing the mental workload level value, range of 0 (not taxing) - 1 (very taxing)
Output: None
Definition: Displays the mental workload level value
- (void) DisplaySB_EEG_GetABDT:(float[20]) Value;
Name: DisplaySB_EEG_GetABDT
Parameters: Array of Float values representing the Delta, Theta, Alpha, Beta, Gamma values in each of the 4 electrode channels
Output: None
Definition: Displays the Delta, Theta, Alpha, Beta, and Gamma values for each of the 4 electrode channels.
- (void) DisplaySB_EEG_GetABDTRaw:(float[36]) Value;
Name: DisplaySB_EEG_GetABDTRaw
Parameters: Array of Float values representing the raw Delta, Theta, Alpha, Beta, Gamma, LowAlpha, HighAlpha, LowBeta, HighBeta values in each of the 4 electrode channels
Output: None
Definition: Displays the raw Delta, Theta, Alpha, Beta, and Gamma values for each of the 4 electrode channels.
- (void) DisplaySB_EEG_GetABDTNorm:(float[36]) Value;
Name: DisplaySB_EEG_GetABDTNorm
Parameters: Array of Float values representing the normalised Delta, Theta, Alpha, Beta, Gamma, LowAlpha, HighAlpha, LowBeta, HighBeta values in each of the 4 electrode channels
Output: None
Definition: Displays the normalised Delta, Theta, Alpha, Beta, and Gamma values for each of the 4 electrode channels.
- (void) DisplaySB_EEG_GetRawData:(int[1000]) Value;
Name: DisplaySB_EEG_GetRawData
Parameters: Array of Int values representing the EEG data, 250 Ints for each channel, with each Int value ranges from -2048 to 2047
Output: None
Definition: Displays raw EEG data from the SenzeBand, with each unit representing 0.61 microvolts
- (void) DisplaySB_EEG_GetRawDataFloat:(float[1000]) Value;
Name: DisplaySB_EEG_GetRawDataFloat
Parameters: Array of Float values representing the EEG data, 250 Floats for each channel, with each Float value ranges from -2048 to 2047
Output: None
Definition: Displays raw EEG data from the SenzeBand, with each unit representing 0.61 microvolts
- (void) DisplaySB_EEG_GetRawDataFiltered:(float[1000]) Value;
Name: DisplaySB_EEG_GetRawDataFiltered
Parameters: Array of Float values representing the EEG data, 250 Floats for each channel, with each Float value ranges from -2048 to 2047
Output: None
Definition: Displays filtered EEG data, with each unit representing 0.61 microvolts
- (void) DisplaySB_EEG_Get5060Hz:(float[4]) Value;
Name: DisplaySB_EEG_Get5060Hz
Parameters: Array of Float values representing the 50-60Hz values for each electrode
Output: None
Definition: Displays the 50-60Hz value, with one float for each channel
- (void) DisplayDA_AuthenticationStatus:(NSString *) status;
Name: DisplayDA_AuthenticationStatus
Parameters: String representing the authentication status from SenzeBand plugin, can be either "True" or "False"
Output: None
Definition: Displays authentication status of SenzeBand
- (void) DisplayDA_AuthenticationStatusCode:(NSString *) statusCode;
Name: DisplayDA_AuthenticationStatusCode
Parameters: String representing the authentication status code from SenzeBand plugin, can be either "True" or "False"
Output: None
Definition: Displays authentication HTTP response
- (void) SB_commandACK:(NSString*) ack;
Name: SB_commandACK
Parameters: String representing acknowledgement
Definition: Displays an acknowledgement of a given command
The following properties and their respective functions are in ViewController.m and are related to data receieved and processed from the SenzeBand. They can be used in your app to handle the data from the SenzeBand. This protocol glossary includes sample implementations of these methods, using interface declaration to receive EEG data via callbacks from SenzeBand framework.
  /*!
  Send command to SenzeBand

  @param command A command String
      COMMAND_AC_LEADOFF
      COMMAND_DC_LEADOFF
      COMMAND_LIGHT_RED
      COMMAND_LIGHT_GREEN
      COMMAND_LIGHT_BLUE
      COMMAND_LIGHT_CYAN
      COMMAND_LIGHT_MAGENTA
      COMMAND_LIGHT_YELLOW
      COMMAND_STOP_RGB
      COMMAND_CMD_FA - Evoke event
      COMMAND_FW_VER - Get firmware version
      COMMAND_CAL_START - Calibration start
      COMMAND_CAL_STOP - Calibration stop
      COMMAND_START start - Sending eeg data
      COMMAND_STOP stop - Sending eeg data
      COMMAND_PPG_START - Start sending ppg data
      COMMAND_PPG_STOP - Stop sending ppg data
  */
  - (void) grabInputCommand:(NSString *) command;
Name: grabInputCommand
Parameters: String representing a command, one of the above
Output: None
Definition: Sends a command to the SenzeBand
- (NSString*) GetEnvironmentData:(int) index;
Name: GetEnvironmentData
Parameters: None
Output: None
Definition: Returns current environment values
- (NSString*) GetEnvironmentData:(int) index;
Name: GetEnvironmentData
Parameters: Int
Output: None
Definition: Returns current environment values
- (void) startStopScanning: (bool) toStart;
Name: GetEnvironmentData
Parameters: Boolean representing a flag to start or stop the scanning.
Output: None
Definition: Sets the scanning mode
- (void) ClearDeviceList;
Name: GetEnvironmentData
Parameters: None
Output: None
Definition: Clears the list of discovered Neeuro devices. Clears the list of discovered Neeuro devices.
- (void) SetEnvironmentThreshold: (NSString*) envThreshold;
Name: SetEnvironmentThreshold
Parameters: String consisting of normalised gamma and 50-60Hz threshold values separated by spaces
Output: None
Definition: Sets gamma and 5060Hz threshold for useful data
(NSString *) getVersion;
Name: getVersion
Parameters: None
Output: String representing SDK version
Definition: Returns current SDK version
- (void) SB_commandACK:(NSString*) ack;
Name: SB_commandACK
Parameters: String representing acknowledgement
Definition: Recieves an acknowledgement of a given command
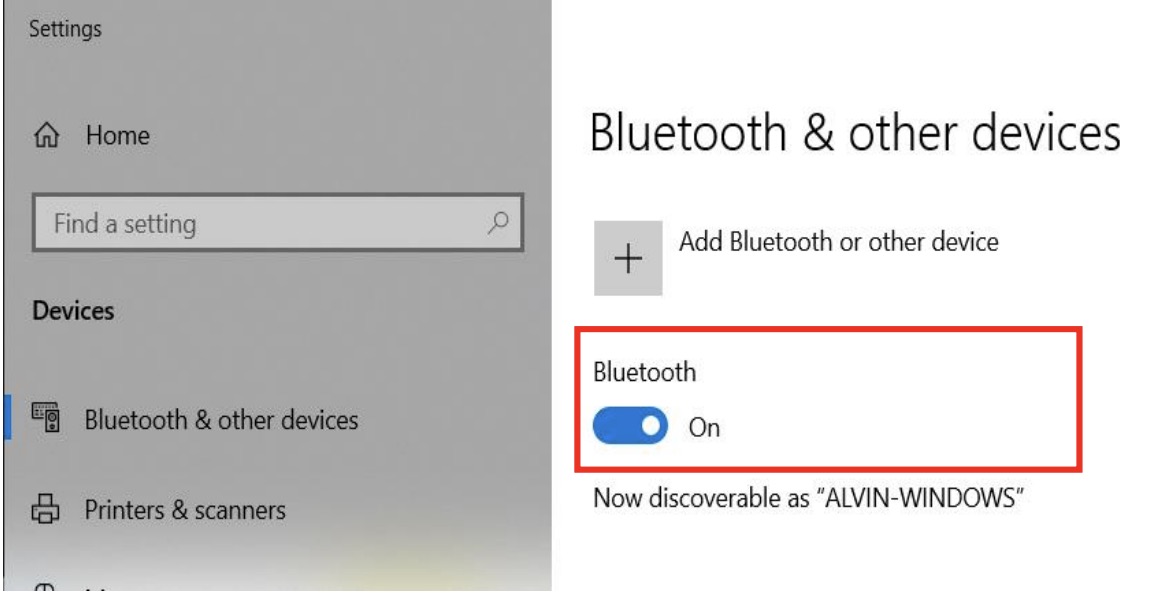
Ensure Bluetooth is turned on for your Windows device
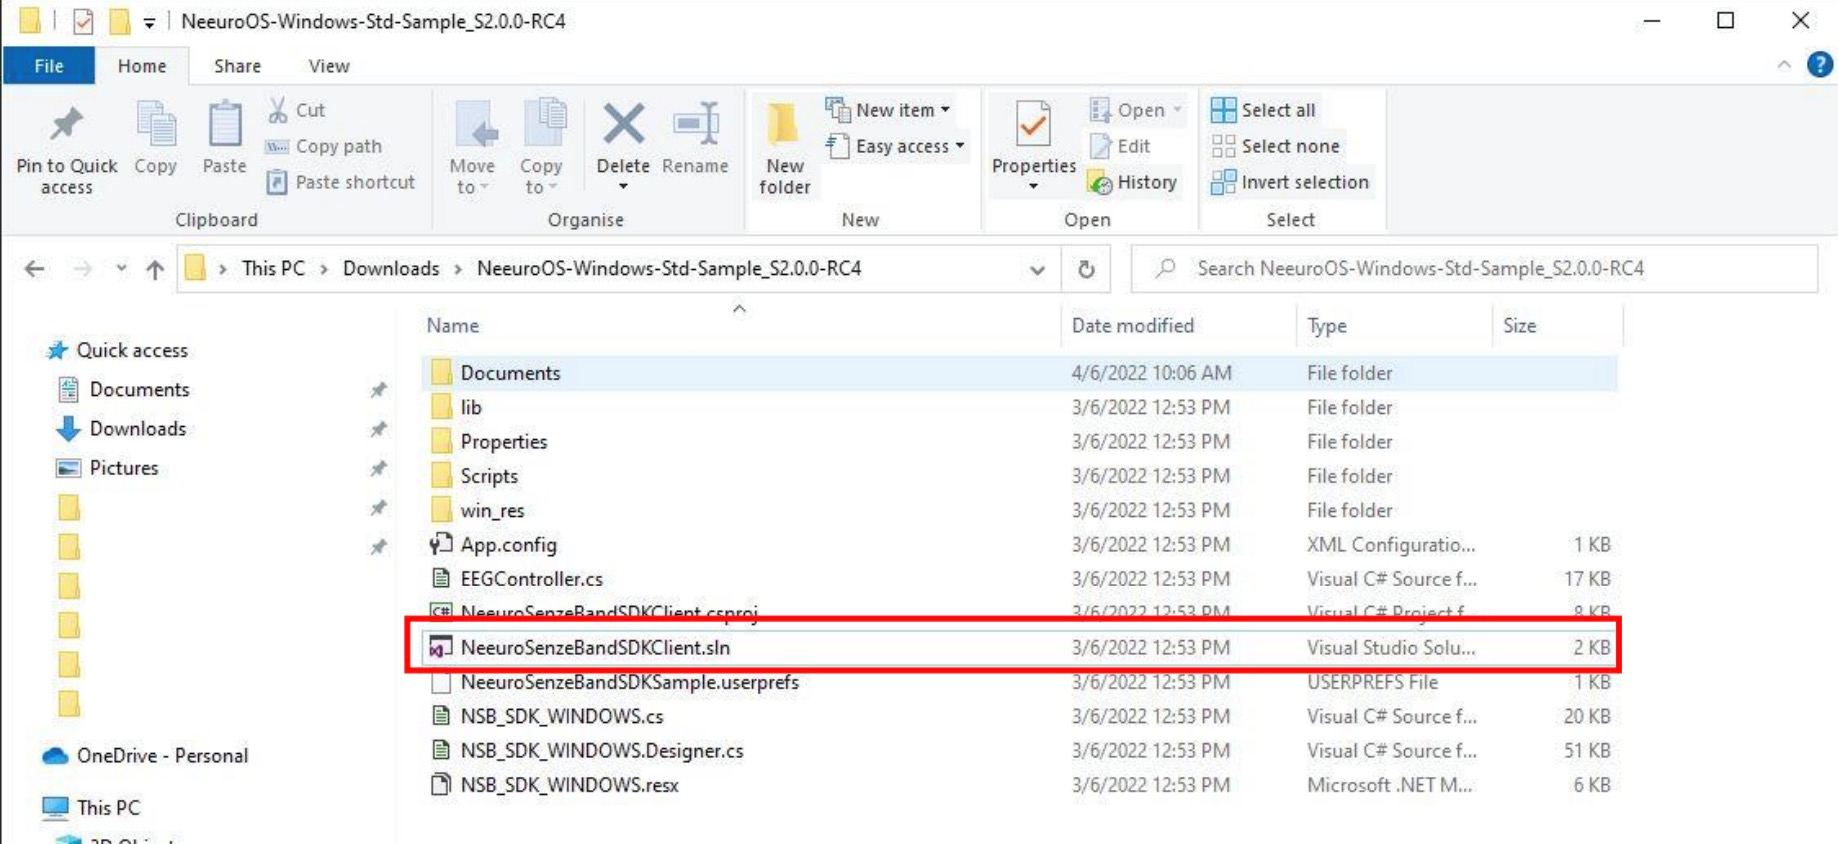
Unzip the zip folder and make sure all these files are inside
Double click on “NeeuroSenzeBandSDKClient.sln” to run the application.
This section will walk you through how to develop your own app using the Neeuro SenzeBand (NSB) Windows Standard SDK.
Development using the Neeuro SenzeBand (NSB) Windows Standard SDK can be done in the following stages:
- Initialisation
- Scanning
- Connecting
- Authenticating
- Impedance Check and Calibration
- Using the SenzeBand
- Disconnecting
- Writing to Files
- Reference the dll: SenzeBandWindowsIPC_ClientDLL.
- Ensure that win_res is in the executable folder. It is required for SenzeBand communication.
- Having set up and built the NeeuroOS SDK, NSB_SDK_WINDOWS.cs will be the main control script for accessing SenzeBand functions.
- Run NSB_SDK to initialise the SDK.
- Call
button_startScanButtonto start scanning. It is automatically switched ON at Initialization. However, in the case when SetScanning was switched to OFF, you can switch it ON manually by calling thebutton_startScanButtonfunction. - When scanning is enabled, there are three possible callbacks.
receiveScanResult()- Callback for detecting a Neeuro SenzeBand added or removed in the scan list- `updateScanResult() - Callback when a property change is detected in the scan list (eg. when a SenzeBand becomes connected)
enumerationComplete()- Callback when the scanning process is completed
- To stop the scan, run
button_stopScanButton.
- There are two callbacks that will trigger once you attempt to connect to a SenzeBand device.
- connectedCallback - this is triggered the moment the plugin confirms that SenzeBand connection is successful.
- connectFailCallBack - this is triggered when the app fails to connect successfully to the SenzeBand.
- To connect to a SenzeBand device, select one device in the list of scanned SenzeBands and call
ConnectDevice(String)with its device id. This automatically causes the scan to stop. - Once the SenzeBand has been successfully connected,
connectedCallbackwill be called.
- For the Standard SDK, you'll need an internet connection to Authenticate your developer code with Neeuro's servers. Call
authButton_Clickto attempt authentication. - Authentication is automatically done when a SenzeBand is connected. However, in the case when authentication fails, you can authenticate manually by calling
authButton_Click. - Note that if authentication fails, you will not be able to receive any data from the SenzeBand.
- Impedance Check helps to verify if the signal quality from the 4 contact points/electrodes are good. Example, if there is makeup or some other impurities on the skin, the impedance values will be much higher due to the contribution of more resistance between the electrodes and skin surface, the EEG signals will not be good/accurate. Good impedance range is below 800k Ohms.
- We recommend to do an Impedance Check/Signal Quality Check after SenzeBand connection before using the SenzeBand.
- To do impedance check, call
ACbutton_Clickin your program. Switching to AC mode will stop SenzeBand from receiving EEG and start on checking signal quality. Advise the user to adjust SenzeBand and wipe off residue on skin to get better contact until all channel signals are green. Once done, switch back to DC mode by callingDCButton_Click. By default, SenzeBand is in DC mode after a successful connection. - Switching AC mode and DC mode can take a moment before plugin can verify and actually switch modes.
- If user thinks that the Acceleration and Orientation data is not accurate, we can perform calibration to improve the accuracy. To initiate calibration, call
CalStartButton_Click. To stop calibration, callCalStopButton_Click.
- After you've connected the SenzeBand, you need to first enable it. You can do this by calling
StartButton_Clickfor EEG data orPPGStartButton_Clickfor PPG data. This allows data from the SenzeBand to be sent over to the app. - There are several different types of data you can grab from the SenzeBand. For each type of data, there is a callback that comes with it with a respective interface, such as scanCallBack, or authenticationCallBack.
- You can call
StopButton_Clickfor EEG data orPPGStopButton_Clickfor PPG data to stop the SenzeBand from sending data.
To start writing to files, open the SDK and press the
Startbutton to start recording.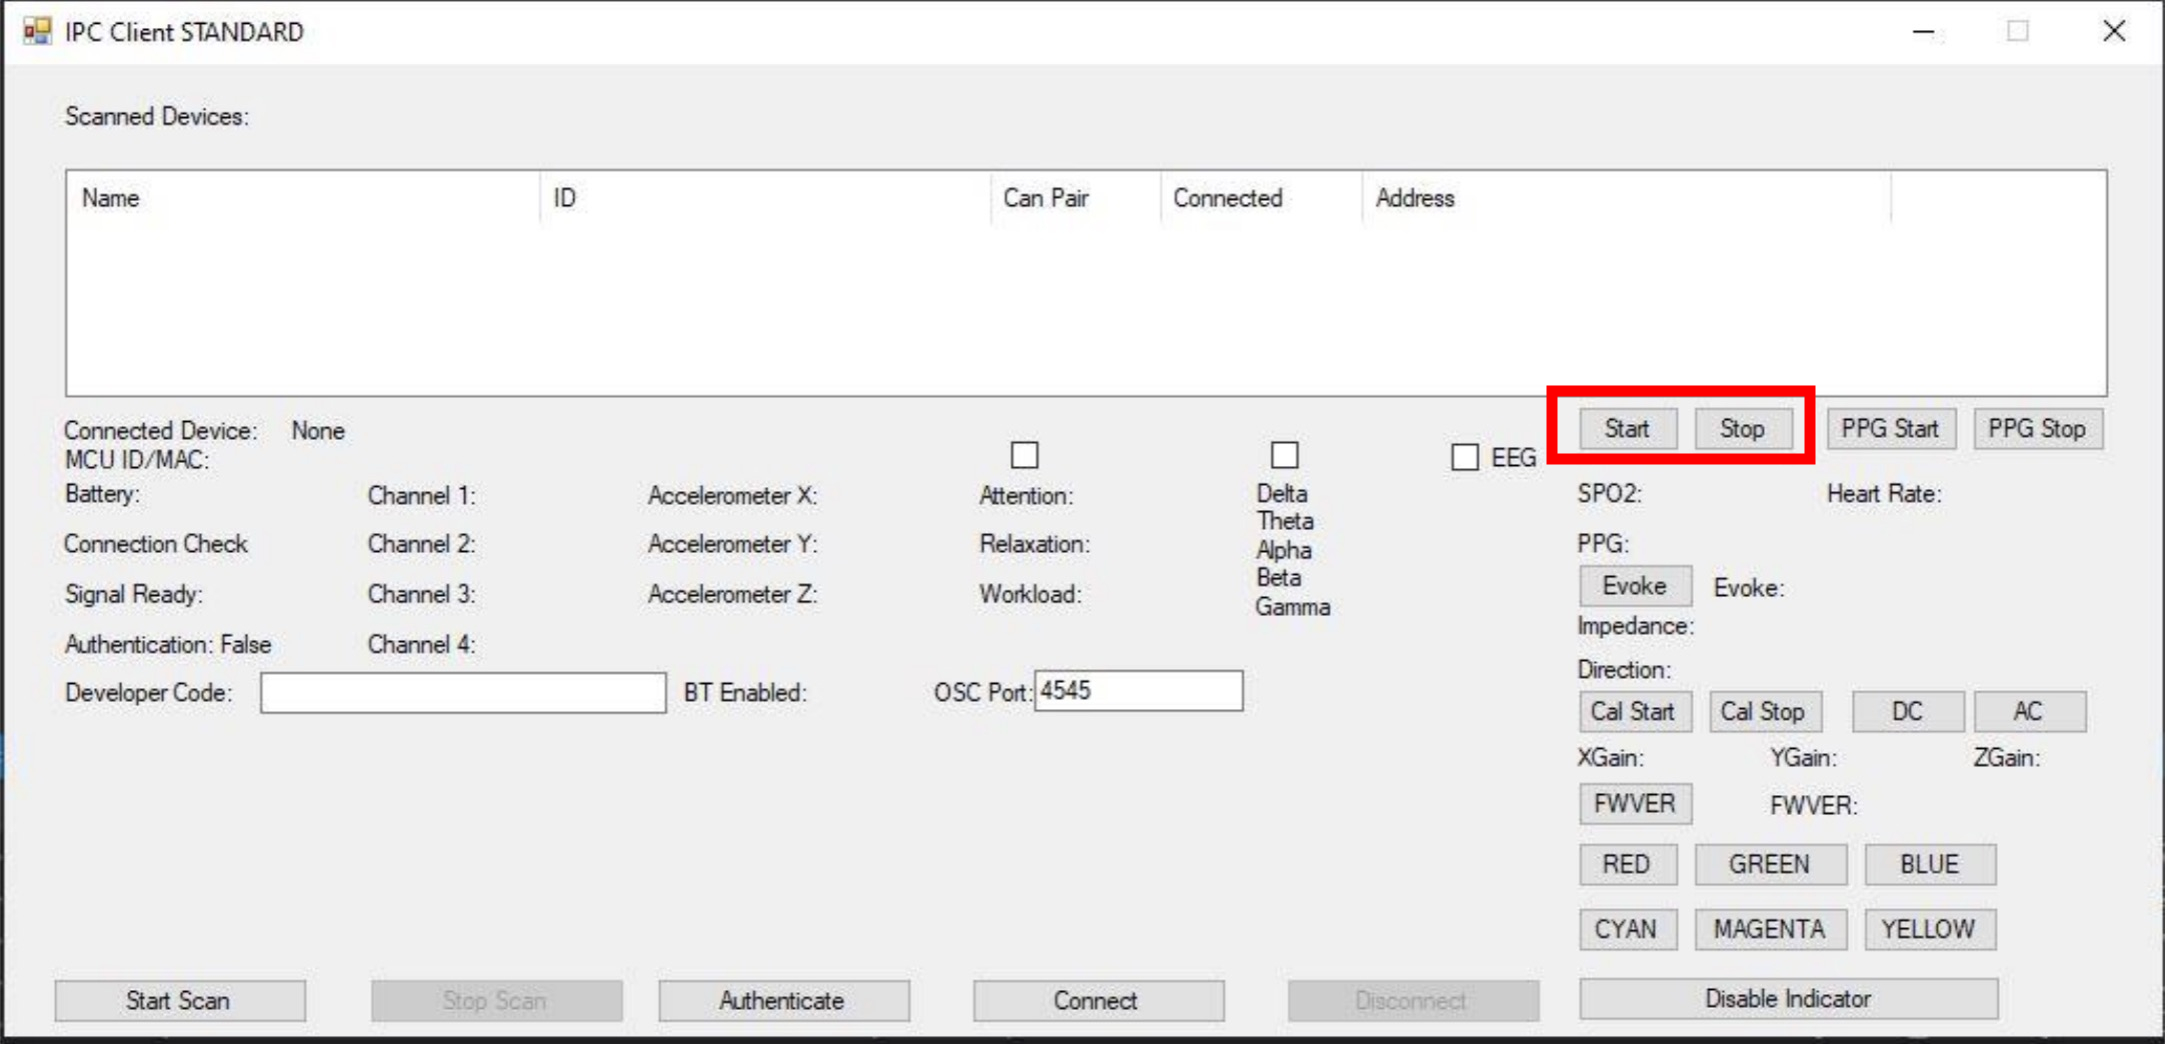
The
Stopbutton stops recording, saving data automatically to a CSV or EDF file at a default location, stated when saving is complete.View the file by accessing the location necessary in the Files app.
void assignAccDelegate(FloatArrayRVoid accDelegateIn);
Name: assignAccDelegate
Parameters: FloatArrayRVoid representing the accelerometer values
Output: None
Definition: Binds the data delegate for accelerometer data. The result is an array of 3 floats for SenzeBand V1 and 6 floats for SenzeBandV2. The first 3 floats hold X,Y,Z components of the force received by the accelerometer. When the device is stationary, the XYZ components will provide the direction of gravity. For SenzeBand V1, each X, Y, Z value range from -2048 to 2048 For SenzeBand V2 the last 3 floats hold X,Y,Z components of orientation.
void assignCalParamsDelegate(FloatArrayRVoid delegateIn);
Name: assignCalParamsDelegate
Parameters: FloatArrayRVoid representing calibration parameters: xGain, yGain and zGain
Output: None
Definition: Binds the data delegate for calibration parameters data.
void assignChannelDelegate(BoolArrayRVoid channelDelegateIn);
Name: assignChannelDelegate
Parameters: BoolArrayRVoid representing 4 channel status boolean data
Output: None
Definition: Binds the data delegate for channel data. Each boolean represents a channel. Each channel may get a strong signal if the sensor is in contact with the forehead. If the channel gets a weak signal, it may be the sensor is not in good contact with the forehead. With the power button facing left, Channel 0 = Center-left, Channel 1 = Center-right, Channel 2 = Right (outer), Channel 3 = Left (outer).
void assignDirectionDelegate(StringRVoid delegateIn);
Name: assignDirectionDelegate
Parameters: StringRVoid representing the receiver delegate
Output: None
Definition: Binds the data delegate for directon data: String value, e.g "", "N", "E", "S", "W", "NE", "SE", "NW", "SW"
void assignEvokeDelegate(IntRVoid delegateIn);
Name: assignEvokeDelegate
Parameters: IntRVoid representing the receiver delegate
Output: None
Definition: Binds the data delegate for time in milliseconds of last evoke event from first EEG data transmission
void assignFilteredDataDelegate(FloatArrayRVoid delegateIn);
Name: assignFilteredDataDelegate
Parameters: FloatArrayRVoid representing the delegate to receive filtered EEG data (1000 ints)
Output: None
Definition: Binds the data delegate for filtered EEG data
void assignImpedanceDelegate(FloatArrayRVoid delegateIn);
Name: assignImpedanceDelegate
Parameters: FloatArrayRVoid representing the delegate to receive array of 4 impedance value in kOhms
Output: None
Definition: Binds the data delegate for 4 channel impedance data
void assignPPGDataDelegate(IntArrayRVoid delegateIn);
Name: assignPPGDataDelegate
Parameters: IntArrayRVoid representing the delegate to receive PPG data. The 1st element is IR and the 2nd element is RED
Output: None
Definition: Binds the data delegate for PPG data
void assignRawData200msDelegate(FloatArrayRVoid delegateIn);
Name: assignRawData200msDelegate
Parameters: FloatArrayRVoid representing the delegate to receive raw EEG data (200 floats), 50 floats for each channel.
Output: None
Definition: Binds the data delegate for raw EEG data 200ms
void assignRawDataDelegate(IntArrayRVoid delegateIn);
Name: assignRawDataDelegate
Parameters: IntArrayRVoid representing the delegate to receive raw EEG data (1000 ints), 250 ints for each channel. Each int value ranges from -2048 to 2047. Every 1 unit represents 0.61 microvolt.
Output: None
Definition: Binds the data delegate for raw EEG data
void assignSPO2HeartRateDelegate(IntArrayRVoid delegateIn);
Name: assignSPO2HeartRateDelegate
Parameters: IntArrayRVoid representing the delegate to receive int array in form of [SPO2, HeartRate, HeartRateValue].
Output: None
Definition: Binds the data delegate for SPO2, heart rate and heart rate detected value. Heart rate detected value is either 0 (sensor is not touched) or 1 (sensor is touched).
void getAuthenticationResult(String address, String result, String message)
Name: getAuthenticationResult
Parameters:
- String representing the address of the device authenticated
- String representing the http status of the authentication
- String representing the message of the authentication 200 : Success. 404 : Developer code is not found
Output: None
Definition: A callback that sends in the authentication result, called when {NativeNSBInterface::authenticateUser} has been called.
void timeUp(Object obj)
Name: timeUp
Parameters: Object representing object being authenticated
Output: None
Definition: A callback that returns when the time given to use the SenzeBand is up. Generally, authentication is done automatically. However, due to factors such as unstable/no Internet connection or an unlikely network error, establishing connection to Neeuro's server may fail. In that case, the time allocated to use the SenzeBand will end. This method will be called once the time frame for authentication is up. To continue using the SenzeBand, you should call {NativeNSBInterface::authenticateUser}.
void initializeSBWI(StringStringBoolRVoid connectedCallBackFunction, StringRVoid setBluetoothDeviceNotConnectFunction, String developerCode, VoidRVoid completedCB = null, StringRVoid errorLog = null)
Name: initializeSBWI
Parameters:
- connectedCallBack: Callback function when a Neeuro SenzeBand connection is completed. The callback will receive: bluetooth address string, mac address string and a boolean hasExistingConnection
- connectFailCallBack: Callback function when the connection fails to succeed. The callback will receive: bluetooth address string
- developerCode: Required for authentication
- completedInitialization: Callback function when the setup (of initialisation) is completed
- errorLog: Callback function when there is an internal system error logged. The callback will receive: log message string
Output: None
Definition: Initialises systems
bool sendCommand(String command)
Name: sendCommand
Parameters: String representing the command to send
Possible String commands include:
COMMAND_START- for starting EEGCOMMAND_STOP- for stopping EEGCOMMAND_PPG_START- start sending ppg dataCOMMAND_PPG_STOP- stop sending ppg dataCOMMAND_AC_LEADOFF- for turning ON impedance check modeCOMMAND_DC_LEADOFF- for turning OFF impedance check modeCOMMAND_LIGHT_RED- sets SenzeBand device light to red colorCOMMAND_LIGHT_GREEN- sets SenzeBand device light to green colorCOMMAND_LIGHT_BLUE- sets SenzeBand device light to blue colorCOMMAND_LIGHT_CYAN- sets SenzeBand device light to cyan colorCOMMAND_LIGHT_MAGENTA- sets SenzeBand device light to magenta colorCOMMAND_LIGHT_YELLOW- sets SenzeBand device light to yellow colorCOMMAND_STOP_RGB- stops light commandsCOMMAND_FW_VER- command for getting the firmware version of SenzeBand deviceCOMMAND_CAL_START- start calibration for acceleration and orientation to improve accuracyCOMMAND_CAL_STOP- stop calibrationCOMMAND_CMD_FA- evoke event
Output: Boolean representing the success of sending the command
Description: Send command to SenzeBand device
void startScanning(scanCB scanCallBack, updateDeviceCB scannedDeviceUpdateCB, VoidRVoid enumerationCompletedCB)
Name: startScanning
Parameters:
- scanCallBack: Callback for detecting a Neeuro SenzeBand added or removed in the scan list
- scannedDeviceUpdateCB: Callback when a property change is detected in the scan list (eg. when a SenzeBand becomes connected)
- enumerationCompletedCB: Callback when the scanning process is completed
Output: None
Definition: Signal plugin to start scanning for SenzeBands
delegate void scanCB (ScannedDeviceClass scanCallBack, bool addDevice)
delegate void updateDeviceCB (ScannedDeviceClass scanCallBack)
delegate void VoidRVoid ()
delegate void StringRVoid (string stringIn)
delegate void IntRVoid (int intIn)
delegate void StringBoolRVoid (string stringIn, bool boolIn)
delegate void StringStringRVoid (string stringIn, string stringIn2)
delegate void StringStringBoolRVoid (string stringIn, string stringIn2, bool boolIn)
delegate void FloatRVoid (float floatIn)
delegate void FloatArrayRVoid (float[] floatArrayIn)
delegate void Float2DArrayRVoid (float[,] float2DArrayIn)
delegate void IntArrayRVoid (int[] floatArrayIn)
delegate void BoolRVoid (bool boolIn)
delegate void BoolArrayRVoid (bool[] boolArrayIn)
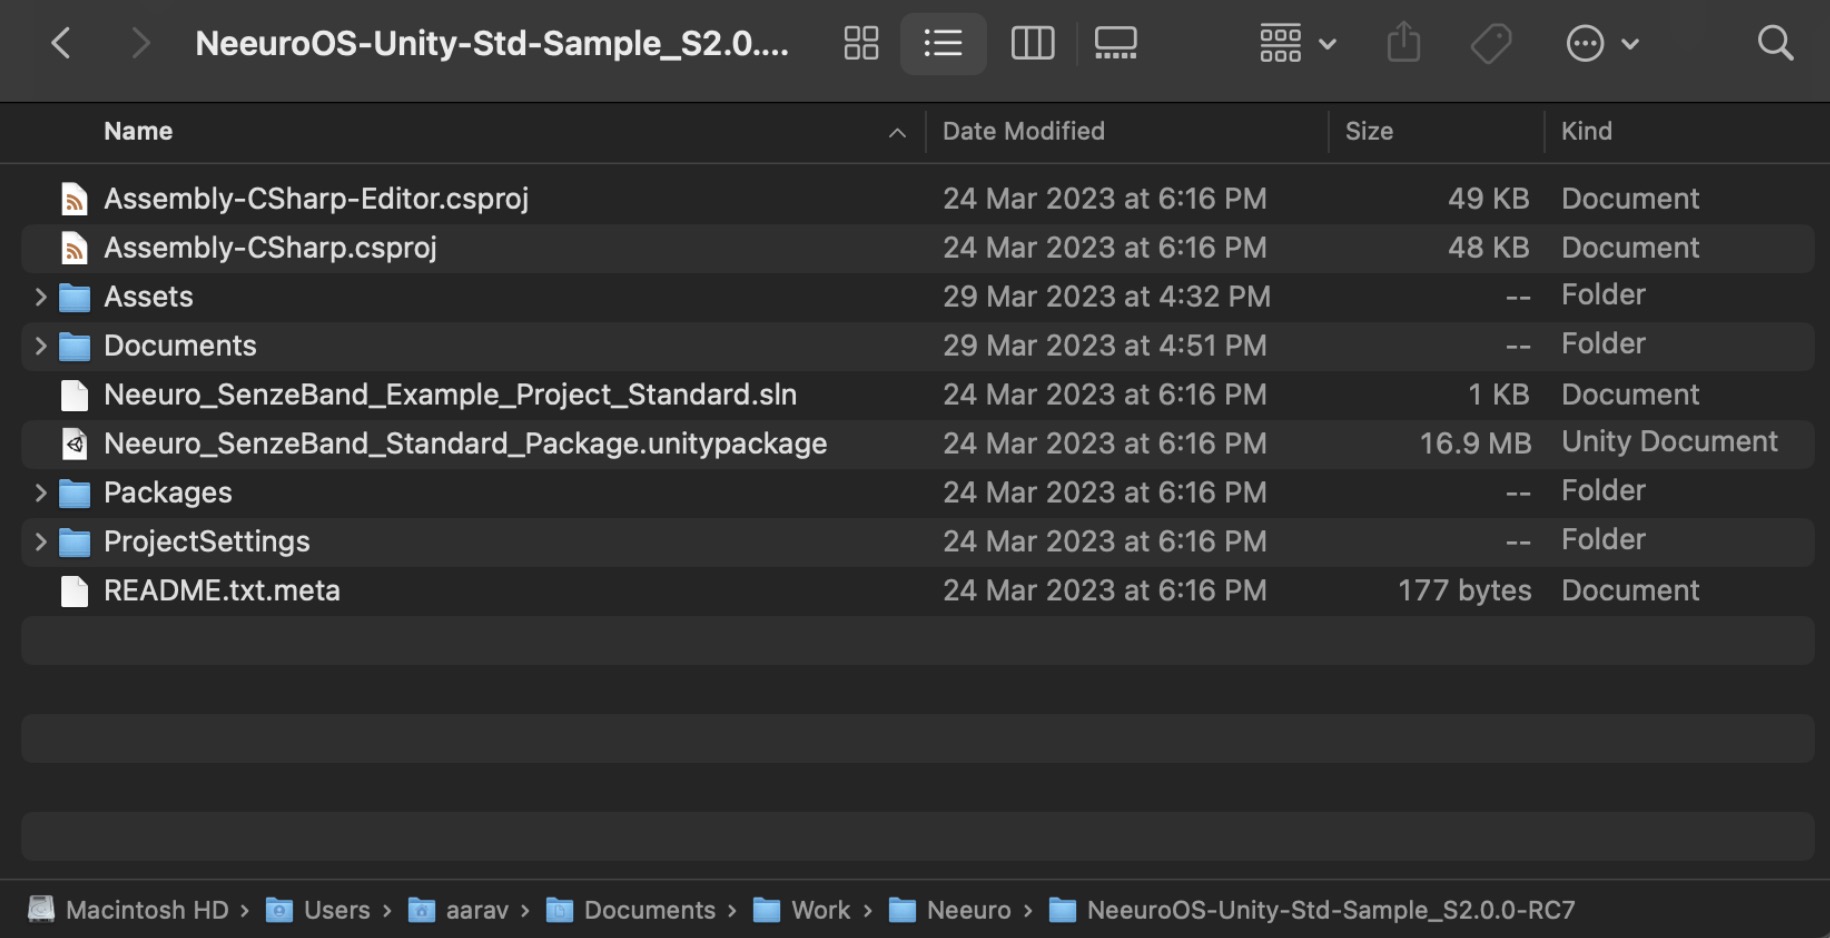
Unzip the SDK folder and make sure all these files are inside. Neeuro_SenzeBand_Example_Project is a sample Unity project that contains a SenzeBand control panel scene to show what the Neeuro SenzeBand can do. Coded with comments on how to use the SDK, using Unity 2022.2.4f1.
Start by importing the asset package into your scene.
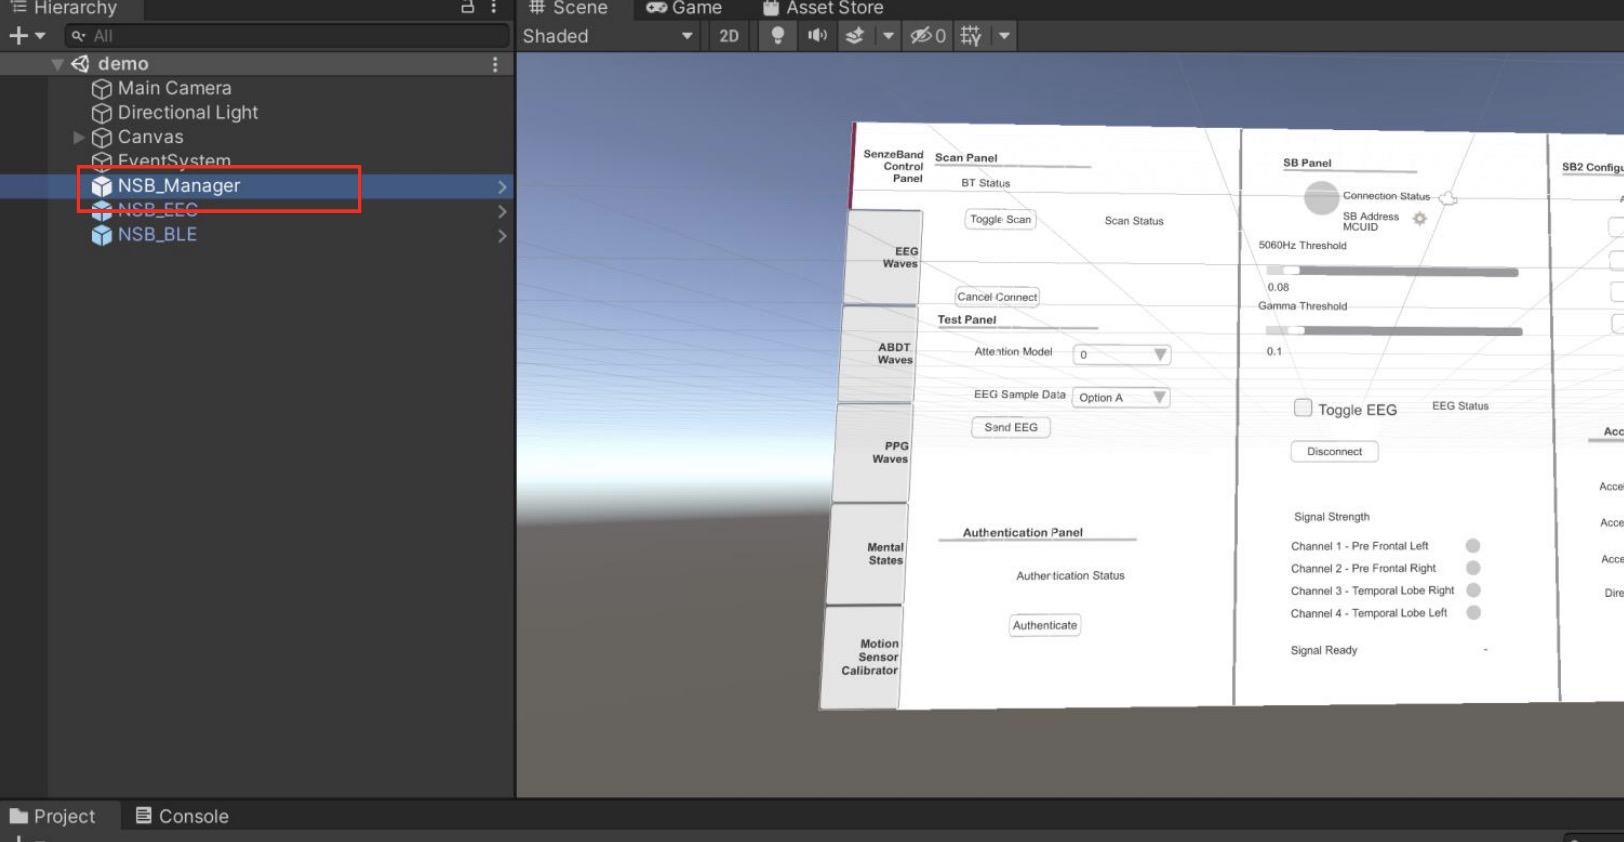
Make sure that the prefabs "NSB_BLE", "NSB_EEG" and "NSB_Manager" are in your scene. The prefabs are in Project window > Assets > NSB_SDK > Prefabs. They have scripts NSB_BLE.cs, NSB_EEG.cs and NSB_Manager.cs respectively. These are required to be able to communicate with the SenzeBand plugin.

Check that NSBAndroidStandard.dll, NSBIOSStandard.dll, NSBWindowsStandard.dll and SenzeBandWindowsIPC_ClientDLL.dll are inside folder /Assets/NSB_SDK/DLL.
Check that NSBAndroidUnityPlugin-standard-release.aar and AndroidManifest.xml are in folder/Assets/Plugins/Android.
Check that IOSBLERobot.framework is in folder /Assets/Plugins/IOS.

Check that win_res folder and win_res.zip are in folder /Assets/.
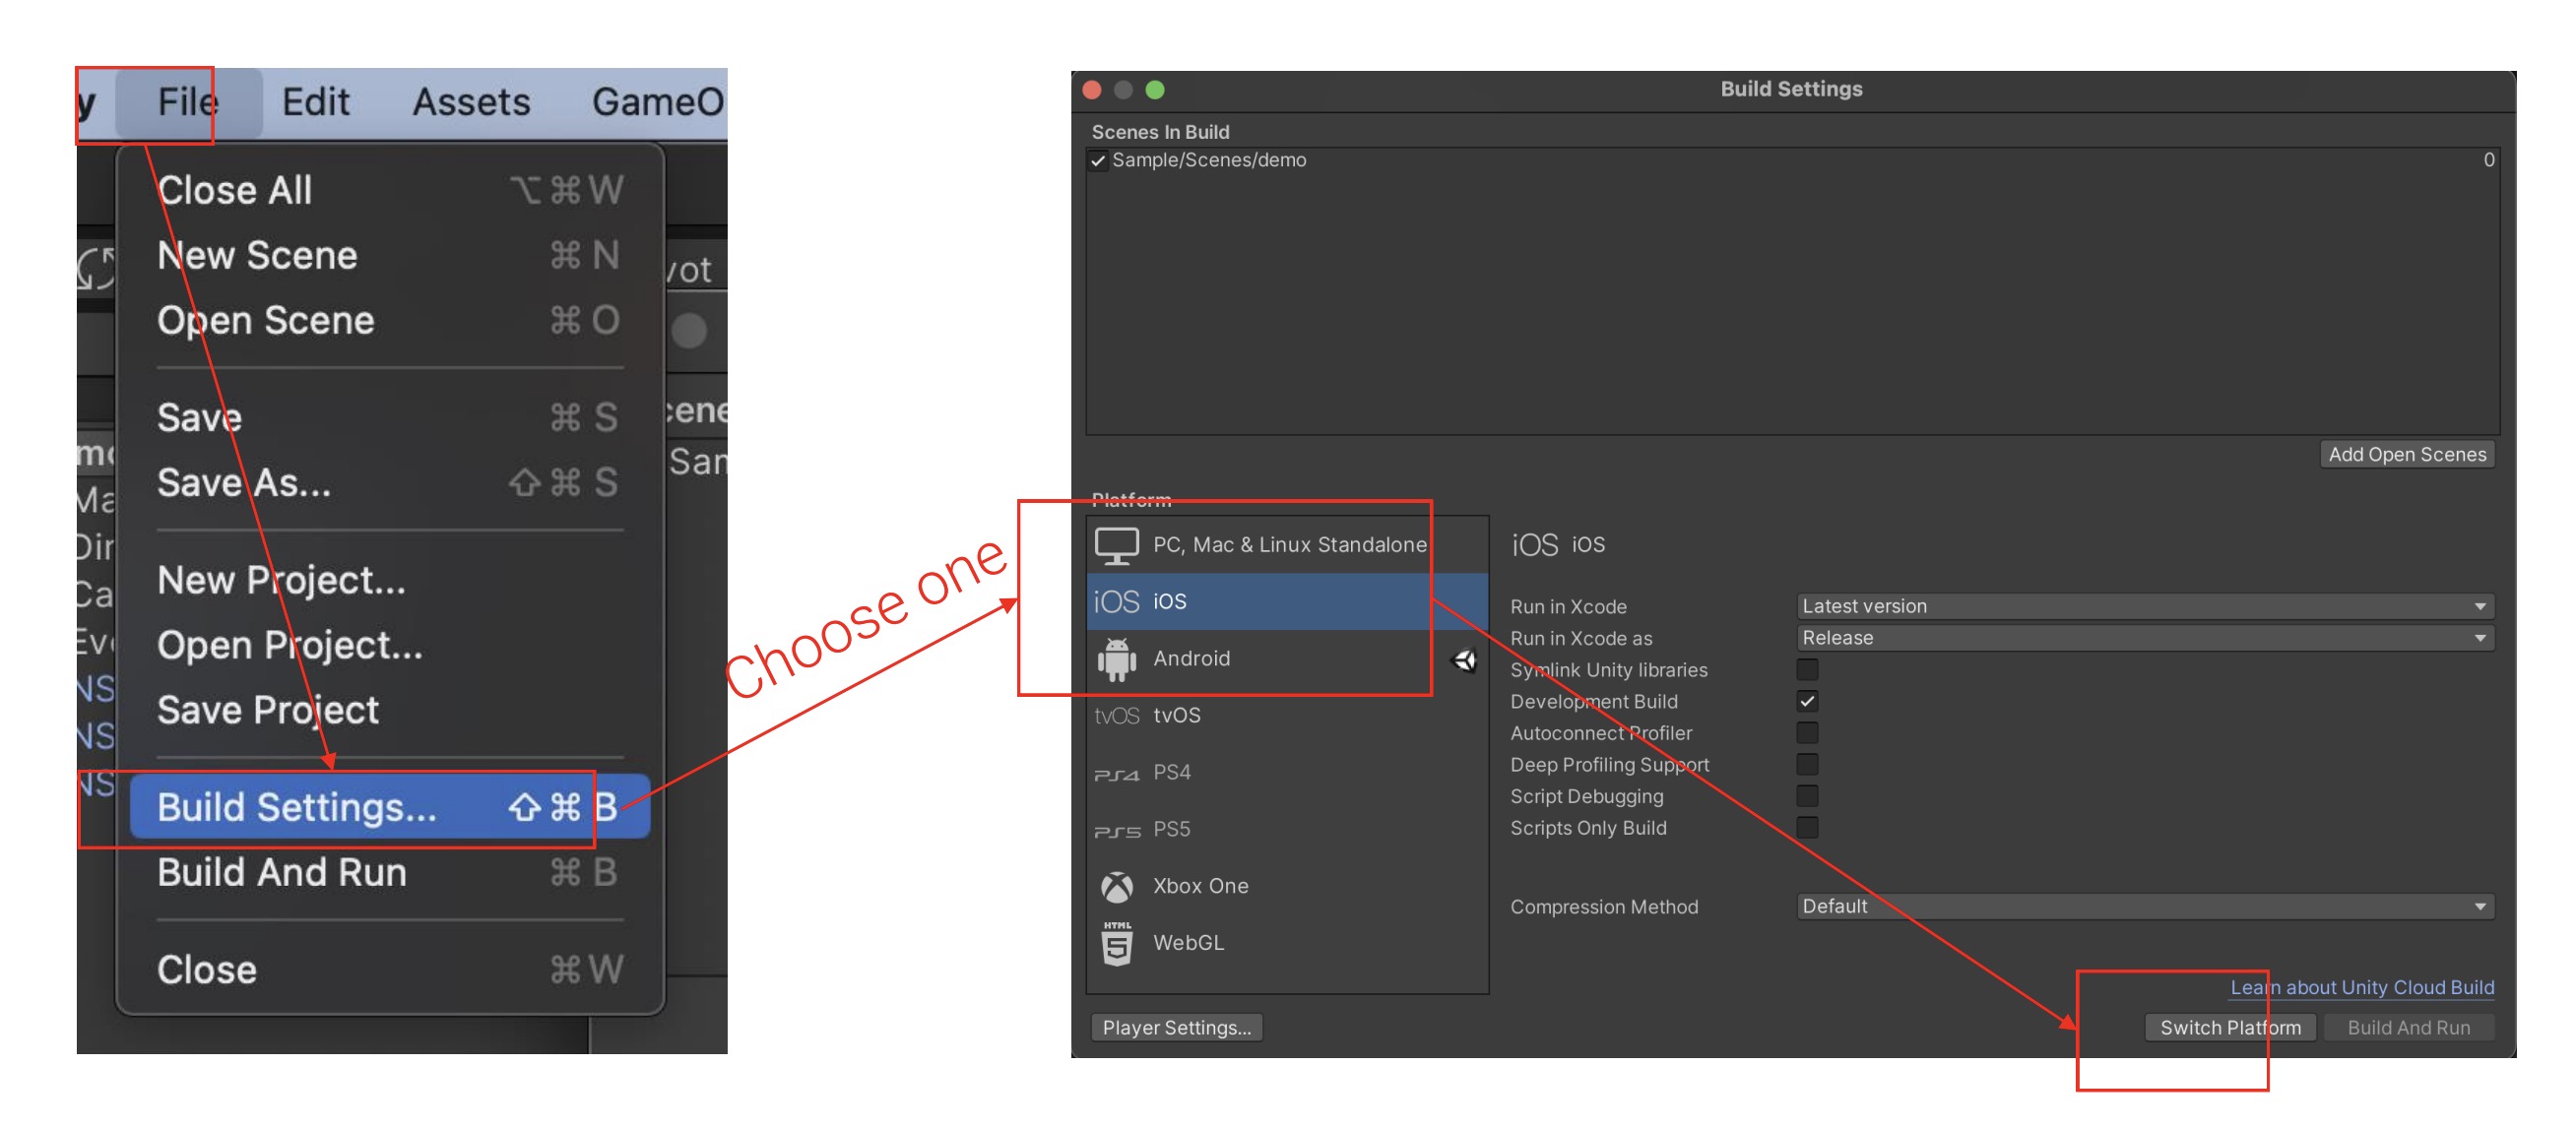
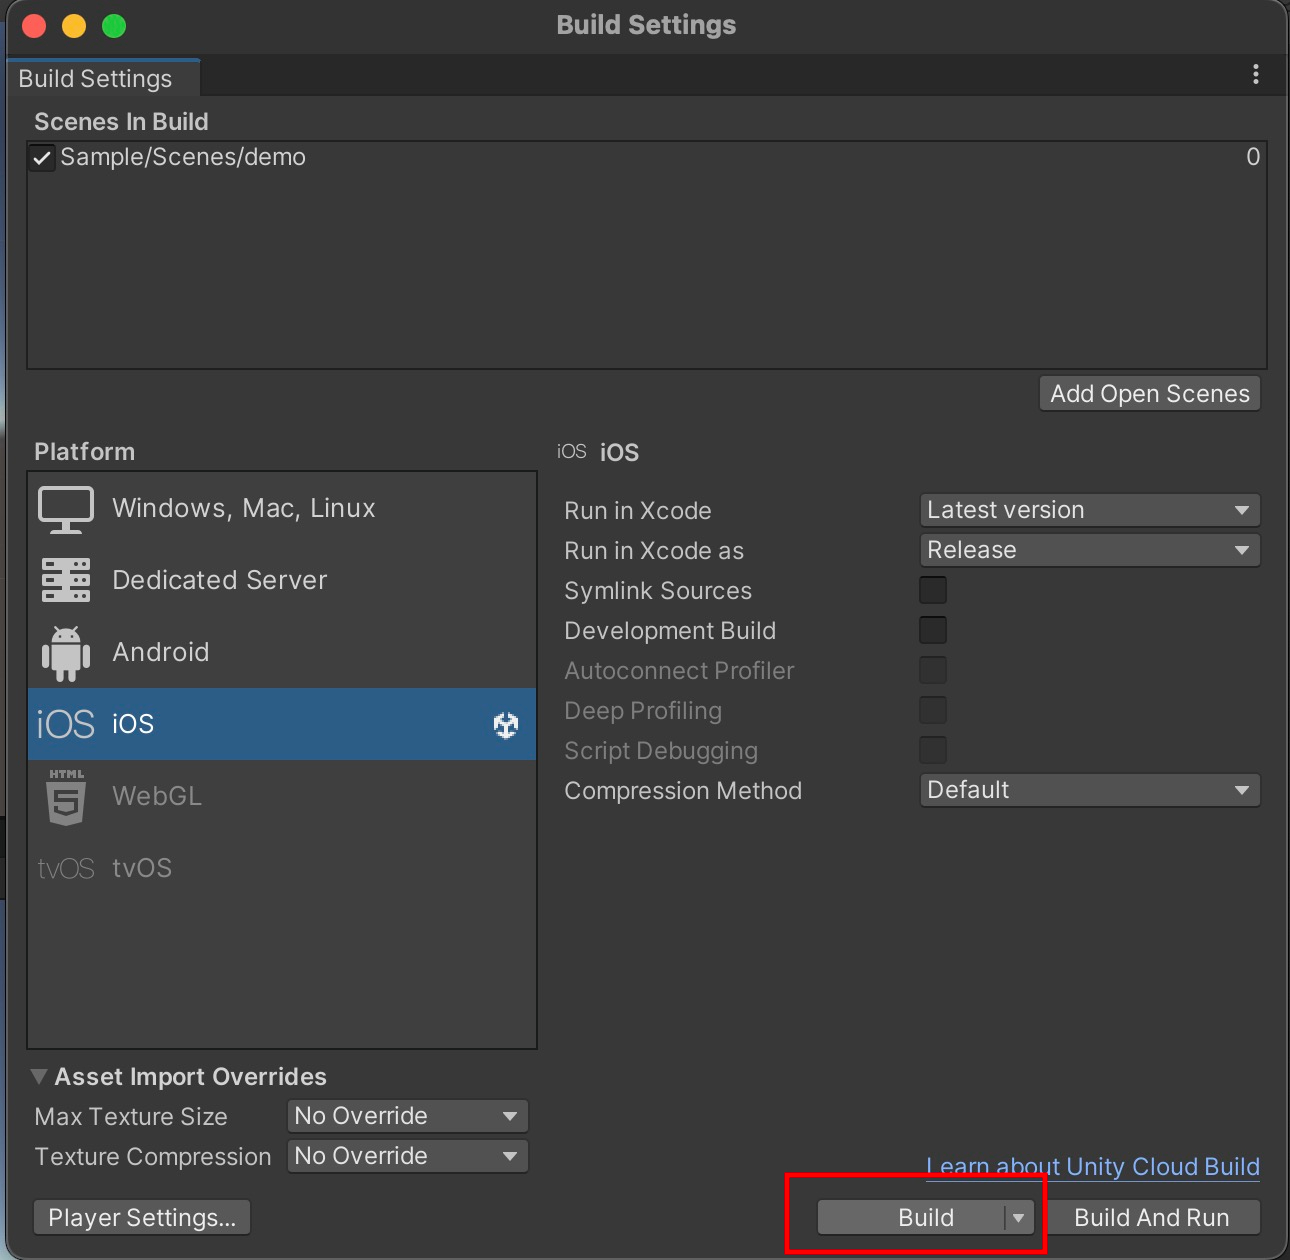
Under Unity Editor's Build Settings, switch your platform to Android, iOS or Windows.
You can now start developing using the SDK!
The following functions are provided for handling the SenzeBand plugin:
- The ForceAskPermission and PermissionCanvas will be used for triggering permission popups for Android and IOS devices so the app can use Bluetooth services.
- ForceAskPermission will be in charge of enabling the NSB_BLE, NSB_EEG, and NSB_Manager objects after Bluetooth services are allowed for the app.
- Feel free to edit the EnablePermissionsPopup_Android and EnablePermissionsPopup_iOS according to your app design and identification.
The set up instructions below include how to enter the provided Developer Code in the NSB_Manager game object. The AuthenticationResult delegate will receive a True value when authentication succeeds. Please also ensure your device has an internet connection and that all system requirements are met.
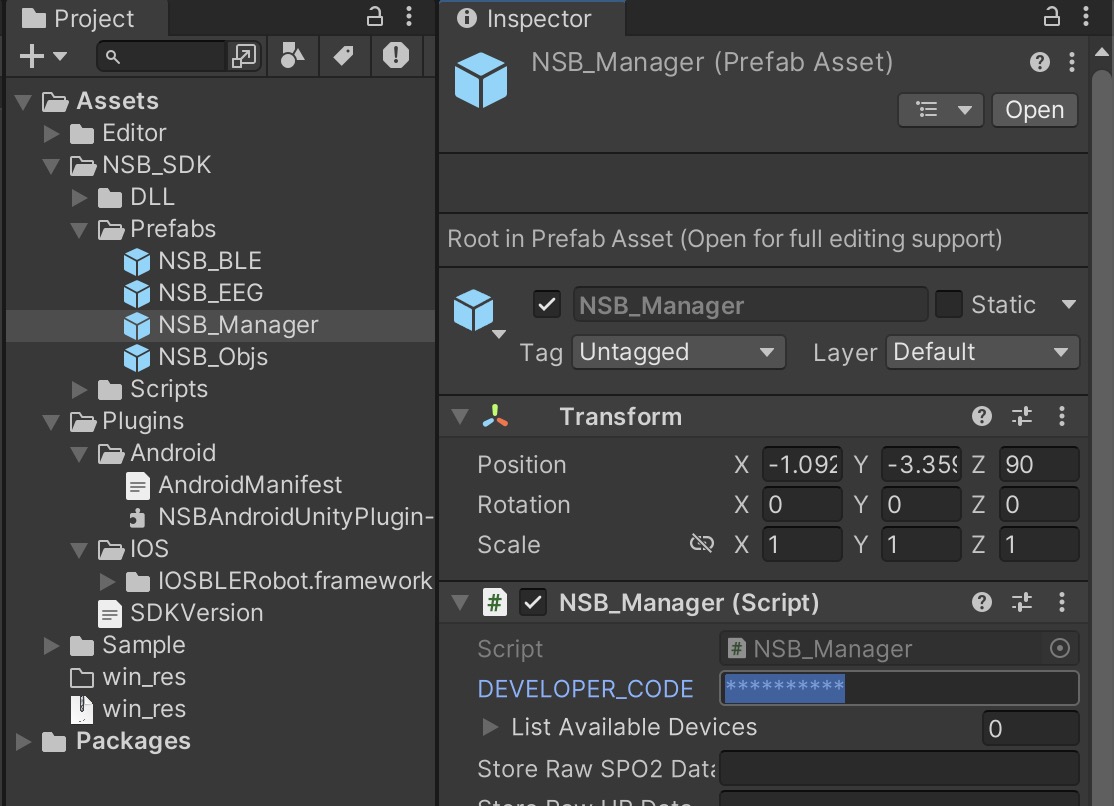
- Select prefab "NSB_Manager" in Project window > Assets > NSB_SDK > Prefab.
- Look for DEVELOPER_CODE under NSB_Manager (Script) in the inspector window.
- Set it to your Developer Code.
The following helper functions are also provided for handling the Developer Code:
- In NSB_Manager.cs, GetAuthenticationStatus() will retrieve whether the app is successful with authenticating with Neeuro's Server. Required to have authentication in order to obtain the data from the SenzeBand (EEG data, mental states, frequency bands, and accelerometer values). At every connection to SenzeBand, the app will try to authenticate. Hence, it is necessary to have Internet connection.
- In NSB_Manager.cs, there is a UnityEvent called authenticationUpdated that is triggered when authentication result is sent from SenzeBand to Unity or every second after authentication is successful. In the sample, it is used to show how many seconds left before authentication expires.
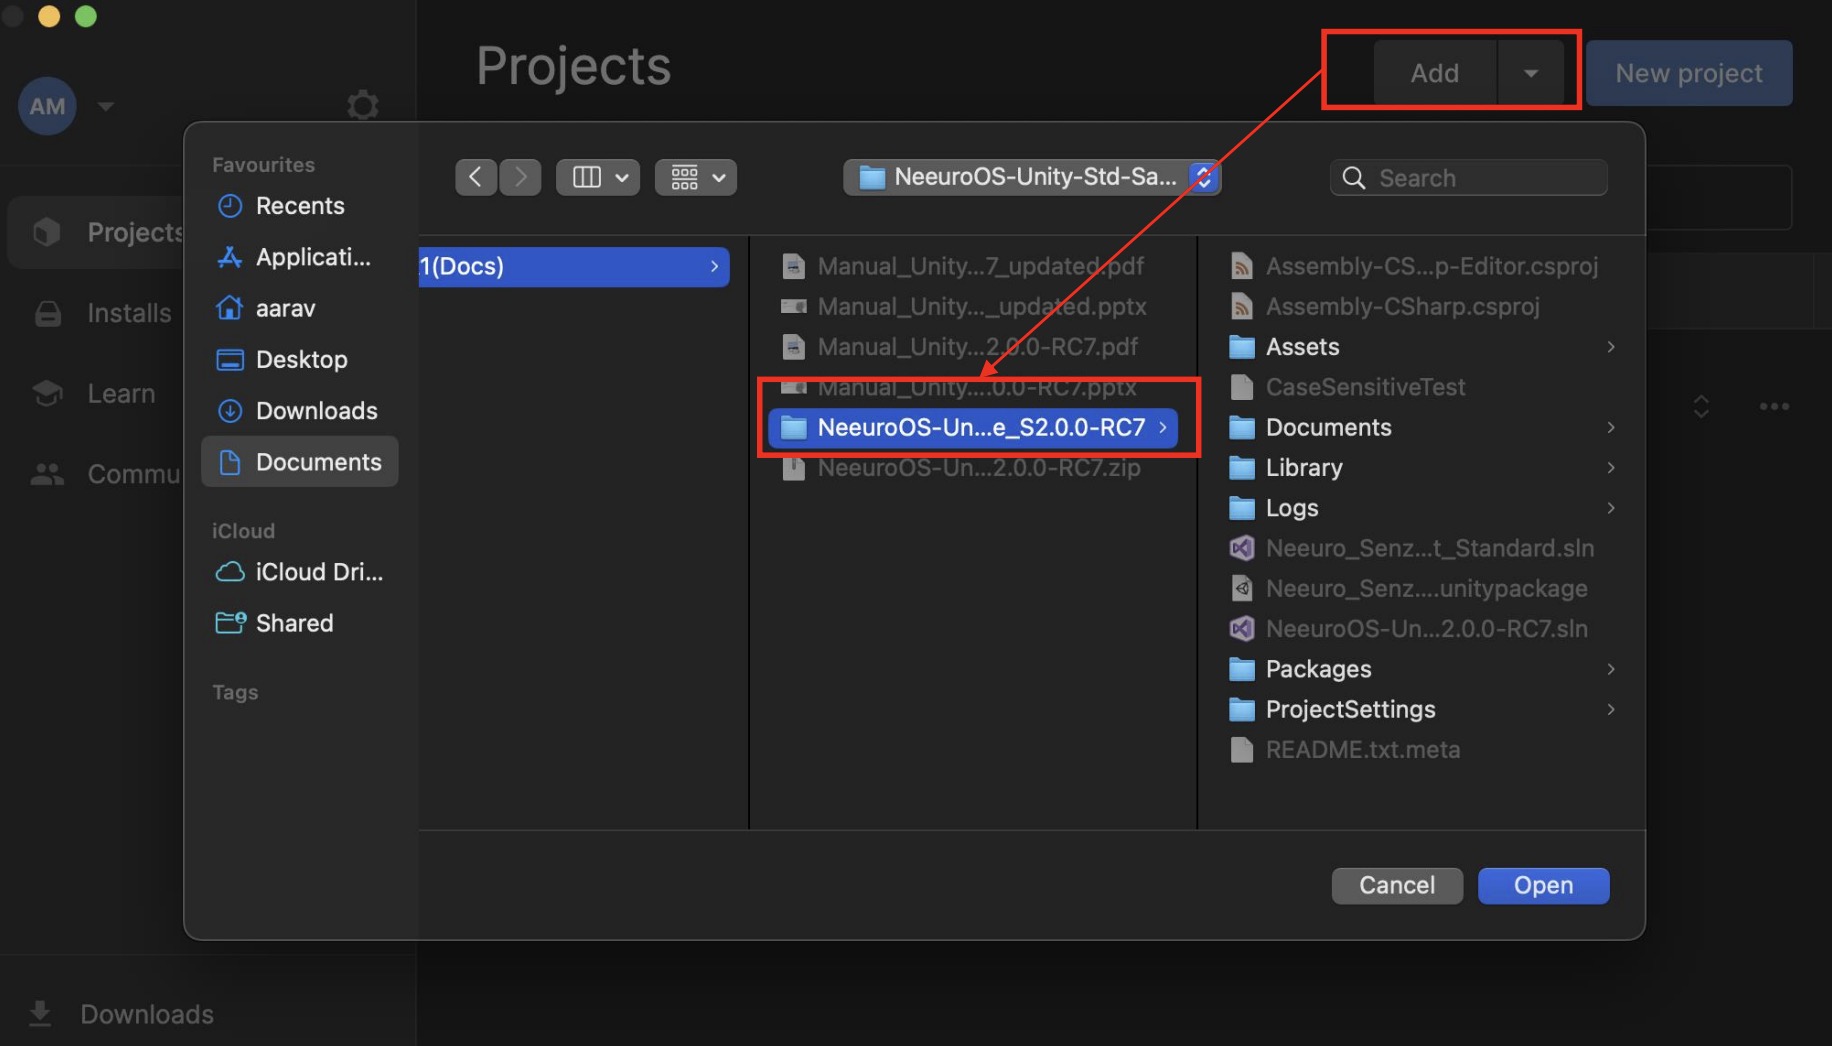
Use Unity to open the project folder.
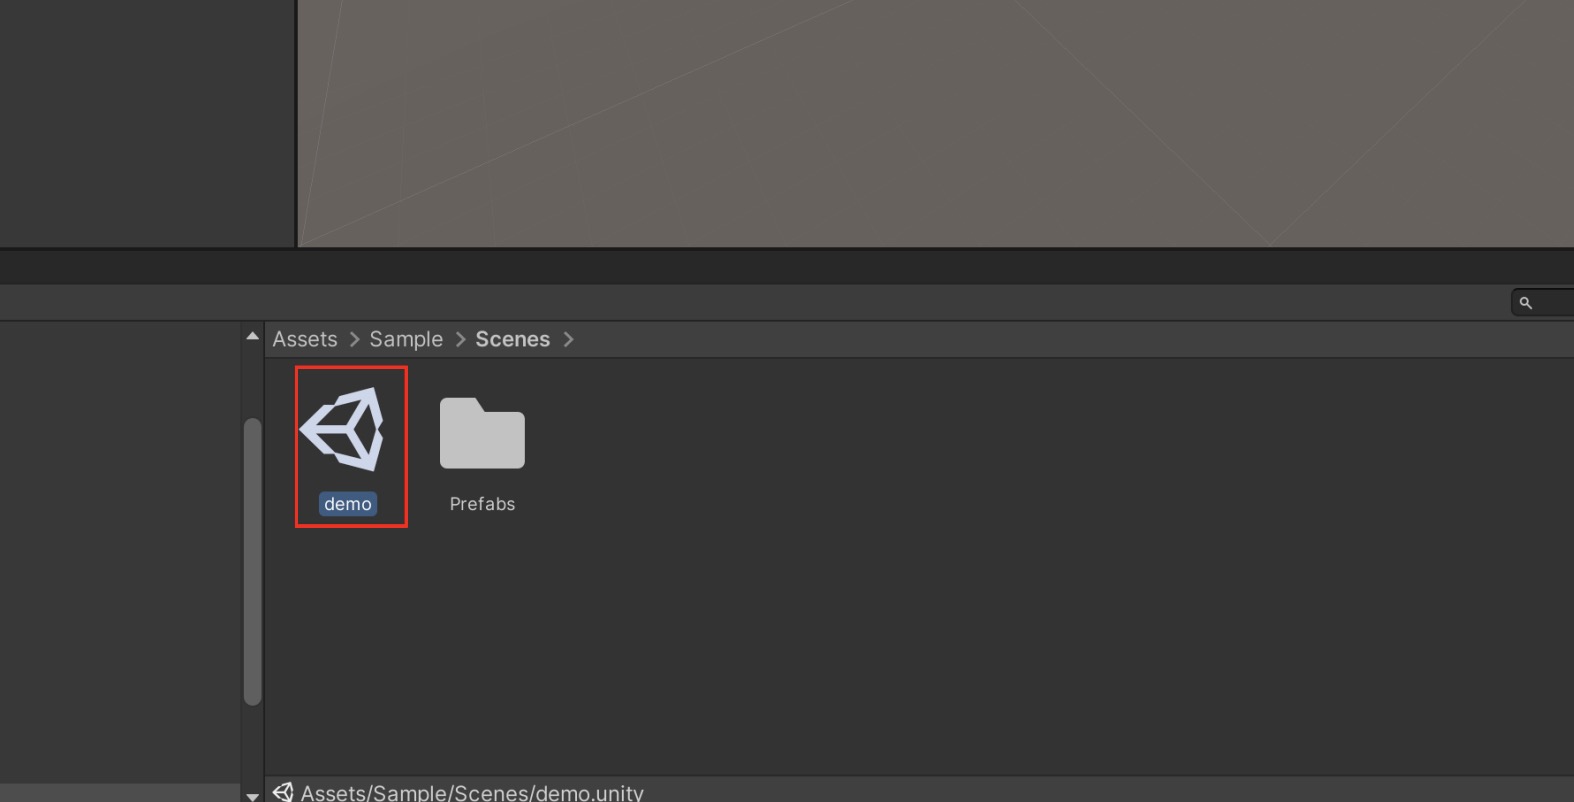
Open "Demo" scene.
The GameObject NSB_Objs contains the required objects to communicate with the plugin.
The GameObject NSB_Manager is the main point to control and receive Mental State data. It communicates with the plugin via NSB_EEG and NSB_BLE.
Under Unity Editor's Build Settings, switch your platform to Android, iOS or Windows.
Follow the next set of instructions for building onto the platforms.
The ForceAskPermission function is what enables Bluetooth services for Android and iOS. It asks for permission from the OS to utilize Bluetooth.
Missing editor version error
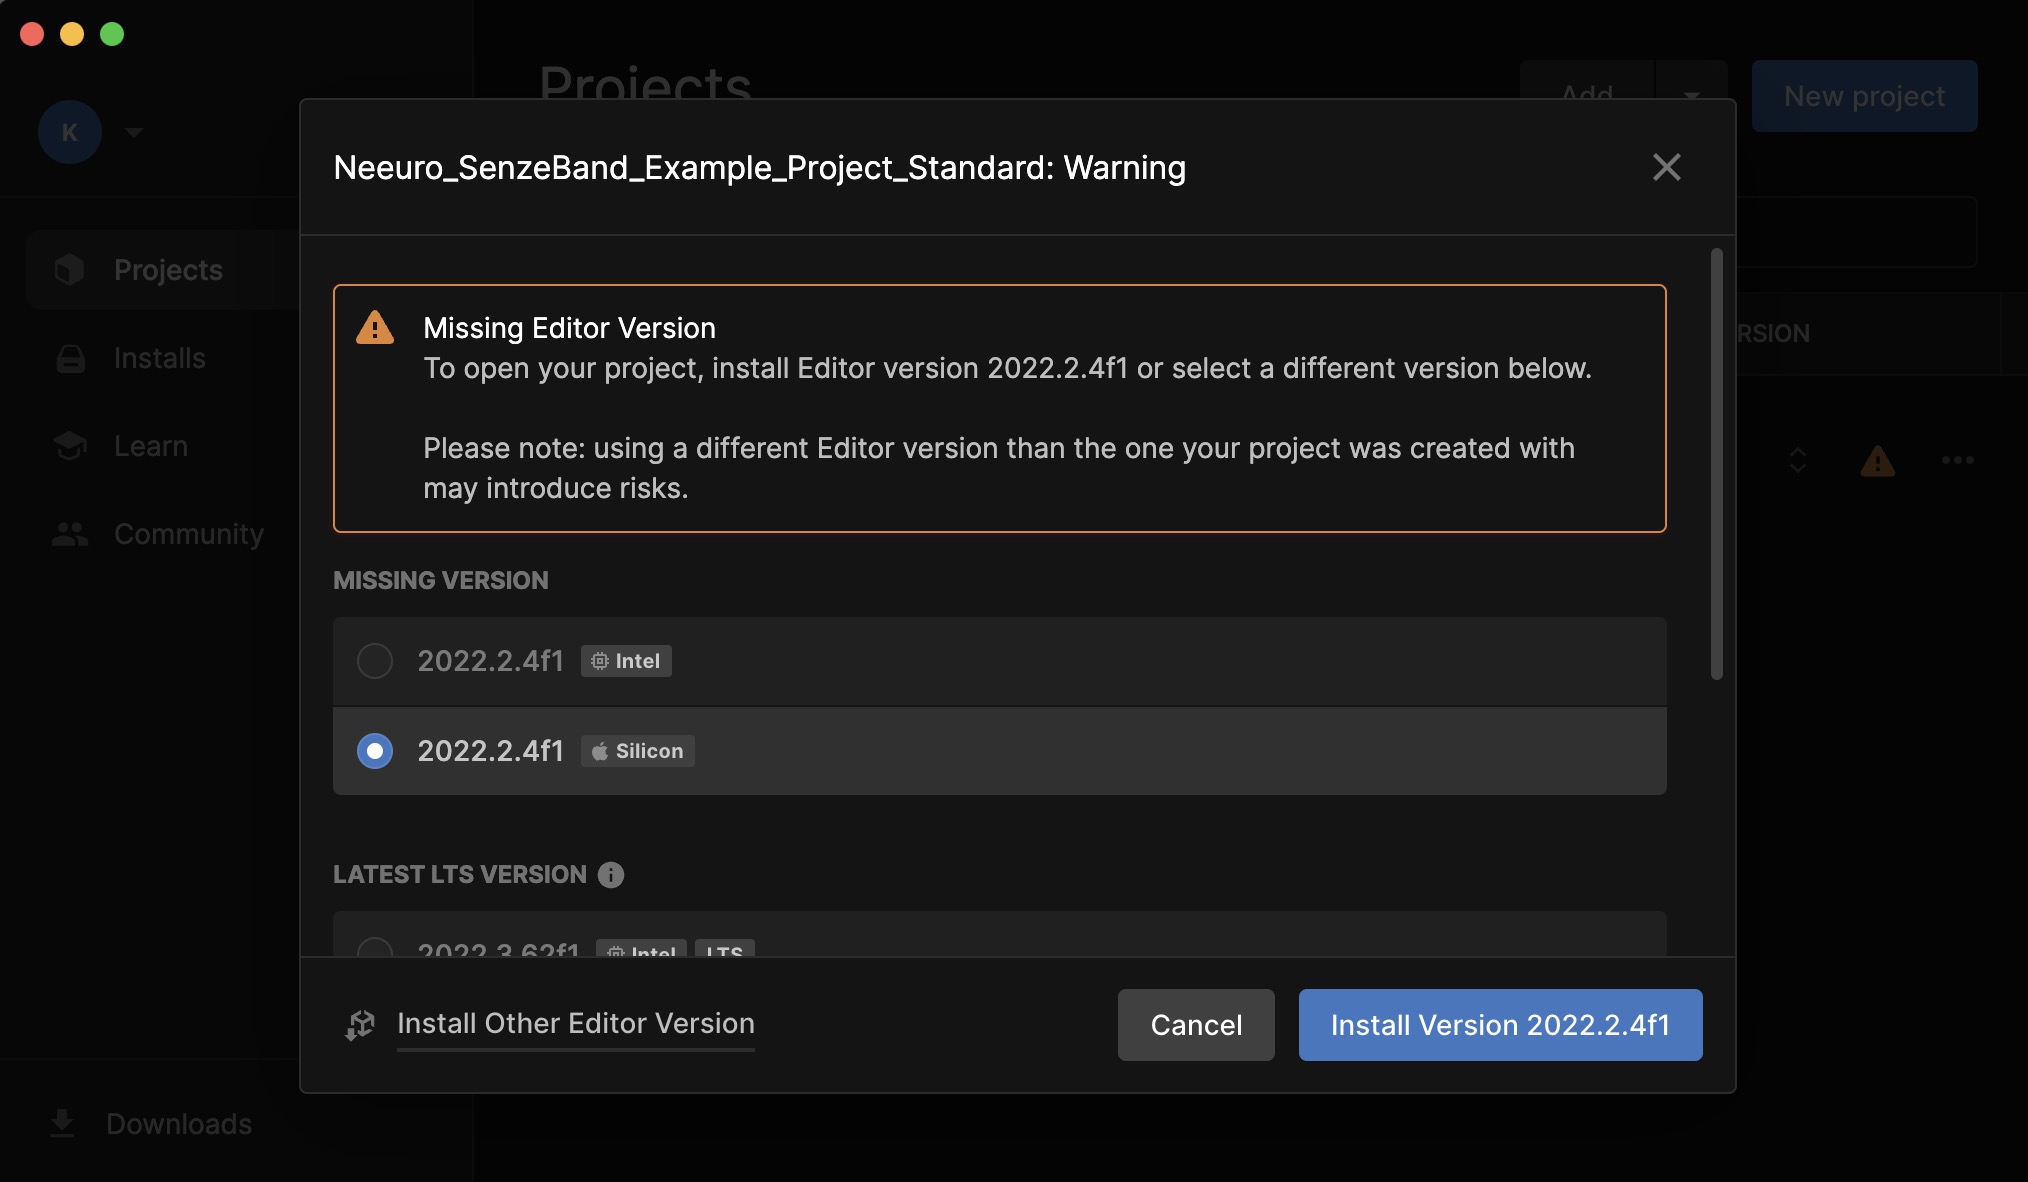 Install the missing version of the editor before trying again.
Enter safe mode? The project you are opening contains compilation errors.
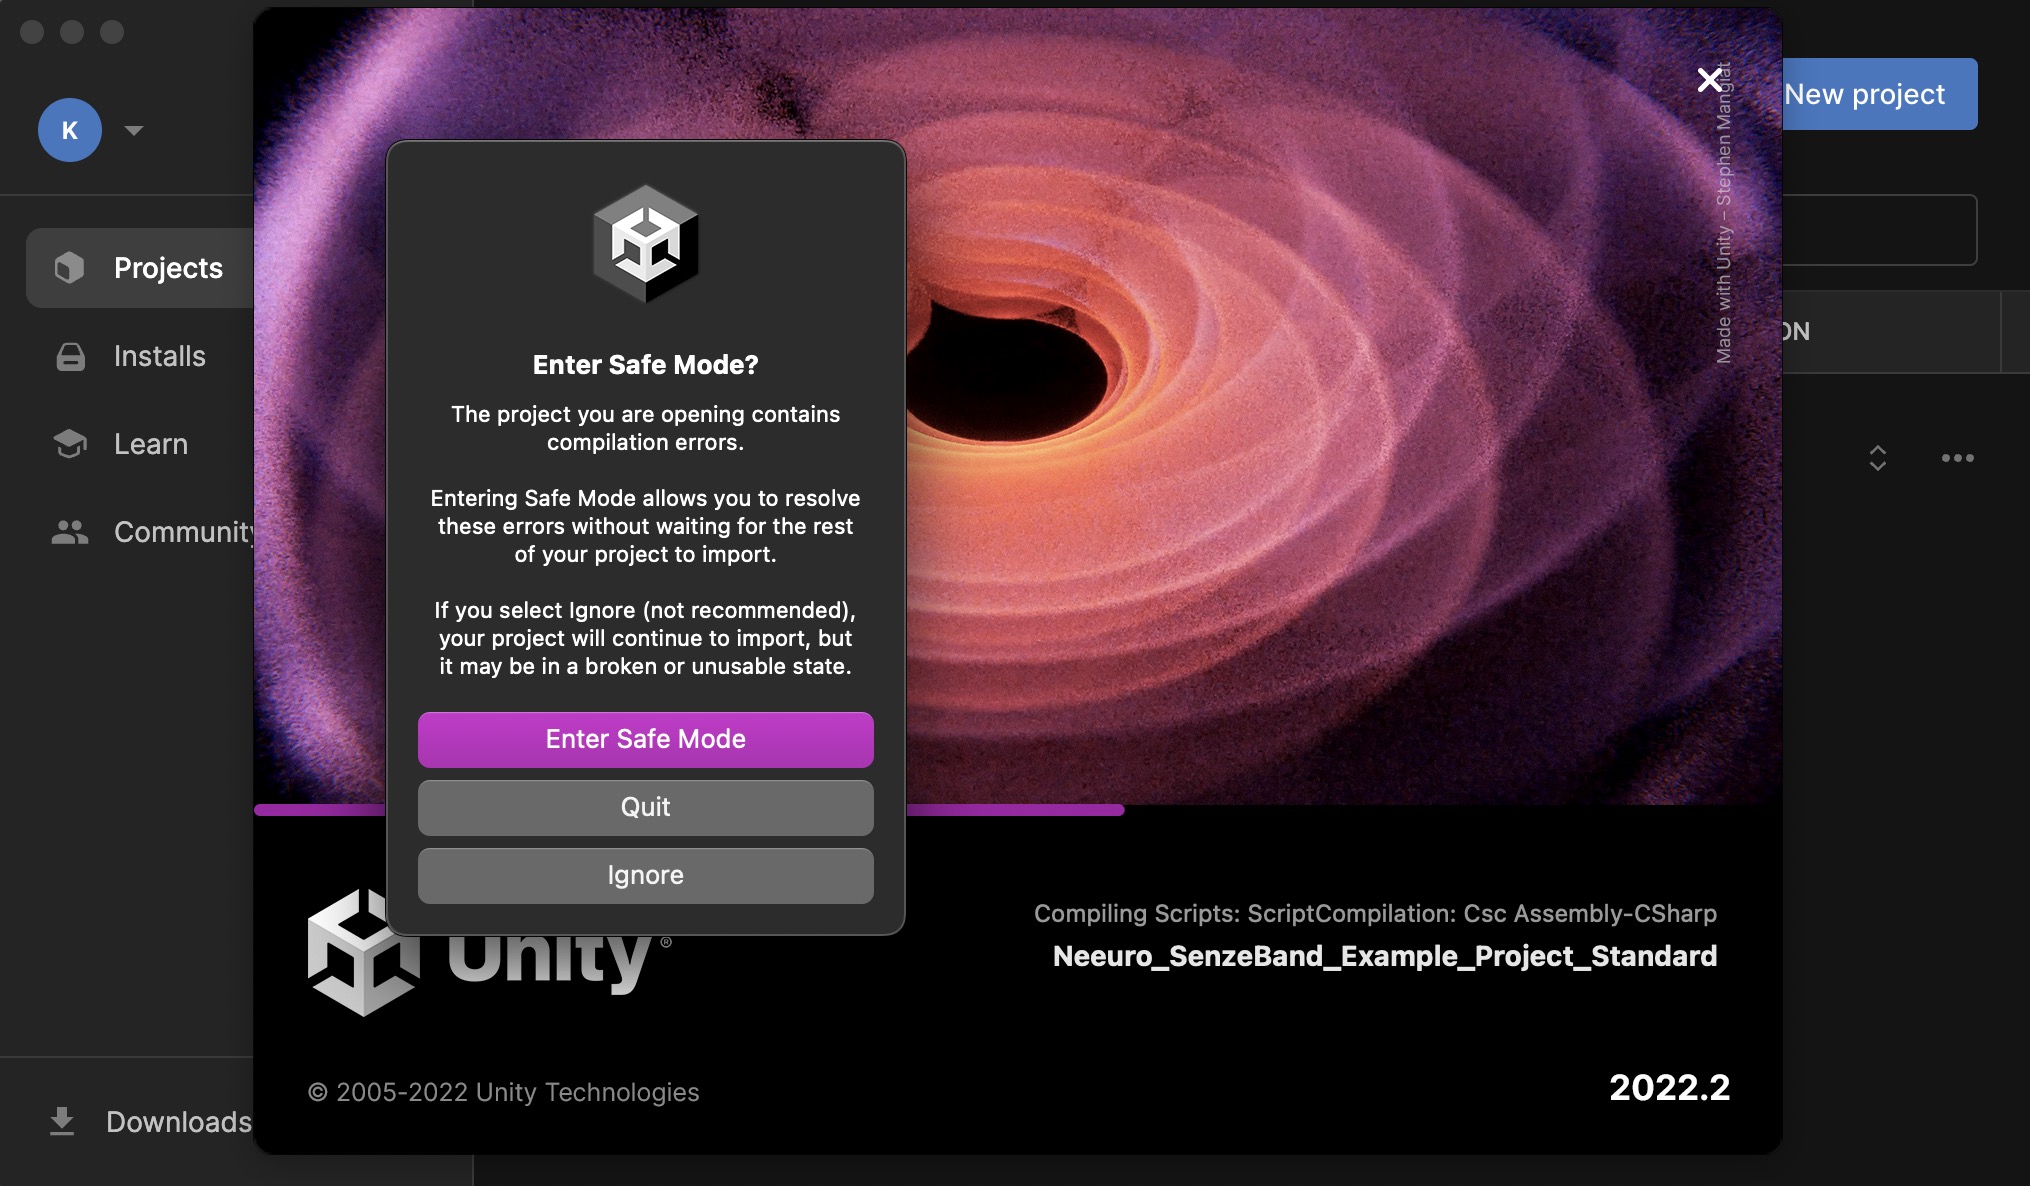 Press enter safe mode.
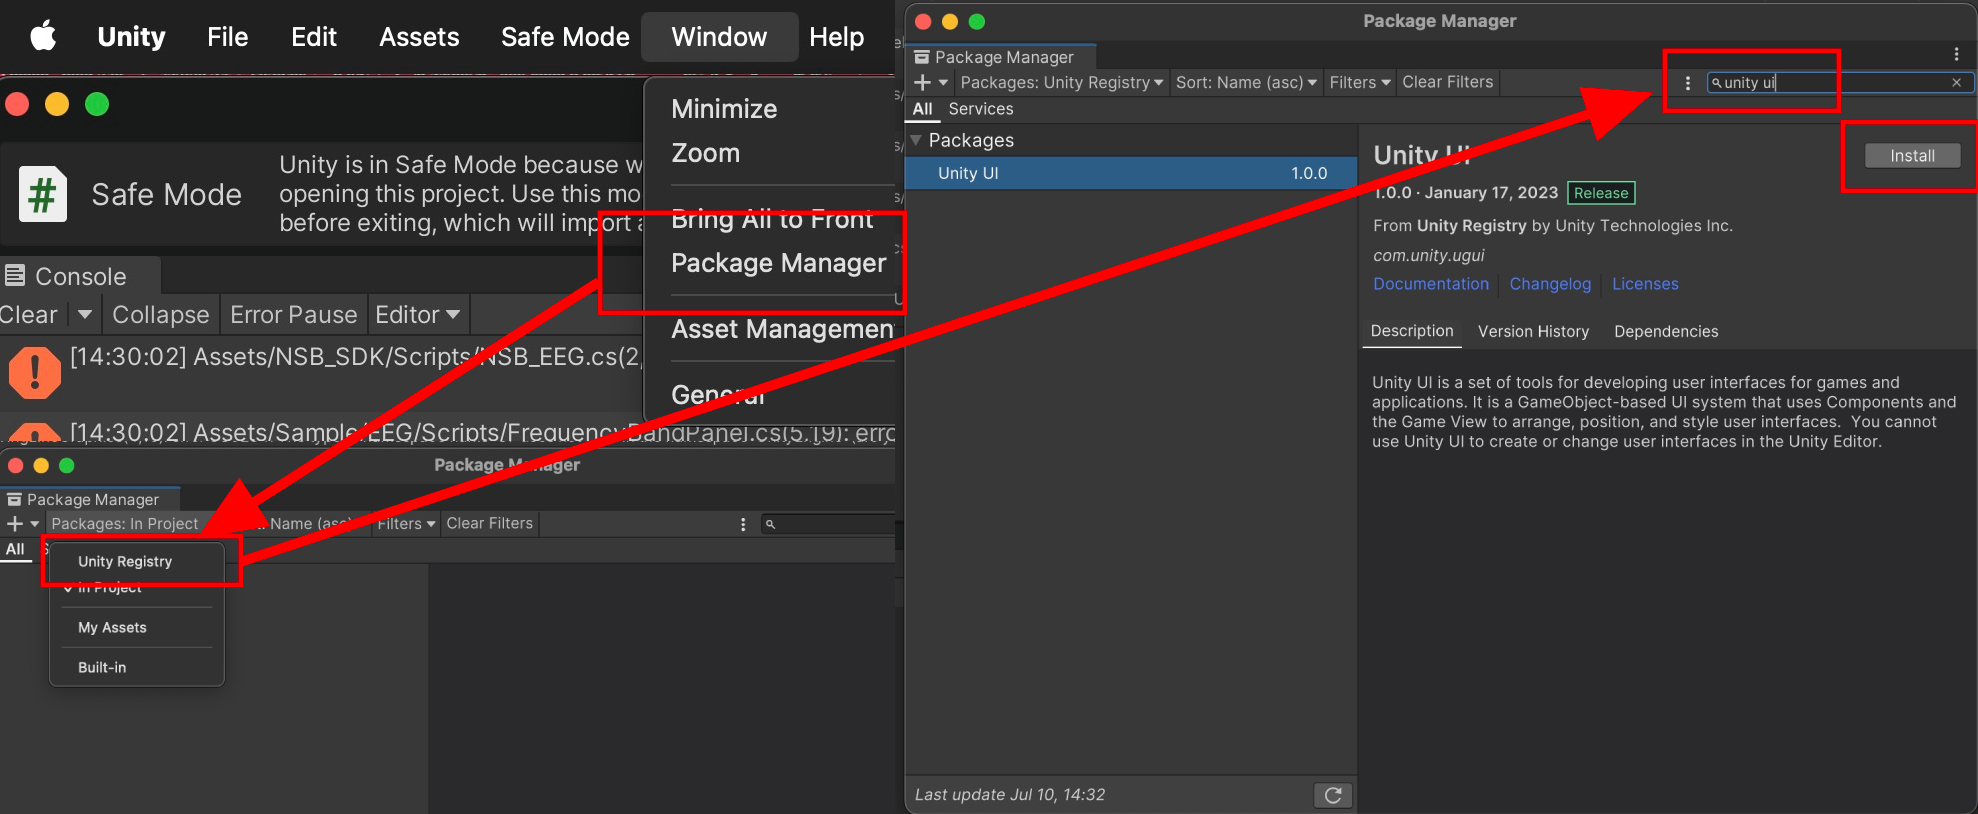
Unity error CS0234: The type or namespace name 'UI' does not exist in the namespace 'UnityEngine' (are you missing an assembly reference?)
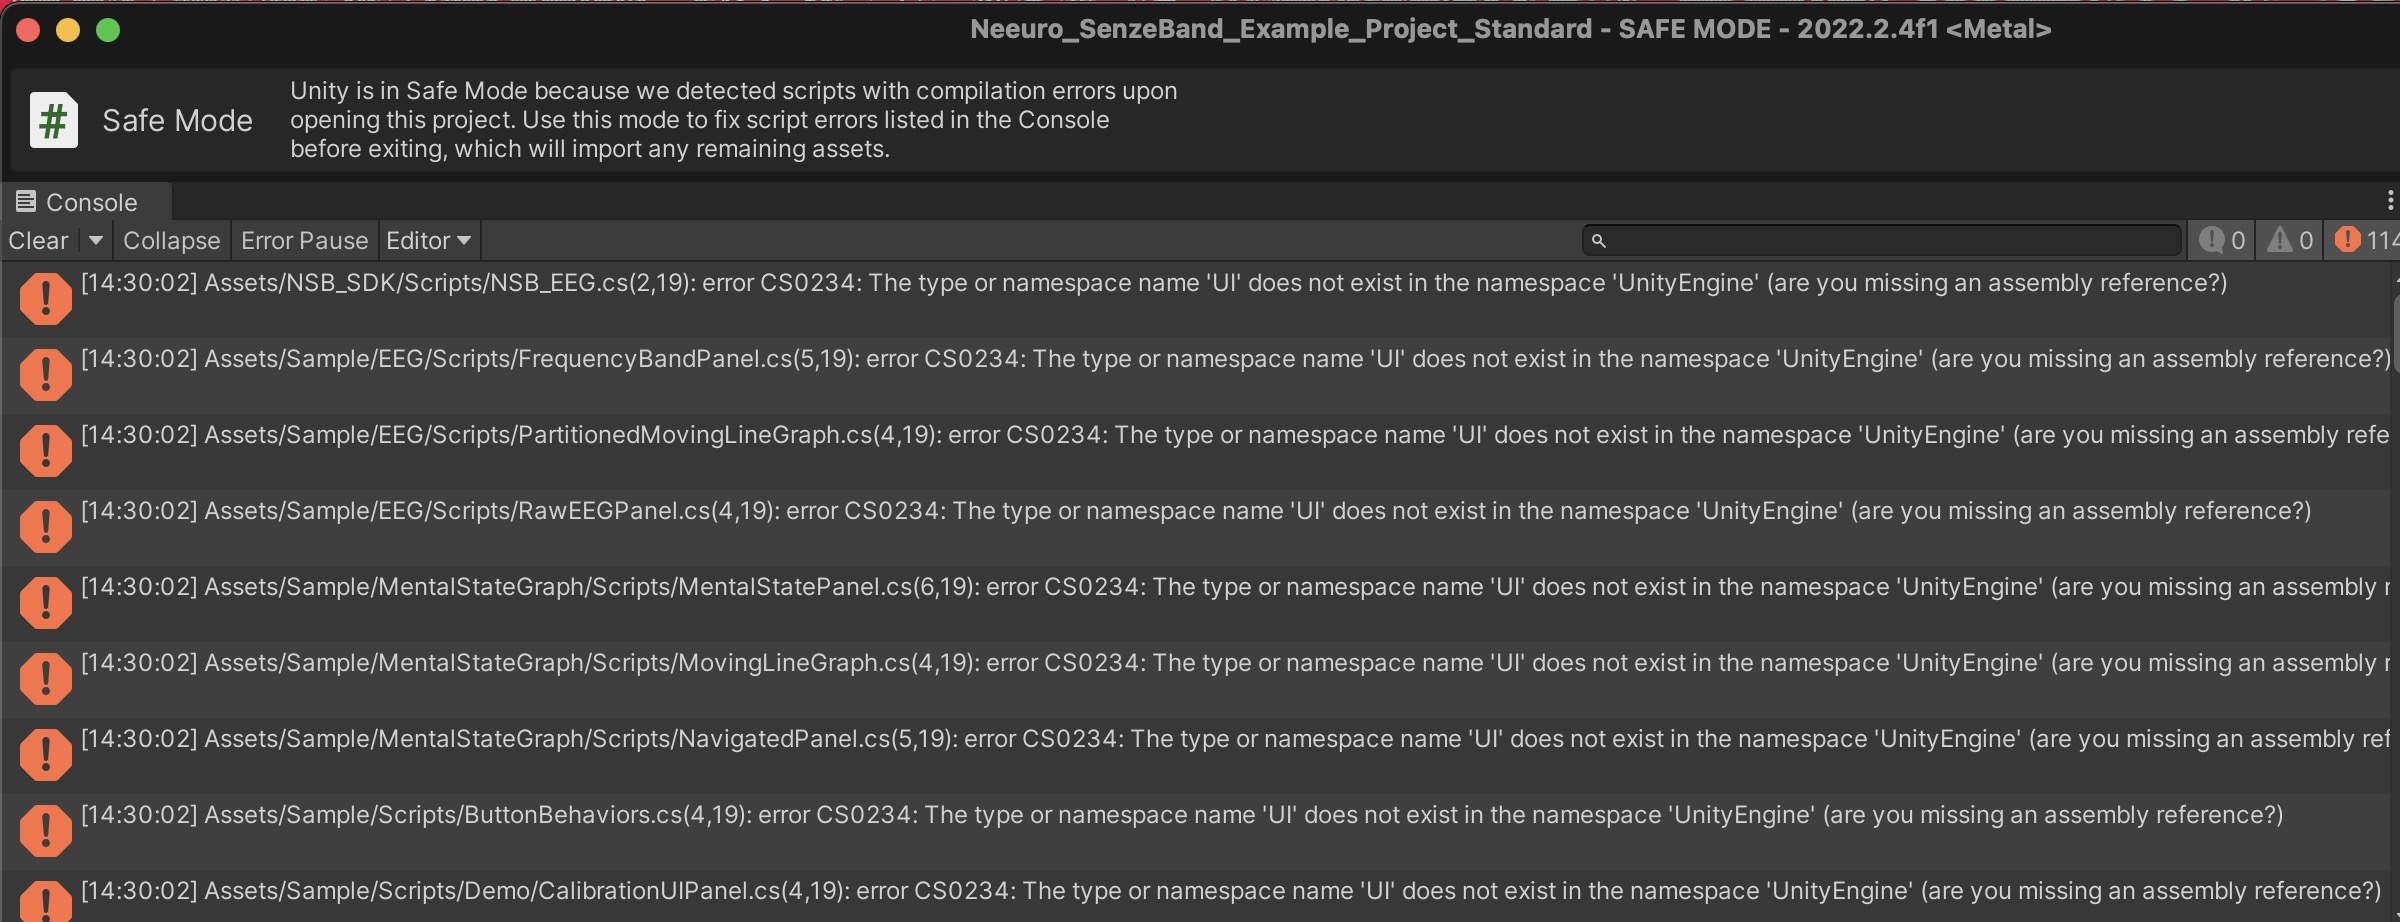
Open Package Manager and add the 'Unity UI' Package.
Unity error CS0236:
 Ignore this error and exit safe mode.
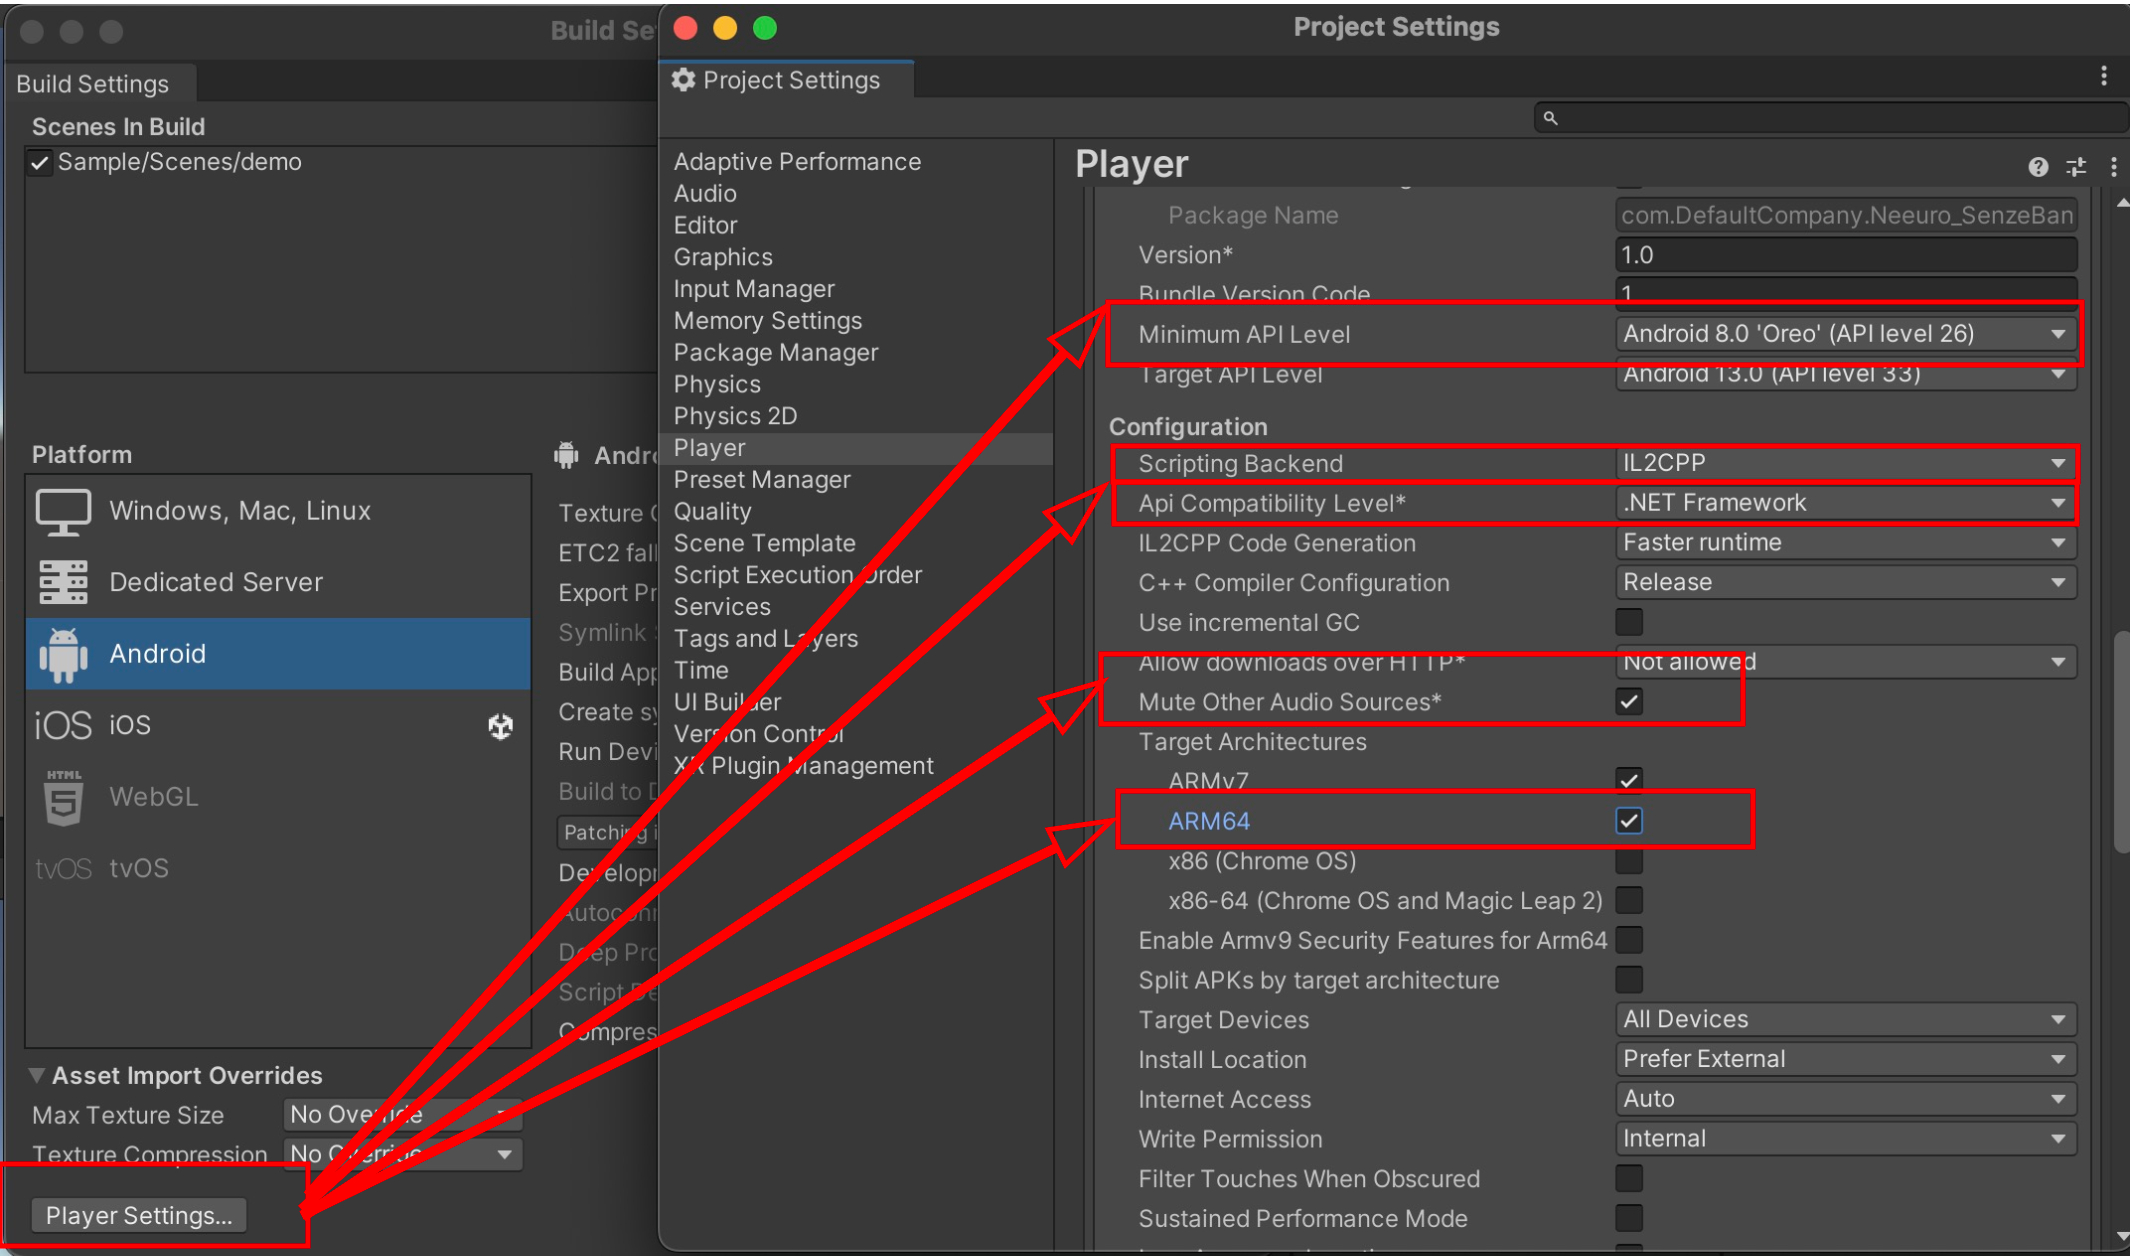
Under Build Settings -> Player Settings -> Other Settings -> set Minimum API Level to Android 8.0 'Oreo' (API level 26).
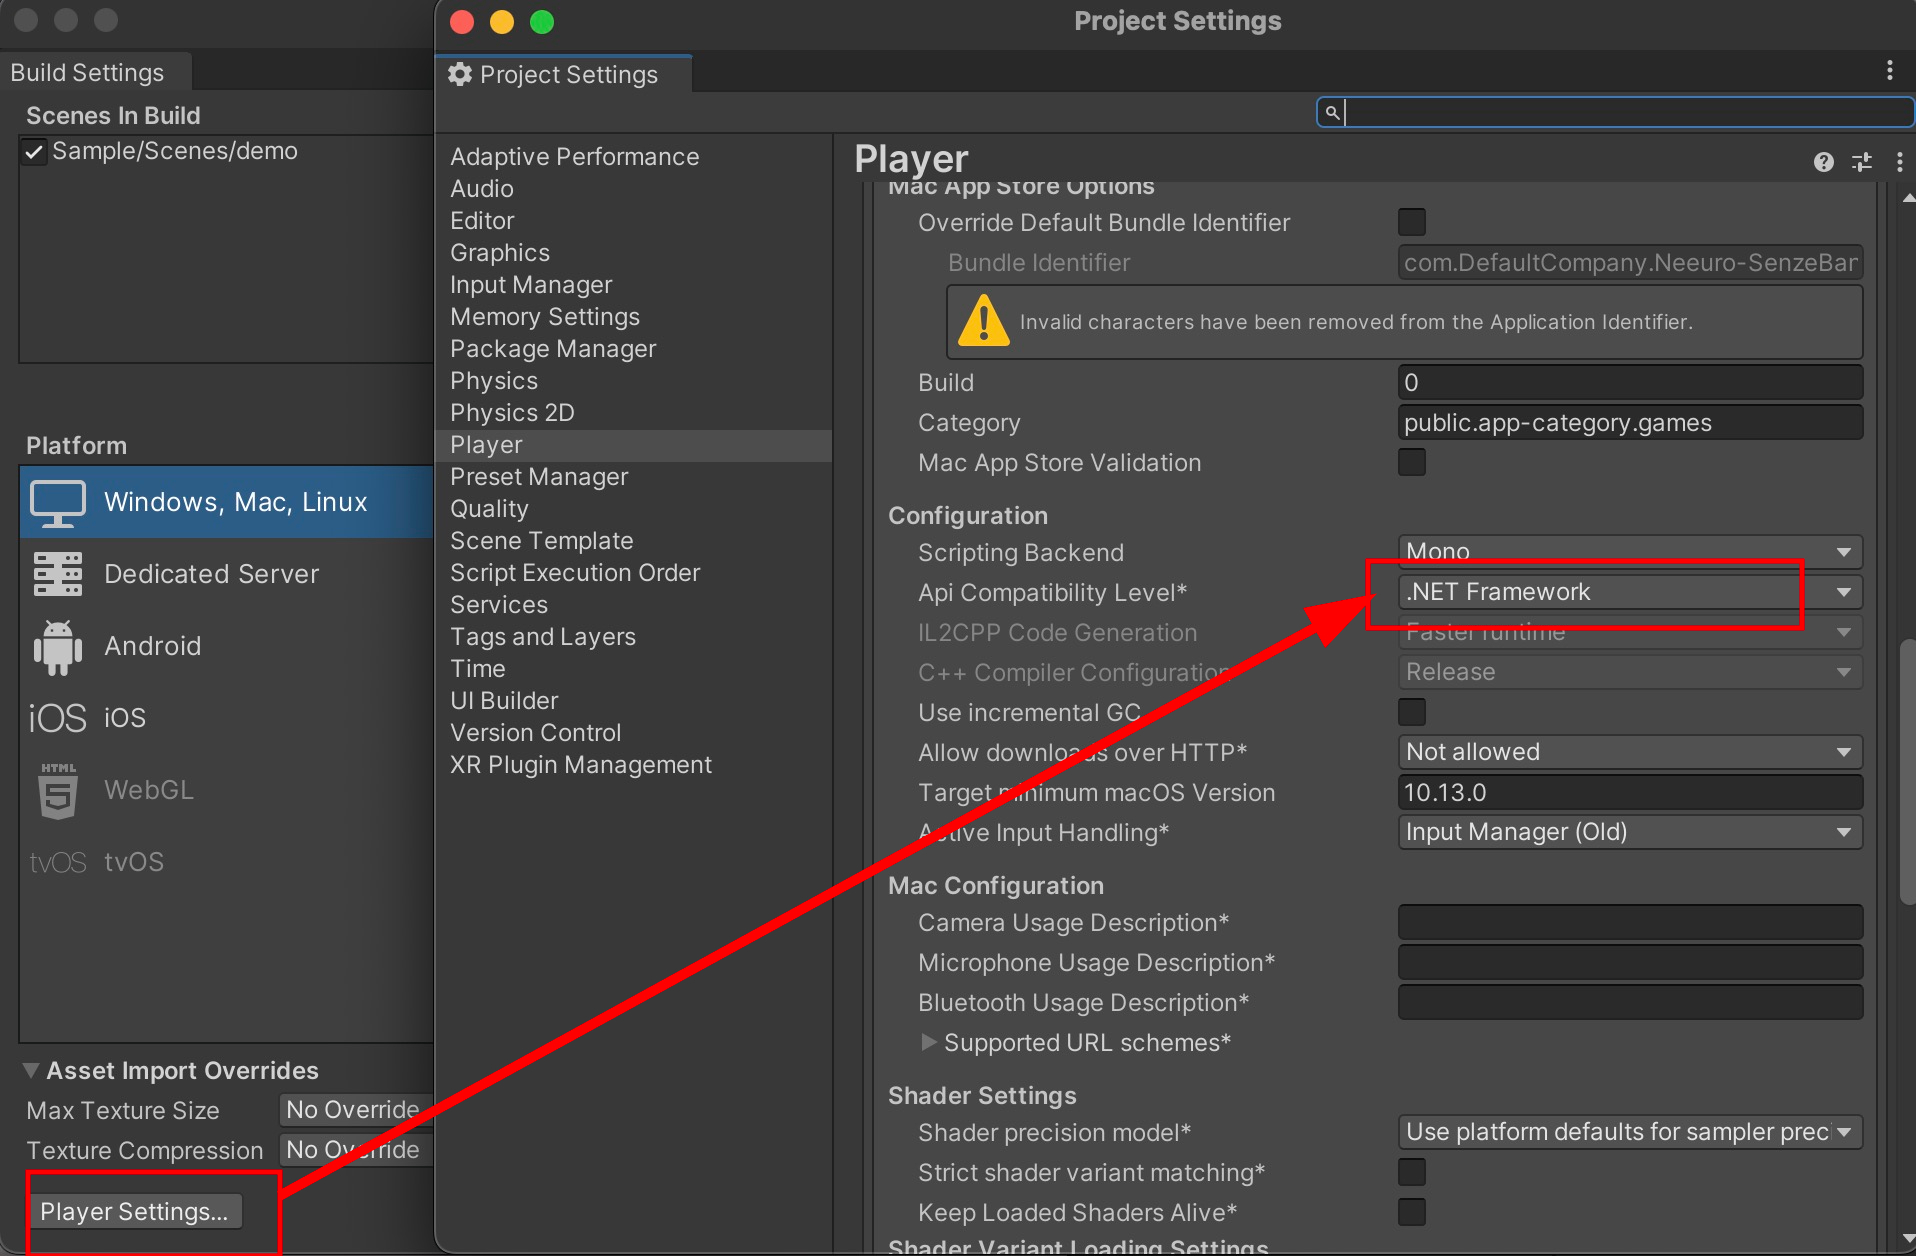
Under Build Settings -> Player Settings -> Other Settings -> API Compatibility level -> Make sure that it is at .NET Framework. Set Mute Other Audio Sources to TRUE.
Under Build Settings -> Player Settings -> Other Settings -> Scripting Backend -> make sure that it is at IL2CPP. Include ARM64 in Target Architectures.
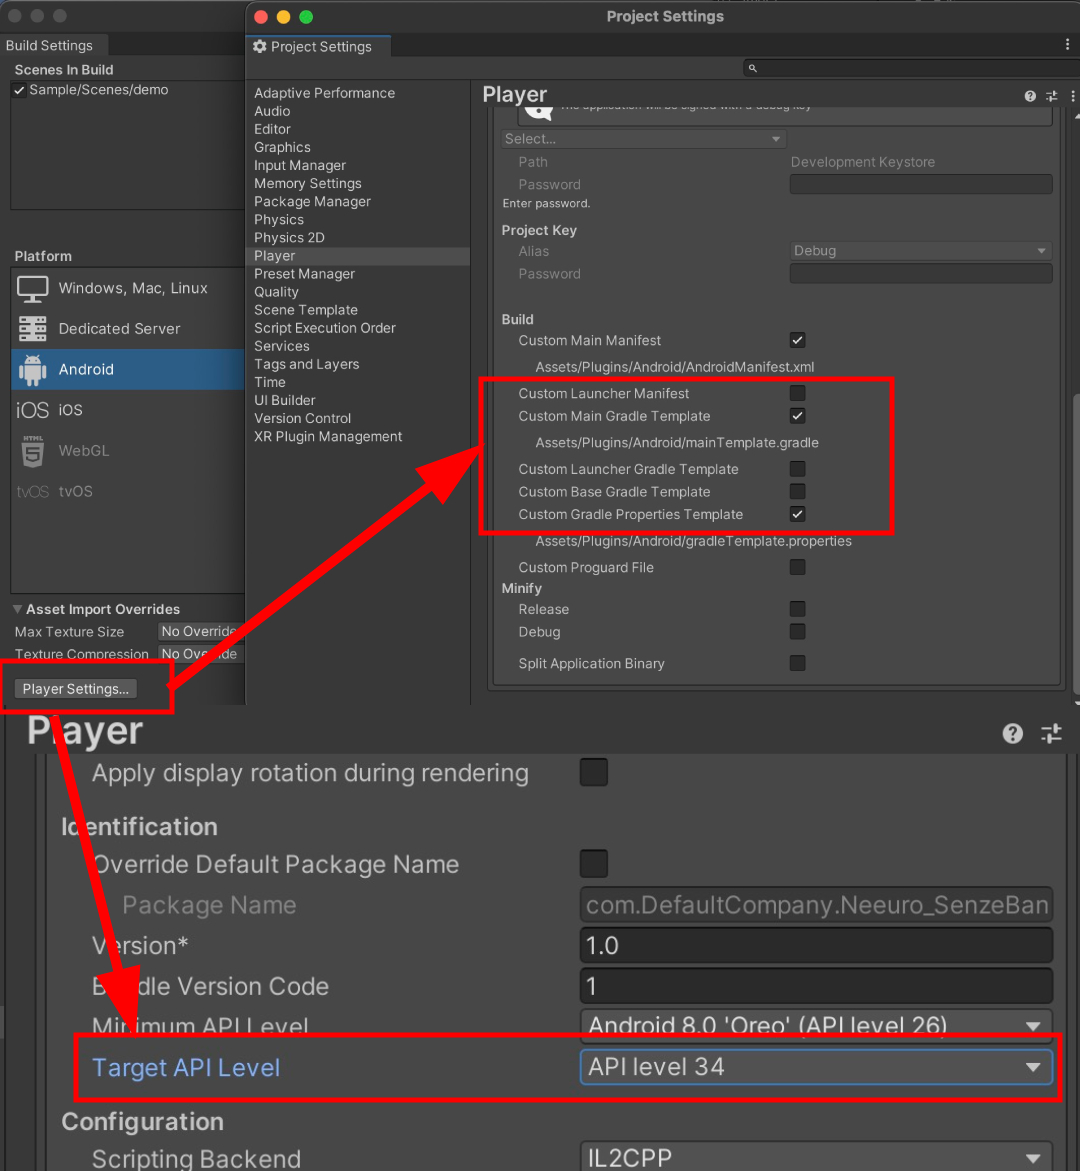
To be able to build, we need to set the Gradle version to 7.5.1. Go to Build Settings -> Player Settings -> Publishing Settings and enable Custom Main Gradle Template and Custom Gradle Properties Template. Go to Player Settings -> Other Settings and set the Target API Level to API Level 34 or higher.
Build the Unity project to generate an APK file
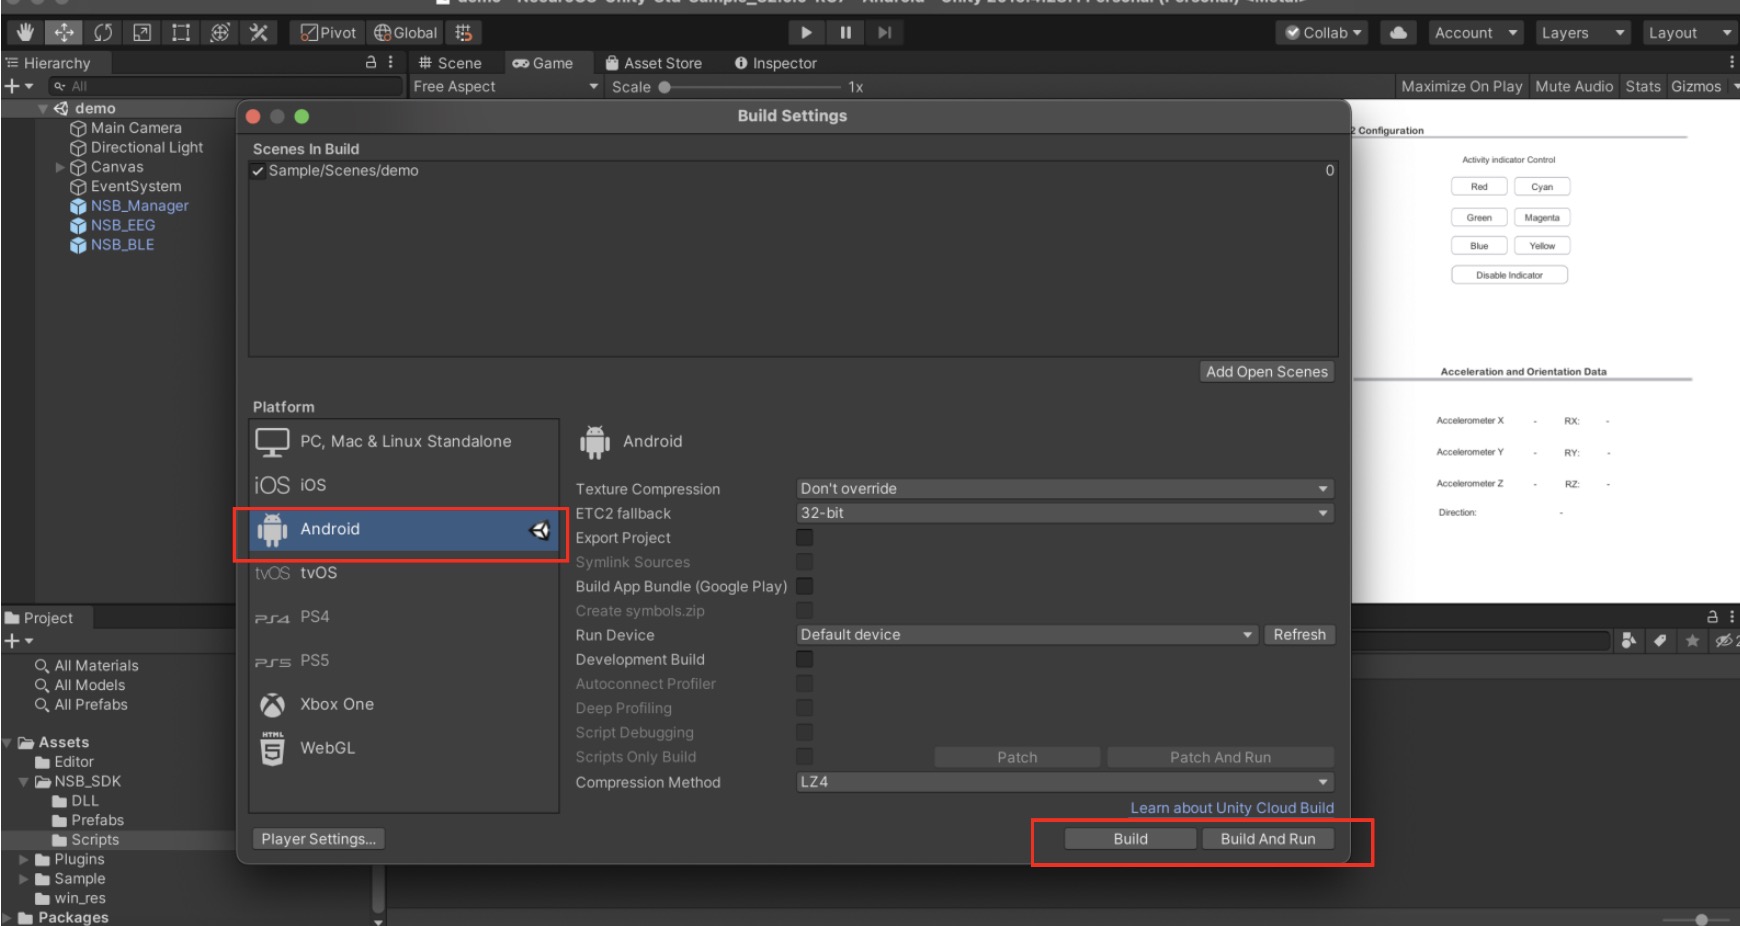
The APK file can be copied to the Android devices, to install your app project.
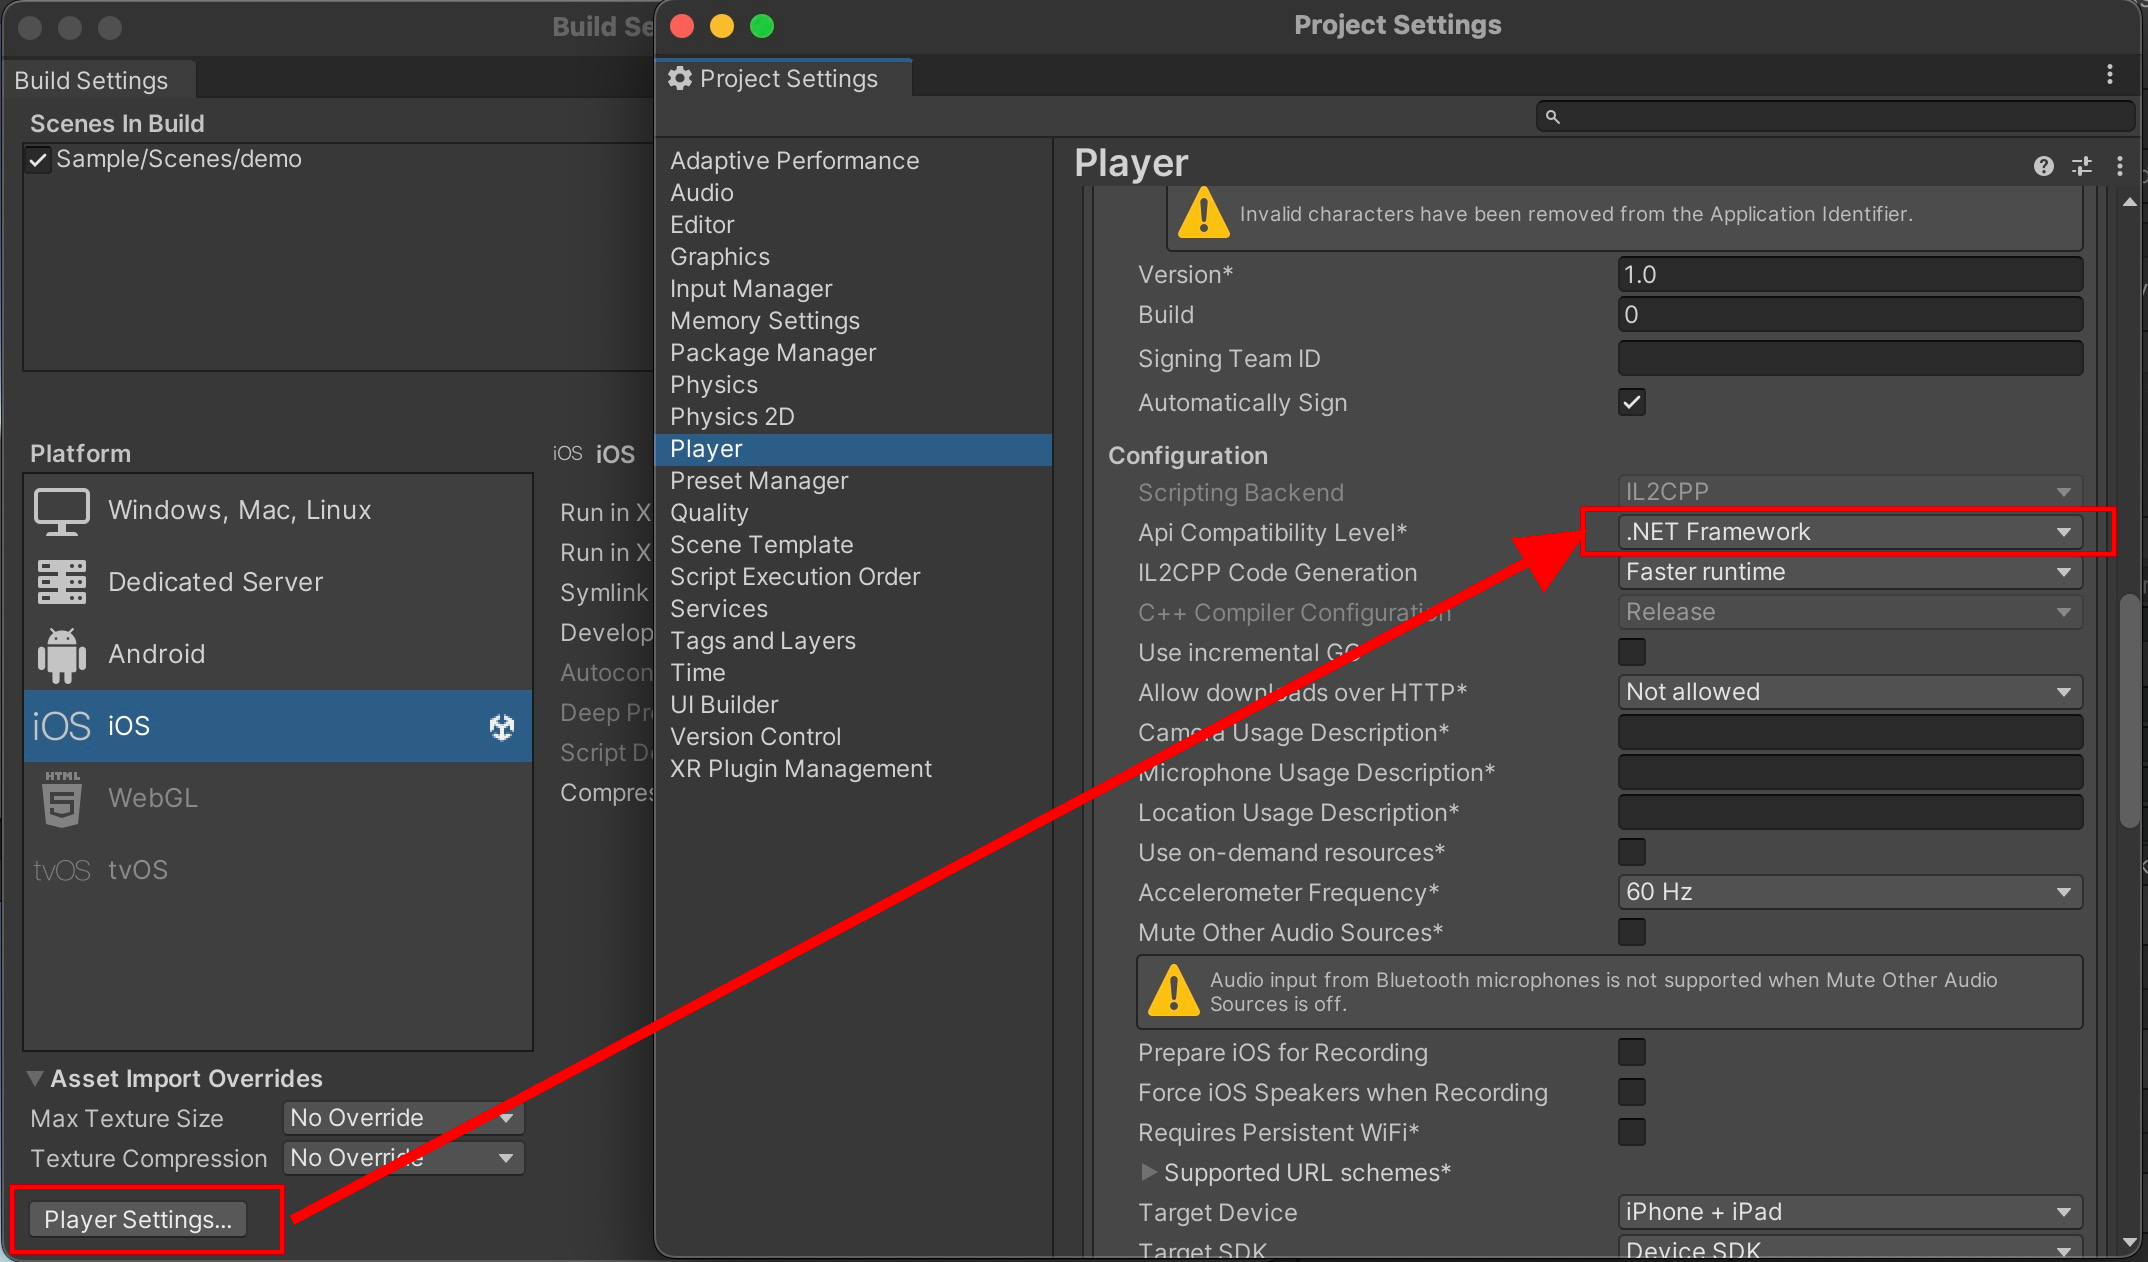
Under Build Settings > Player Settings > Other Settings > API compatibility Level > Make sure that it is at .NET Framework.
Build the Unity project into Xcode project.
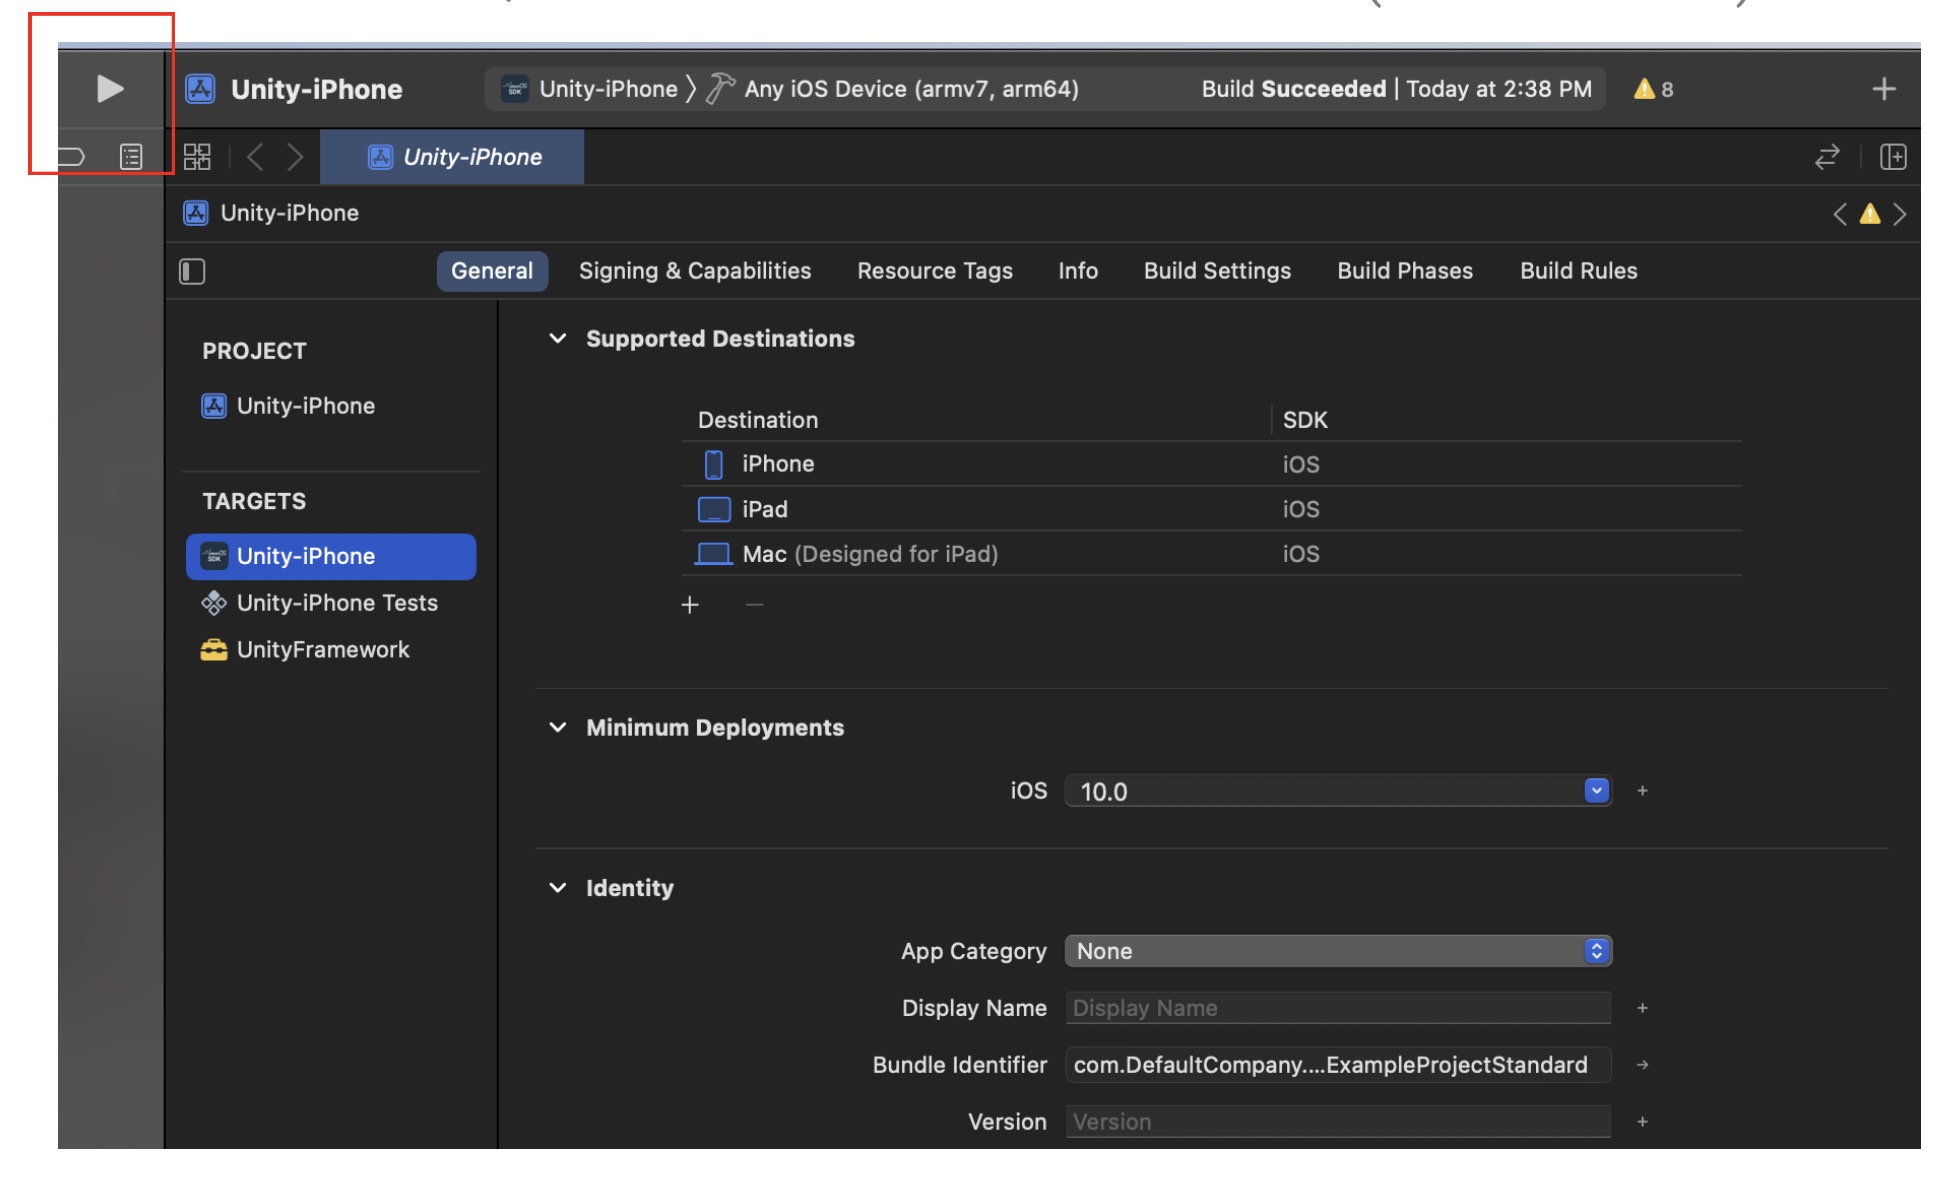
Open the Xcode project. Connect your iOS device to your Mac via a cable.

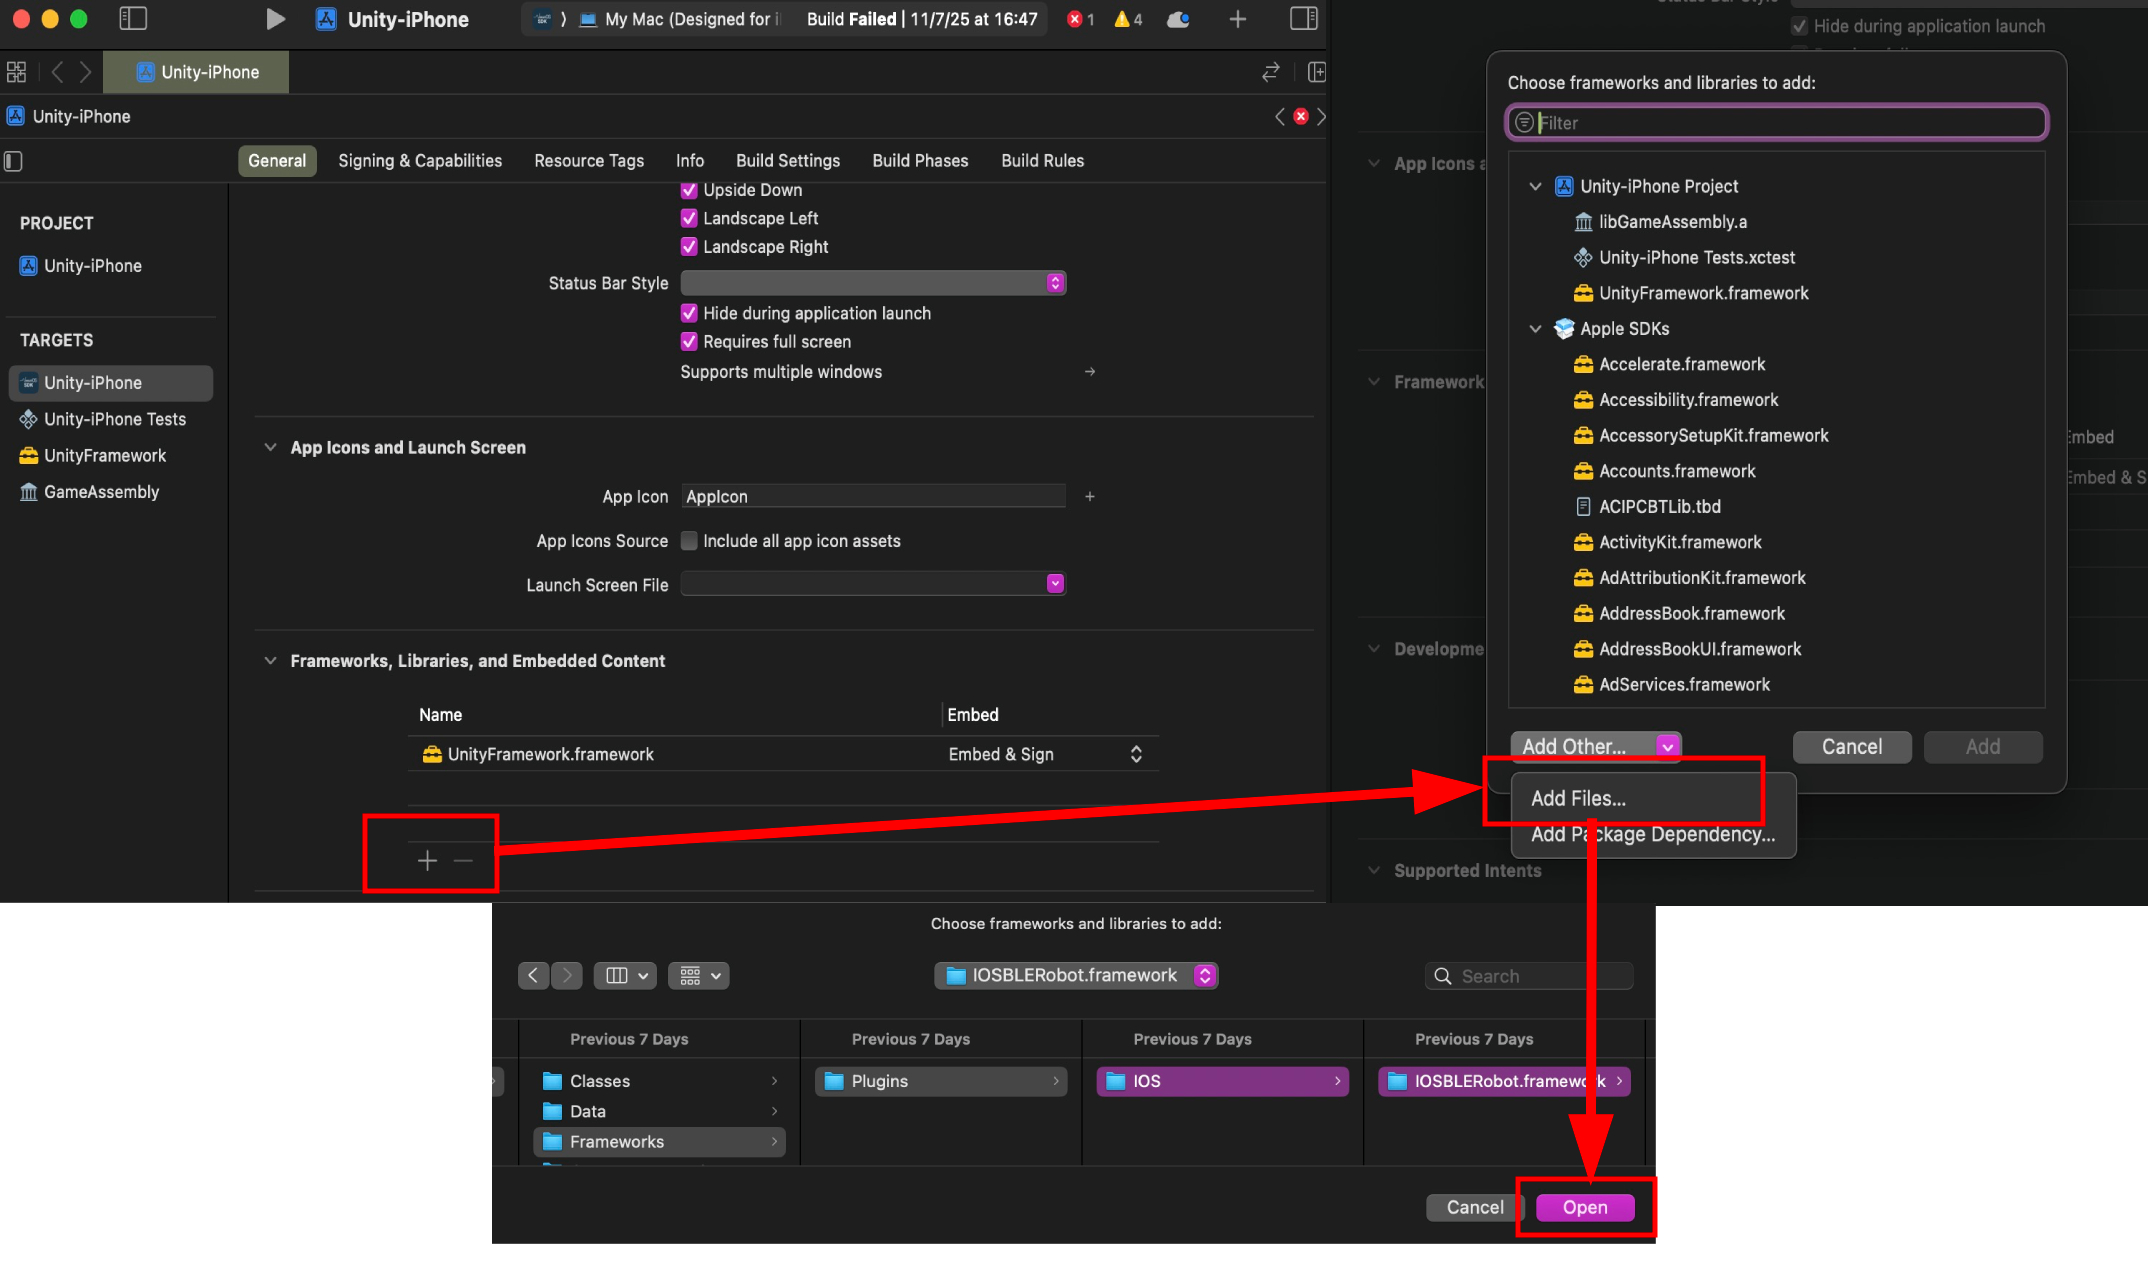
Select Unity-iPhone in the sidebar. Under General -> Frameworks, Libraries and Embedded Content, click Add (+) -> Add Other... -> Add Files... -> Frameworks -> Plugins -> IOS -> IOSBLERobot.framework.
Under General -> Frameworks, Libraries and Embedded Content, ensure that the UnityFramework.framework is added. It can be found by clicking the + button.
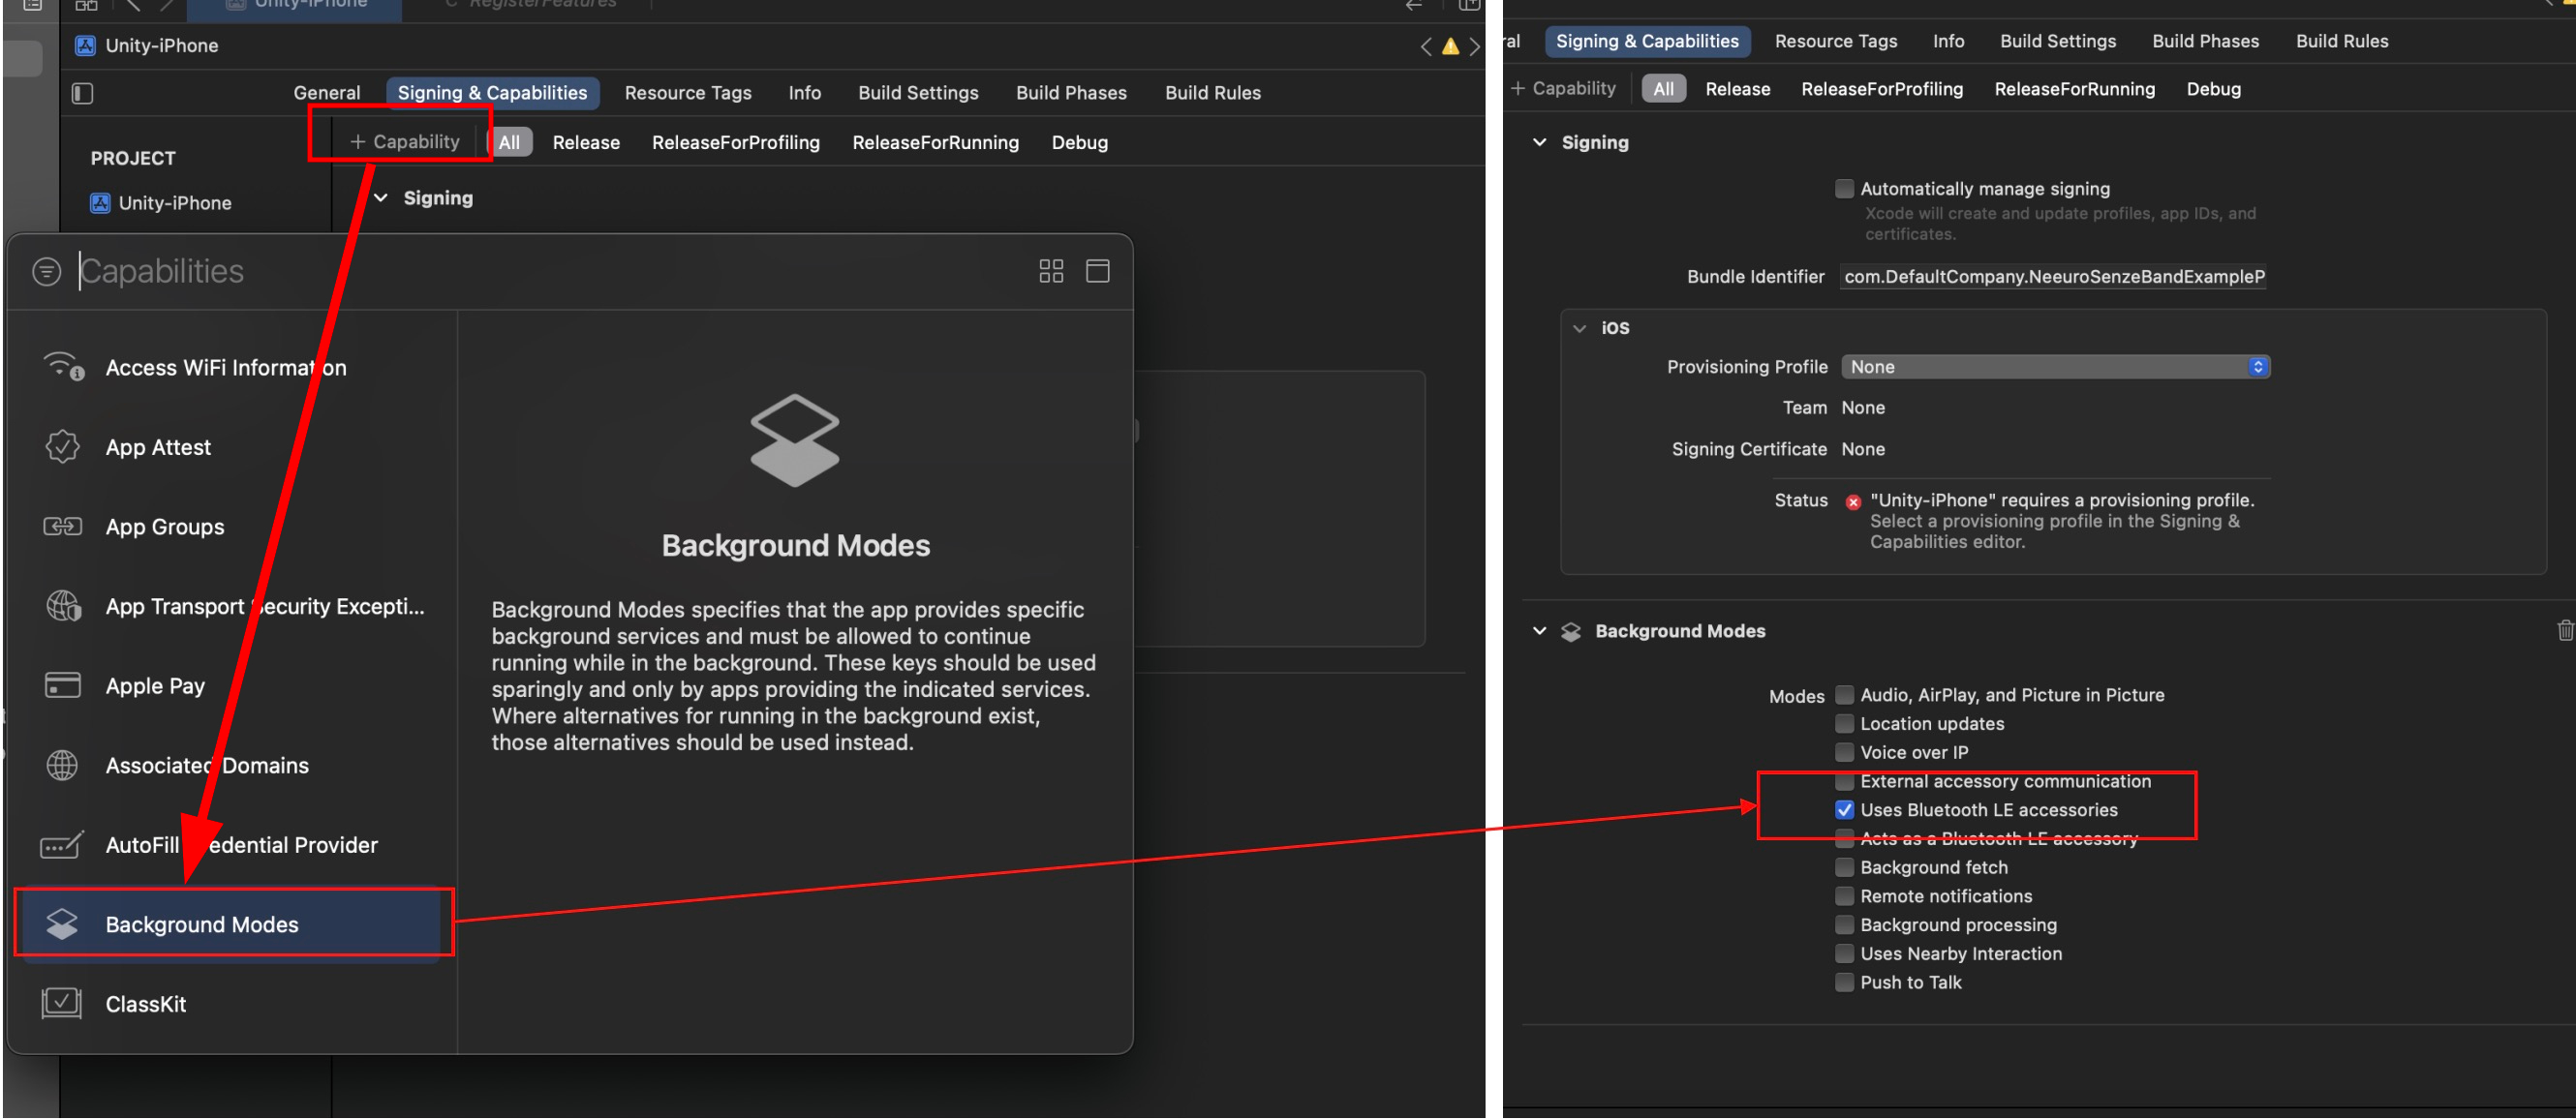
Under Signing & Capabilities, press the '+ Capability' button and search for 'Background Modes'. Ignore the popup 'Error Loading Capabilities: No development team is set'
Add Background Modes to the project and select 'Uses Bluetooth LE accessories'.
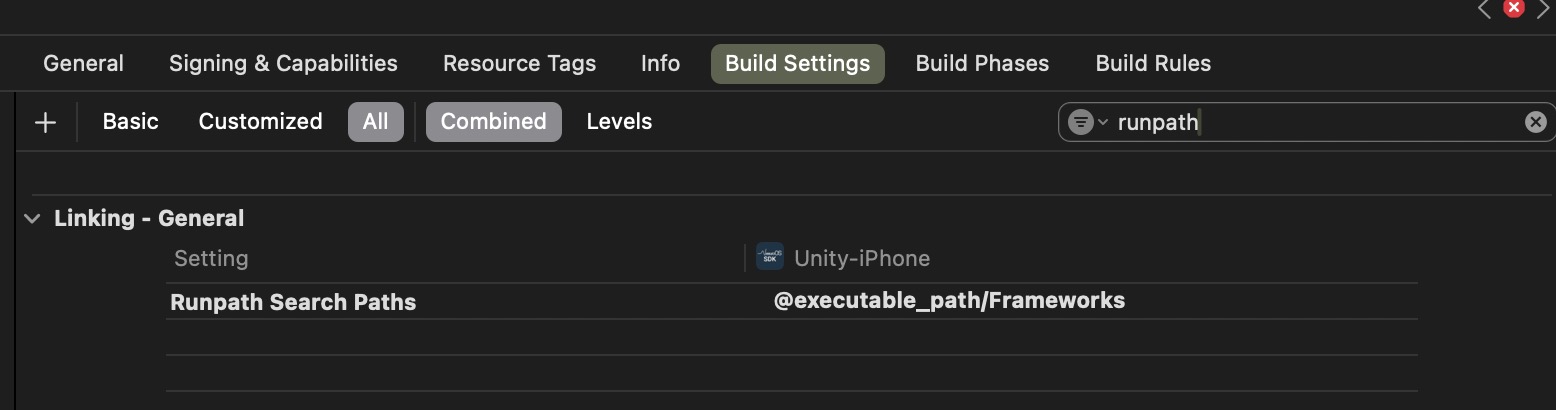
Under Build Settings, search for "Runpath Search Paths" then change the value to "@executable_path/Frameworks".
Under Build Settings, search for 'Bitcode' > Build Options > Enable Bitcode = 'No'. If using Xcode 16 and above, this setting may not be found, skip this step.
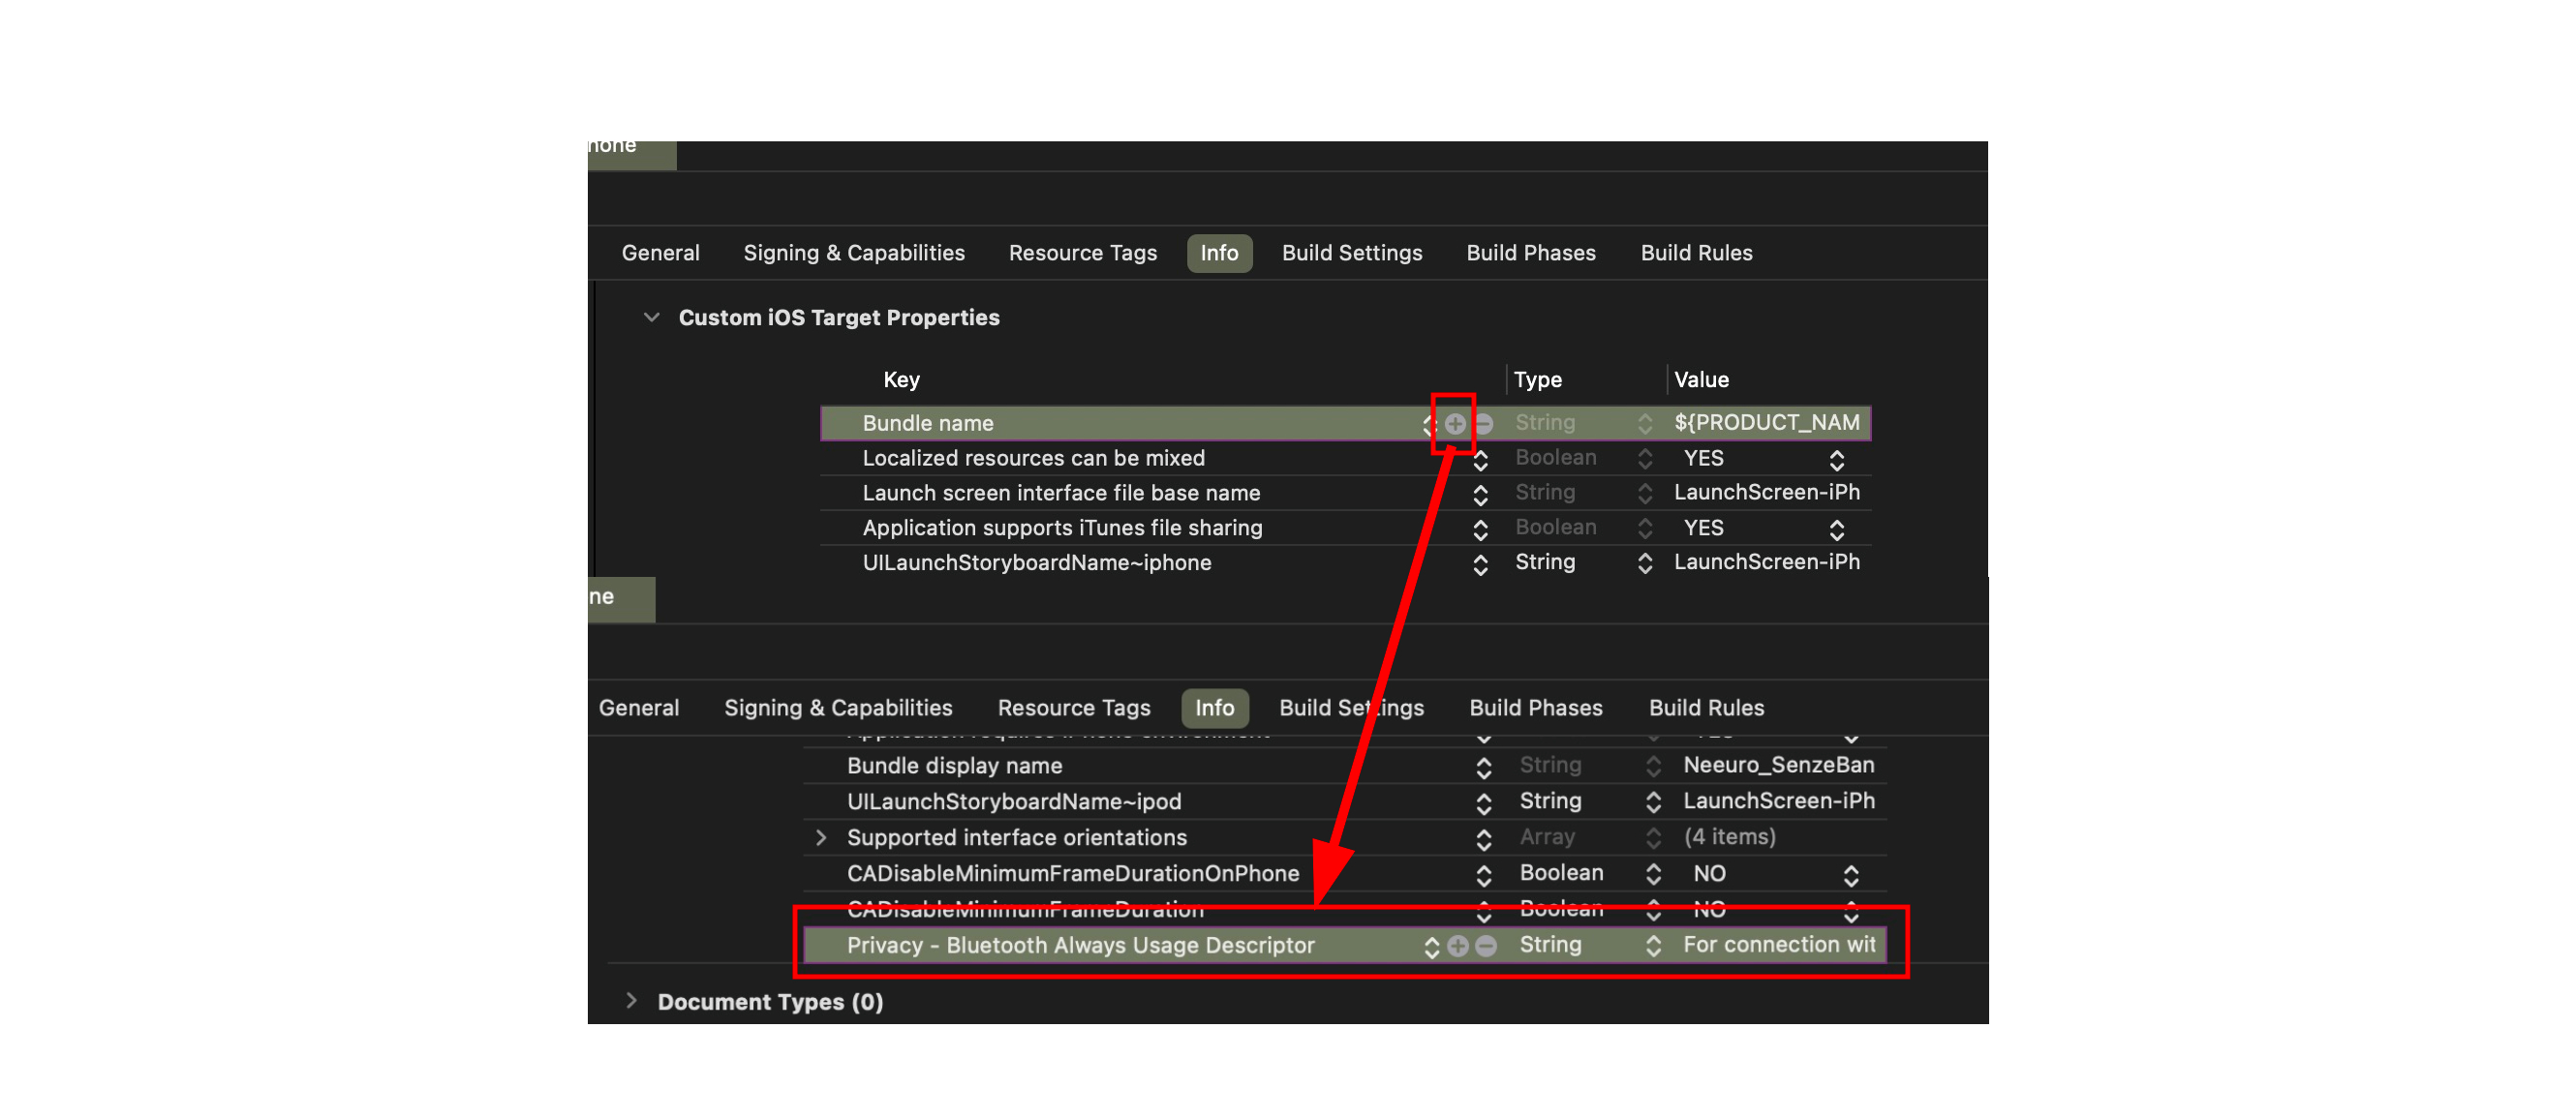
Under Info > iOS Target Properties, add a property 'Privacy - Bluetooth Always Usage Descriptor', give a value 'For connection with Neeuro SenzeBand'.
Under Info > iOS Target Properties, add a property "Privacy - Bluetooth Peripheral Usage Description", give the same value.
Under Info > iOS Target Properties, add a property "Privacy - Location When In Use Usage Description", give a value "For detecting nearby SenzeBand devices".
If present, remove "libiconv.2.dylib" on the Project panel
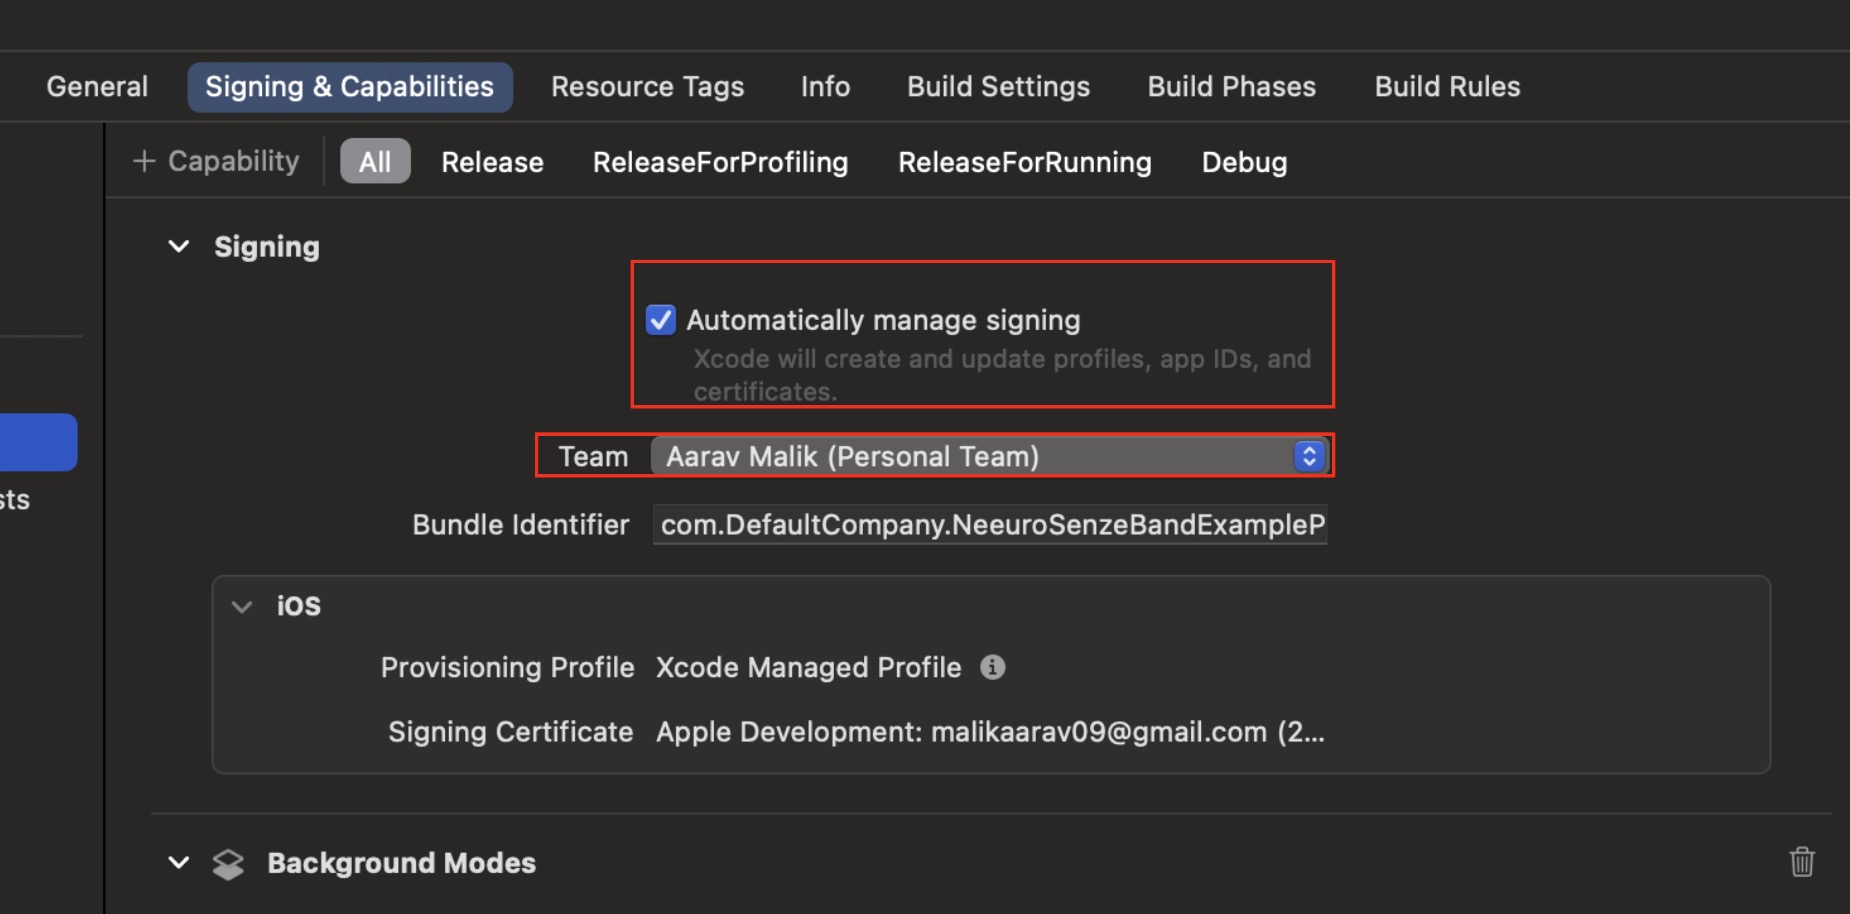
Under Signing & Capabilities > All - Click Automatically manage signing if you want Xcode to do it automatically and then select a Development Team.
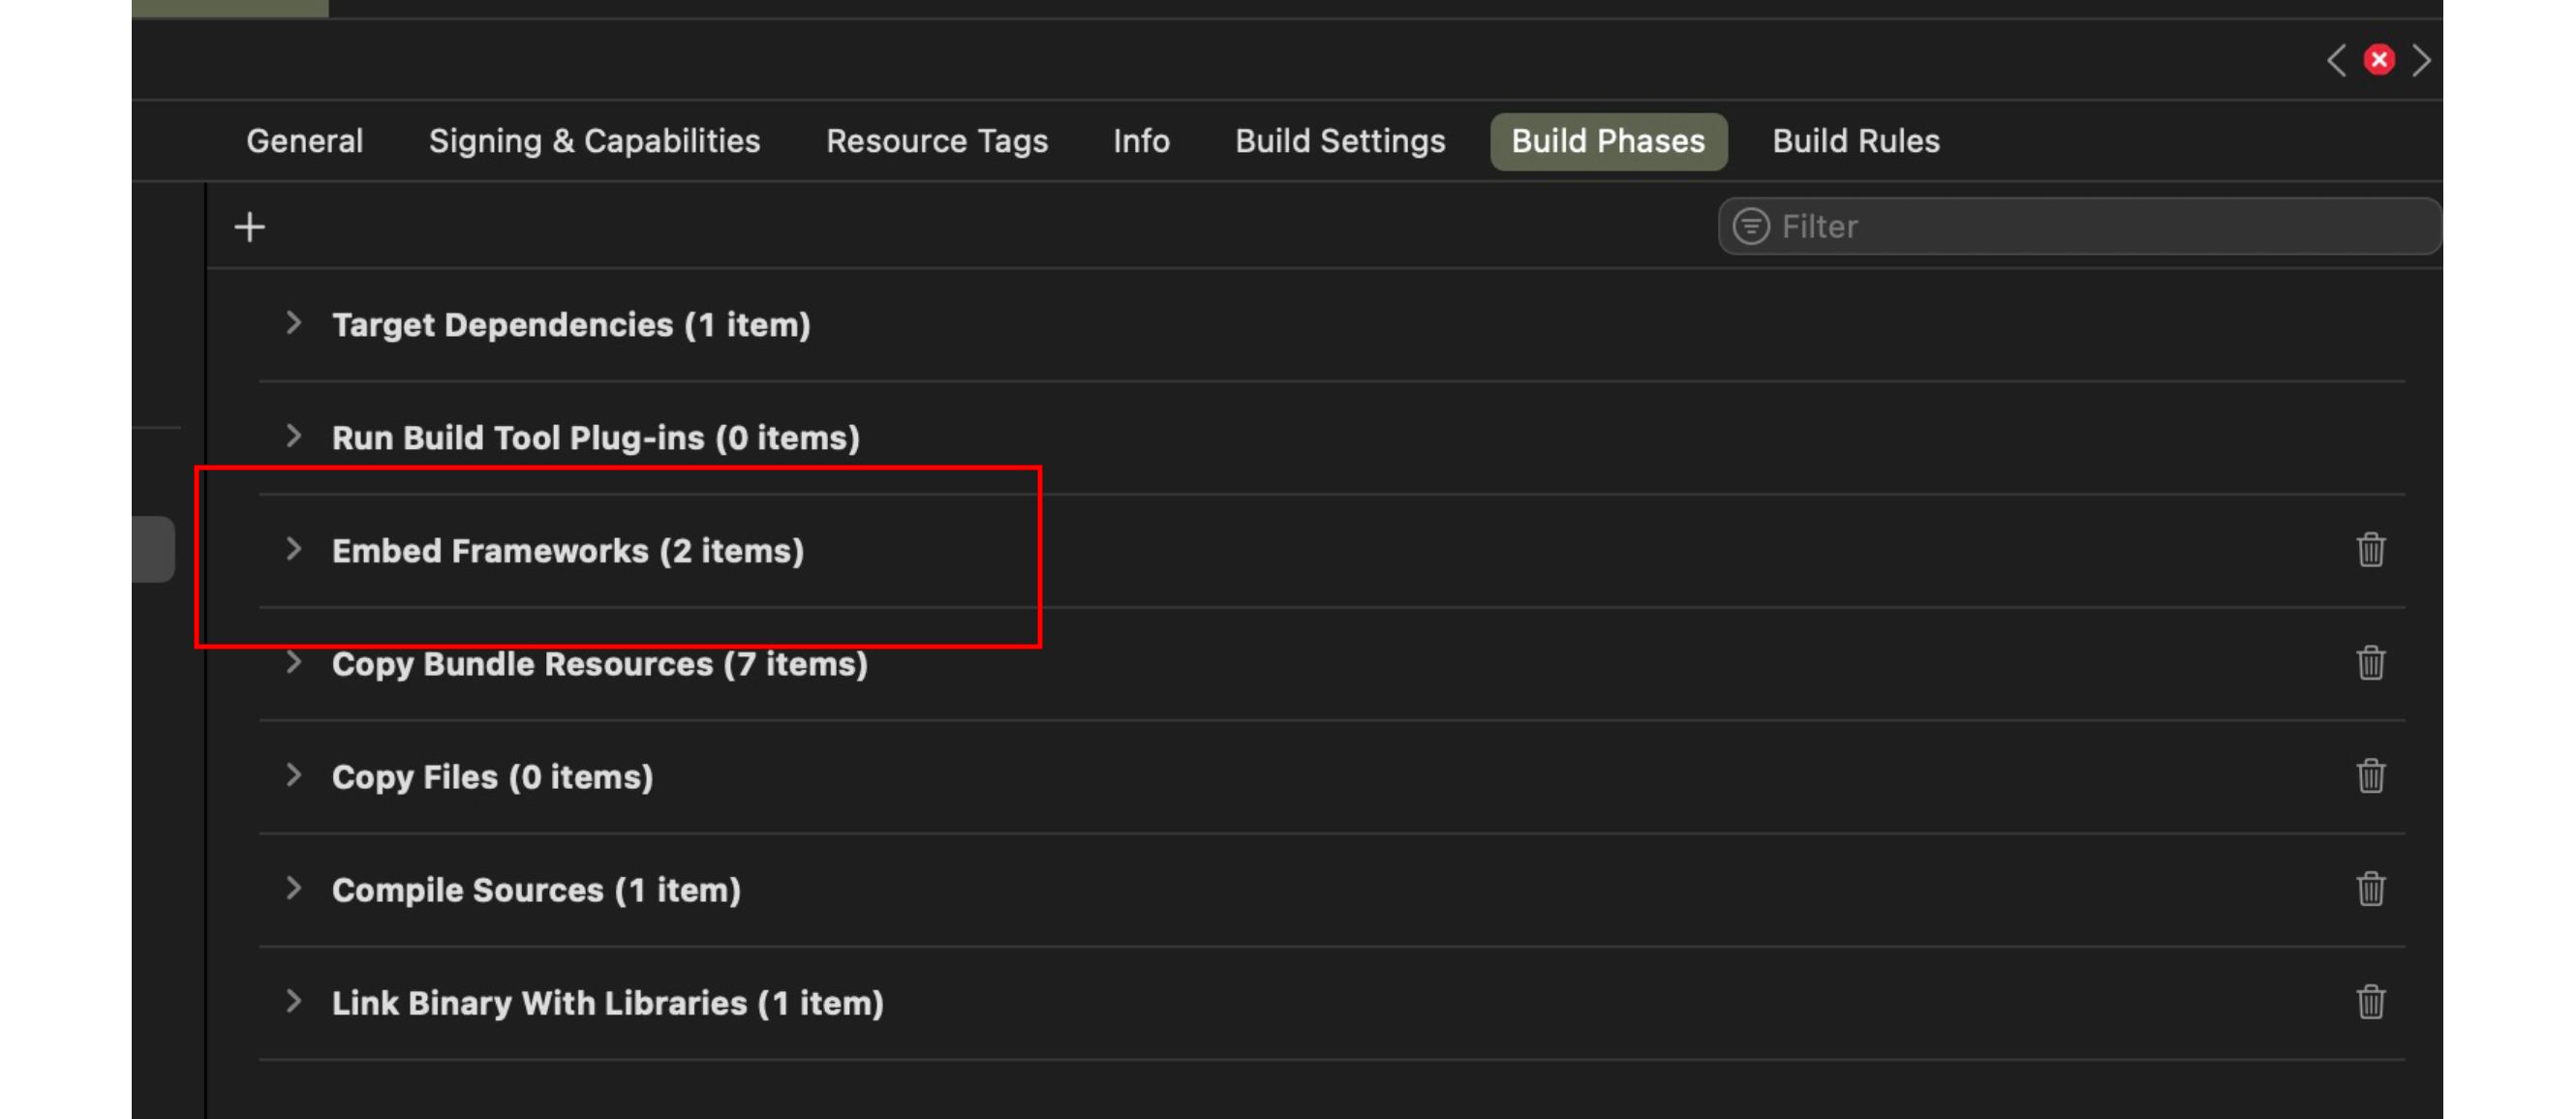
Under Build Phases, drag Embed Frameworks to the 3rd position.
Build and run on Xcode and the connected iOS devices (not simulated)
Change device to iOS and open the app.
Under Build Settings > Player Settings > Other Settings > API Compatibility level > Make sure it is at .NET Framework.
Ensure that the win_res folder is in the Assets folder and that the program in the .server is able to scan and connect to a SenzeBand.
To manually copy the win_res folder to the build, extract the "win_res.zip" file in the "Assets" folder to the same directory.
Build the Unity project to output Windows program. Note: WindowsBuild.cs Editor script will automatically copy the win_res folder into the build folder for Bluetooth process handling.
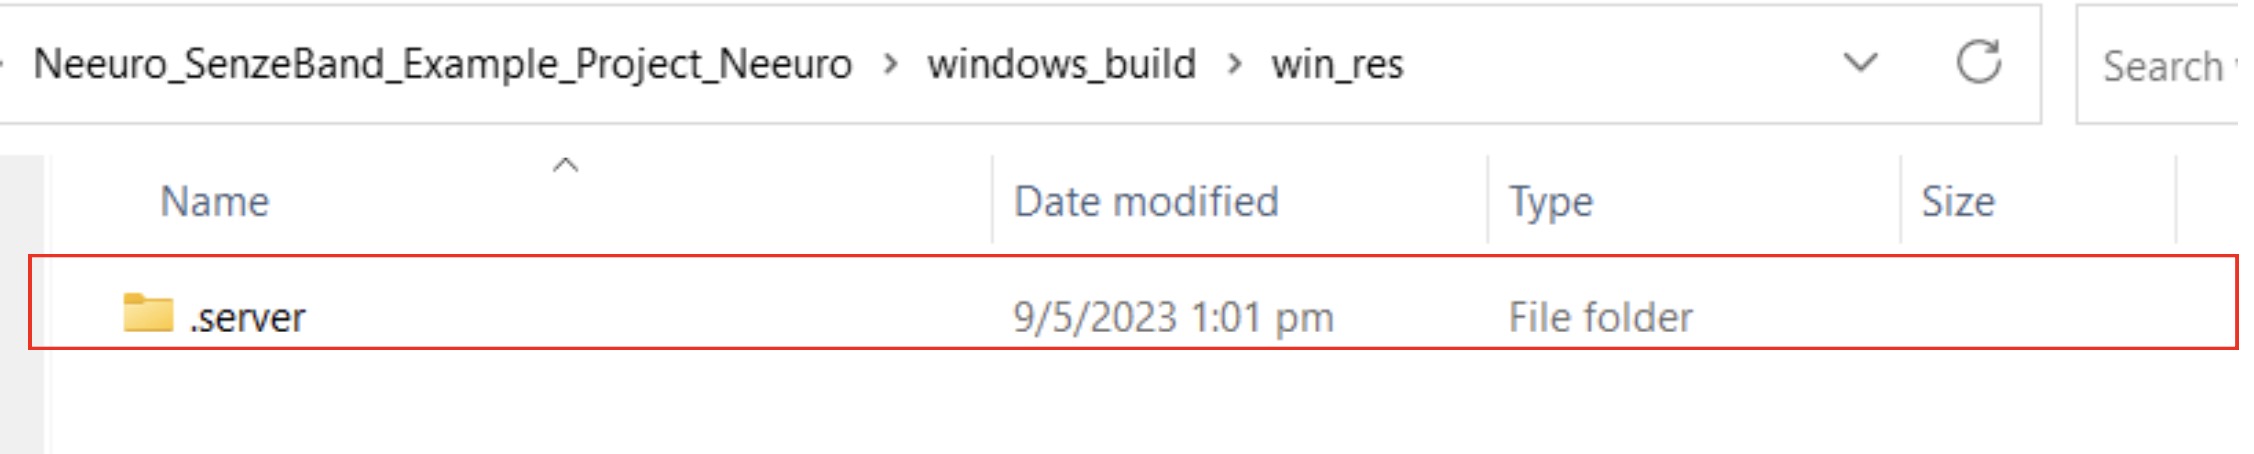
From the "/Assets/win_res/" folder, copy the ".server" folder to be in the same folder as the output EXE file. This program is required for Windows Bluetooth connection to Neeuro SenzeBand.
Build the Windows app.

Note on C# Exceptions: If Exception handling is used in Unity scripts, "Enable C# Exceptions" must be set to true.
No module loaded in build settings.
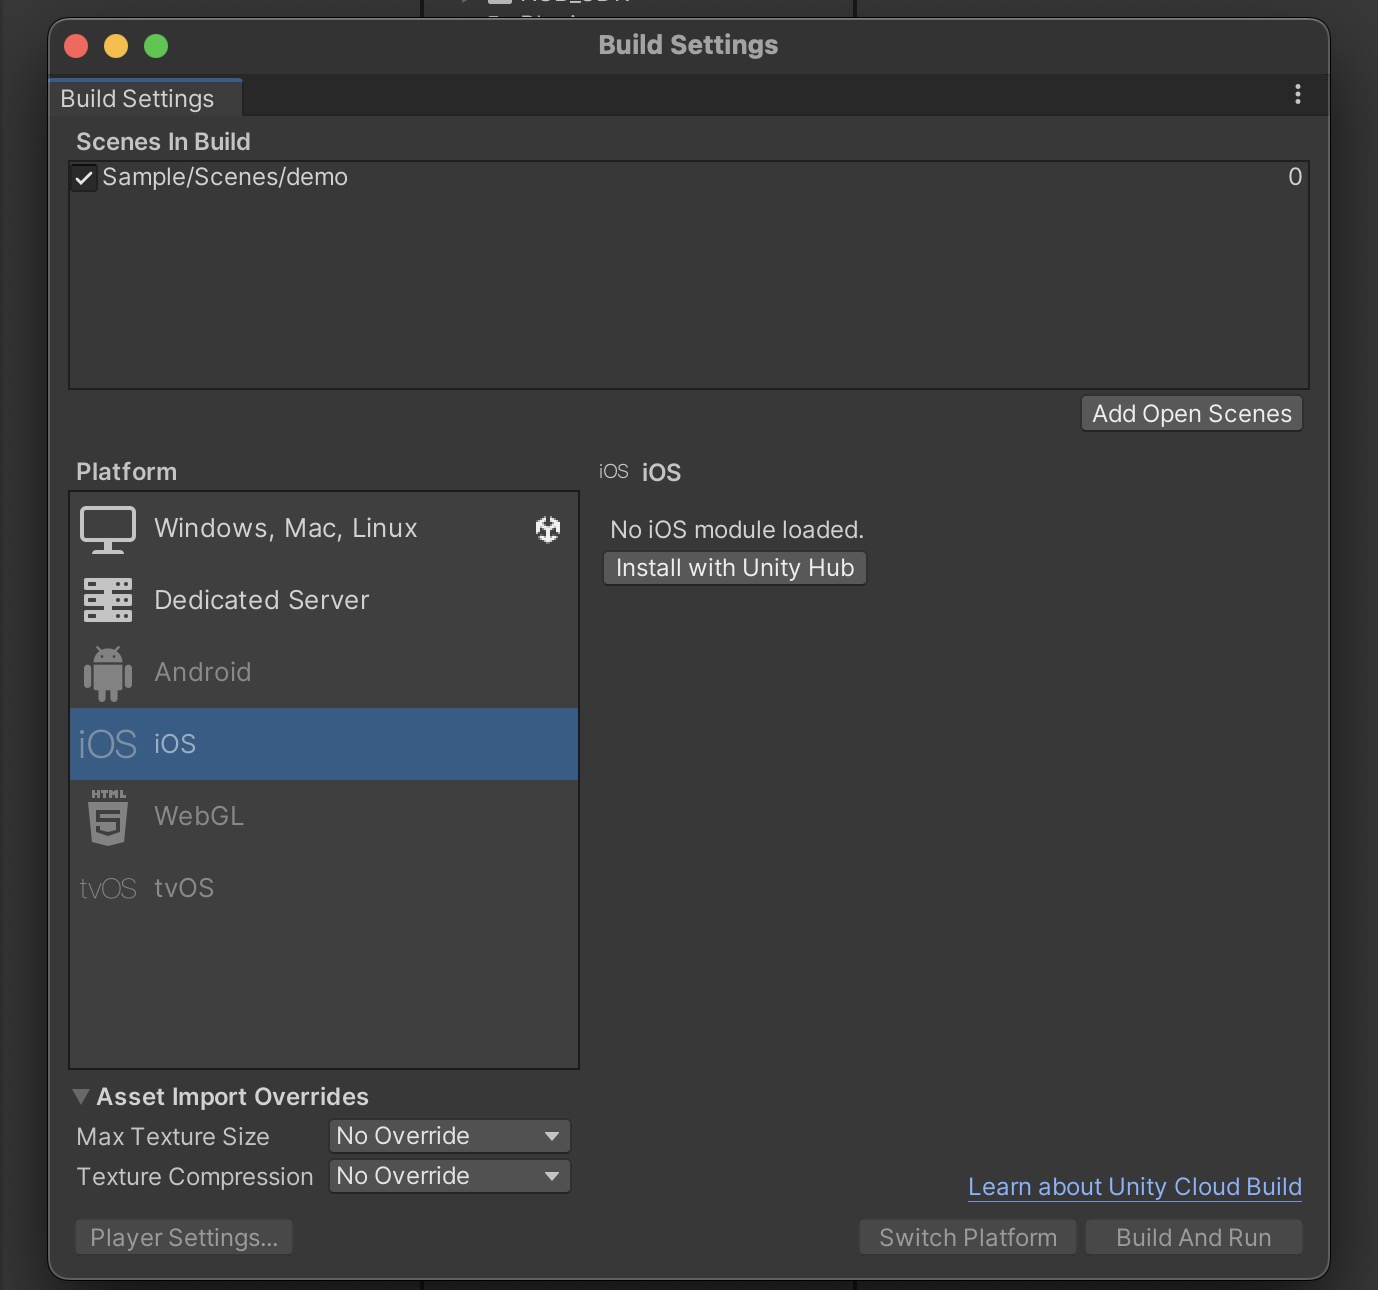
Press 'Install with Unity Hub' and select all the platforms you want to build your app for.
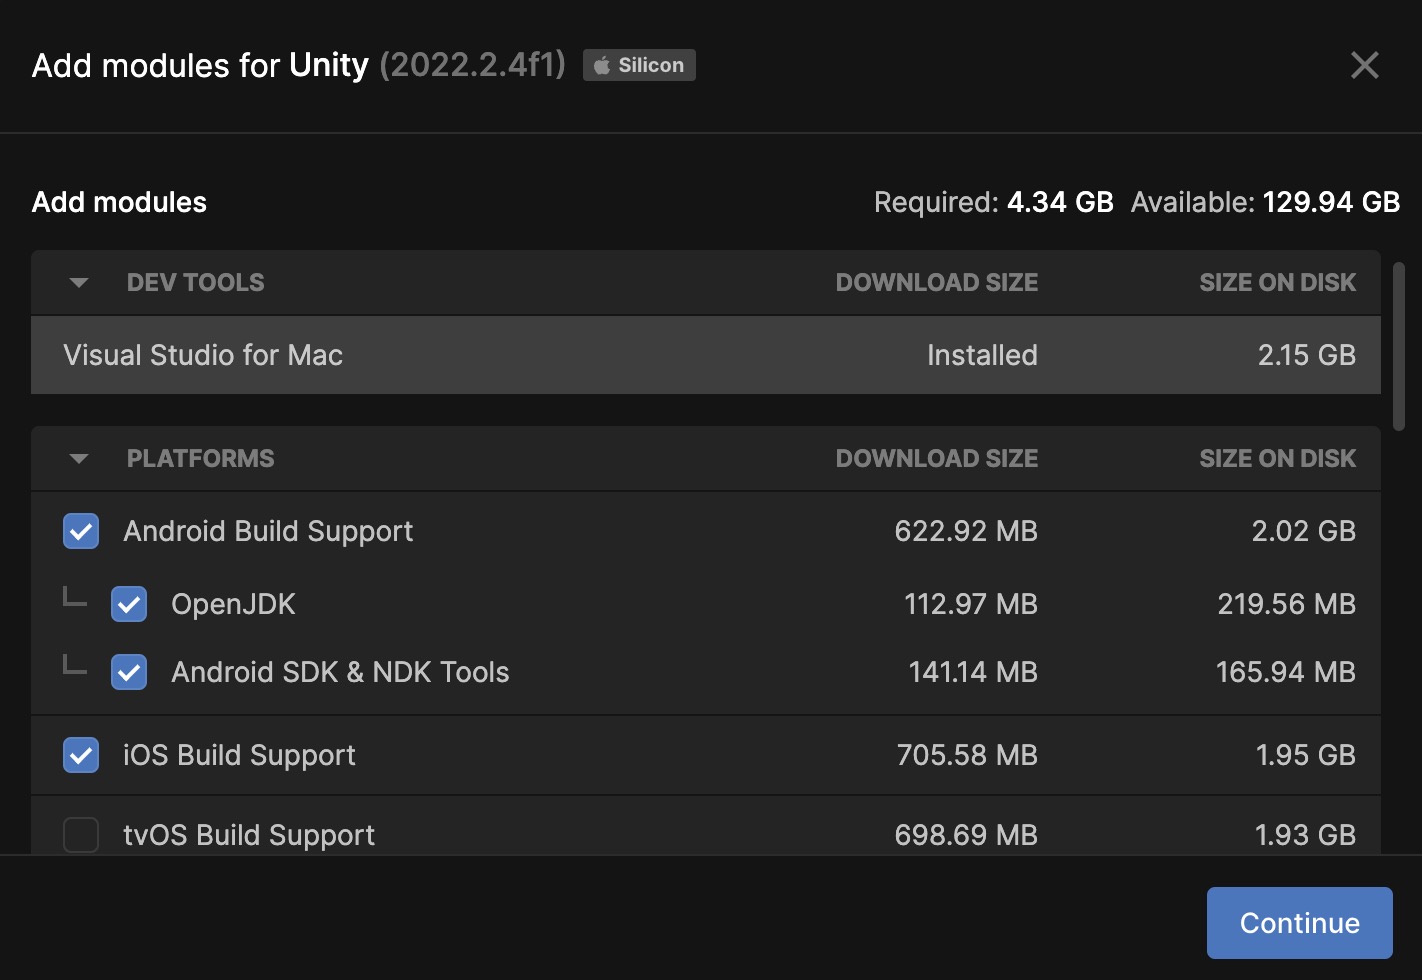
After install is complete, if build settings still say there is no module loaded, close and reopen the project.
I can't find .NET Framework in API Compatability level.
Make sure that API Compatibility level is at .NET 4.x or .NET Framework. These are the same, in Unity 2021.2 .NET 4.x was renamed to .NET Framework.
iOS build warning: No Xcode automatically detected to run your project. Please check Xcode is installed and select it manually.
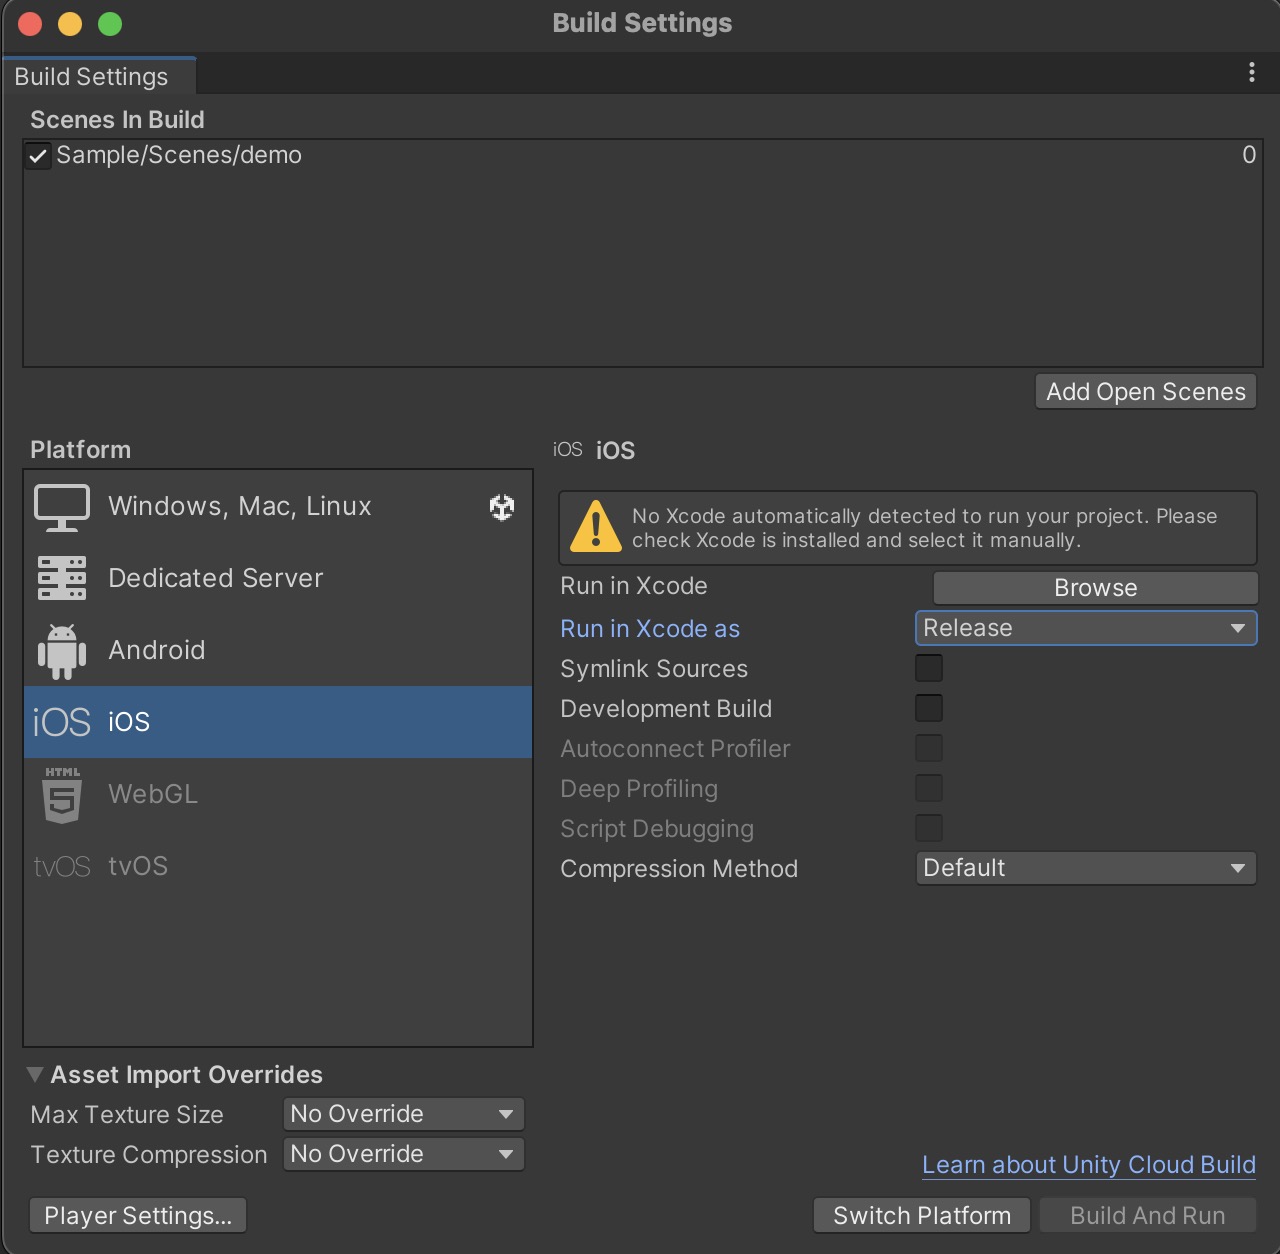
Install Xcode through app store on Mac.

Note: It is not possible to develop an iOS app without a Mac as Xcode is not available for non-Mac users. After install is complete, if build settings still say there is no Xcode detected, close and reopen the project.
iOS build failure: Unity-iPhone requires a provisioning profile. Select a provisioning profile in the Signing & Capabilities editor.
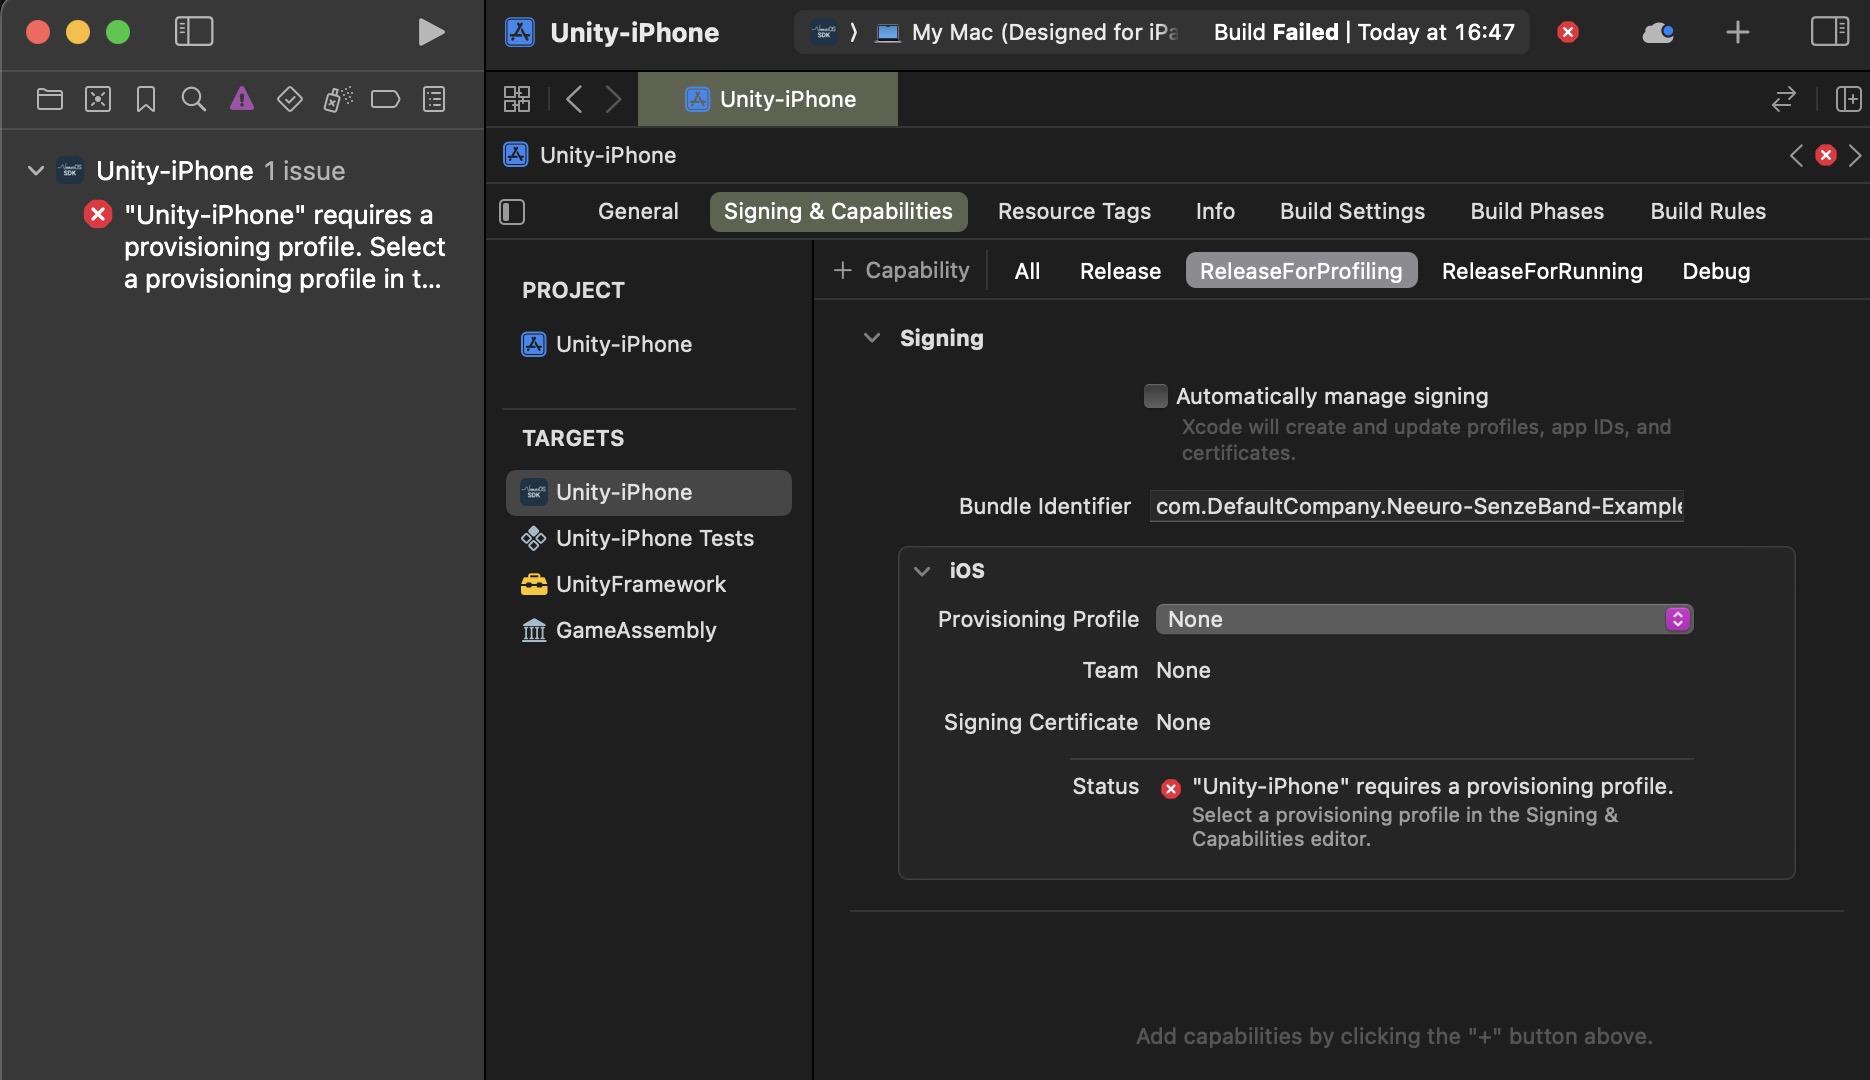
Under Signing & Capabilities > All - Click Automatically manage signing and then select a Development Team. You may need to go to developer.Apple.com and sign up before being able to login to your Apple Account in Xcode preferences.
This section will walk you through how to develop your own app using the Neeuro SenzeBand (NSB) Unity Standard SDK.
Development using the Neeuro SenzeBand (NSB) Unity Standard SDK can be done in the following stages:
- Initialisation
- Scanning
- Connecting
- Authenticating
- Impedance Check and Calibration
- Using the SenzeBand
- Disconnecting
- Changing Scenes
- Writing to Files
Parts of this tutorial will reference the scripts provided in the Sample project of the SDK, found under the Assets folder.
- Having set up and built the NeeuroOS SDK, NSB_Manager.cs will be the main control script for accessing SenzeBand functions. It is advisable to never change anything inside this script and just access the functions inside from external classes/scripts.
- Inside NSB_Manager,
Init()is called within theStart()function. It contains all delegate initializations for when the plugin sends back data from SenzeBand to our app. - After library initialisation is complete, the system will call
InitComplete(), inicating that intialisation is completed. This may take a while. - Once initialisation is completed, you are now free to use the public functions inside NSB_Manager.
- Call
SetScanning(bool)to switch scanning ON or OFF. It is automatically switched ON at Initialization. However, in the case when SetScanning was switched to OFF, you can switch it ON manually by calling theSetScanning(bool)function inStart(). - When scanning is enabled,
FoundAvailableDevice(String, String)is called whenever system detects an active SenzeBand device nearby. This function stores the detected device's address inList<String> listAvailableDevices. - Objects that have been scanned before will not be picked up again. So if they are turned off, there will be no indicator. This is why NSB_Manager calls
ClearList()every 6 seconds insideUpdate(). - Connected devices will not be picked up by the scanner again.
- To access the list of scanned addresses, call NSB_Manager's
GetScannedSenzeBandList()in your function, which returns Listof all the scanned device addresses.
- There are three UnityEvent/callbacks that will trigger once you attempt to connect to a SenzeBand device. This is called within the NSB_Manager's
Update()function, every 6 seconds to ensure successful state of connection.connectionSuccessfulCallback- this is triggered the moment the plugin confirms that SenzeBand connection is successful.connectionBrokenCallback- this is triggered when SenzeBand connection is broken or disconnected either via switching OFF the SenzeBand device, switching OFF Bluetooth, or when DisconnectSB() is called.connectionFailedCallback- this is triggered when the app fails to connect successfully to the SenzeBand. Feel free to AddListener/subscribe to these UnityEvents the functions if you want to get called when any of these events happen. A listener for a UnityEvent allows the functions provided in the listener to be called whenever the associated UnityEvent is triggered. For example, the Sample project's SBPanelUI.cs line 76, where if connection is lost the EEG button is set to false.
- To connect to a SenzeBand device, call
ConnectSB(String)passing the address String of a given scanned device. - Once the SenzeBand has been successfully connected,
connectionSuccessfulCallbackwill be called, triggering any attached listeners to the UnityEvent.
- For the Standard SDK, you'll need an internet connection to Authenticate your developer code with Neeuro's servers. Call
AuthenticateUser()to attempt authentication. In the sample, this function is attached to the Authenticate button, as seen in line 64 of SBPanelUI.cs. - Authentication is automatically done when a SenzeBand is connected. However, in the case when authentication fails, you can authenticate manually by using a listener to call
NSB_Manager.instance.AuthenticateUser(). - Once authentication is done, NSB_Manager.cs calls two functions via callbacks:
grabAuthenticationStatus()- sends back authentication status from SenzeBand plugingrabAuthenticationResult()- sends back authentication result(success or fail) from SenzeBand plugin. The moment authentication result returns success/verified, a countdown will start for the validity period of authentication.
- You can AddListener/subscribe to UnityEvent
authenticationUpdatedthe functions you want to get called when authentication callback is triggered (e.g. updating authentication UI). An example of this can be seen in line 88 of SBPanelUI.cs, which updates the text of the UI to show the updated authentication period. - Note that if authentication fails, you will not be able to receive any data from the SenzeBand.
- Impedance Check helps to verify if the signal quality from the 4 contact points/electrodes are good. Example, if there is makeup or some other impurities on the skin, the impedance values will be much higher due to the contribution of more resistance between the electrodes and skin surface, the EEG signals will not be good/accurate. Good impedance range is below 800k Ohms.
- We recommend to do an Impedance Check/Signal Quality Check after SenzeBand connection before using the SenzeBand.
- To do impedance check, call
NSB_Manager.instance.sendCommand("COMMAND_AC_LEADOFF")in your program. Switching to AC mode will stop SenzeBand from receiving EEG and start on checking signal quality. Advise the user to adjust SenzeBand and wipe off residue on skin to get better contact until all channel signals are green. Once done, switch back to DC mode by callingNSB_Manager.instance.sendCommand("COMMAND_DC_LEADOFF"). By default, SenzeBand is in DC mode after a successful connection. - Switching AC mode and DC mode can take a moment before plugin can verify and actually switch modes. That is why we advise to AddListener/subscribe to NSB_Manager's
onCommandAcknowledgedto know if plugin successfully switched modes already. This UnityEvent will trigger with parameter value either "COMMAND_ACK_DC_LEAD_OFF" or "COMMAND_ACK_AC_LEAD_OFF". An example of using AddListener for this is line 46 of CommandHandler.cs in the Sample. - In the sample project, this UnityEvent was utilized to disable Impedance Check button temporarily and wait until the UnityEvent is triggered to enable to Impedance Check button again. This is to avoid spamming the button in switching modes.
- If user thinks that the Acceleration and Orientation data is not accurate, we can perform calibration to improve the accuracy. To initiate calibration, call
NSB_Manager.instance.sendCommand("COMMAND_CAL_START"). Please refer to the sample project on how to perform the calibration, CommandHandler.cs lines 97, 312 etc. To stop calibration, callNSB_Manager.instance.sendCommand("COMMAND_CAL_STOP").
- After you've connected the SenzeBand, you need to first enable it. You can do this by calling
NSB_Manager.instance.SetReceiveEEG(true). This allows data from the SenzeBand to be sent over to Unity. This can be done using a ToggleEEG function like in lines 227 of the SBPanelUI.cs, and have that be called in an AddListener (line 76). - There are several different types of data you can grab from the SenzeBand. For each type of data, there is a callback that comes with it. NSB_Manager already assigned these callbacks for you in
Init(), so just have to call the getters inside NSB_Manager to get the data, refer to the functions listed below. - Data from the SenzeBand will update/come in once every second. You can AddListener/subscribe to NSB_Manager's UnityEvent rawdataGrabbed the functions you want to get called when new set of EEG data is sent from SenzeBand (e.g. function for updating attention graph, etc). UnityEvent
rawdataGrabbedis just a flag to let you know that EEG data is updated. - You can call
NSB_Manager.instance.SetReceiveEEG(false)to stop the SenzeBand from sending data.
- Call NSB_Manager's
DisconnectSB()to disconnect the SenzeBand. - Once the SenzeBand has been disconnected, whatever you AddListener/subscribe to UnityEvent
connectionBrokenCallBackwill be called.
- When the scenes are changed, the NSB_Objs GameObject could potentially be destroyed so make sure they don't get destroyed and should persist throughout all scenes.
- This can be prevented by using DontDestroyOnLoad in a script attached to the NSB_Objs GameObject. To prevent duplicates when reloading a scene, add logic to ensure there's only one copy. An example of how this can be implemented is below:
  public class NSB_ObjsPersist : MonoBehaviour
  {
    private static NSB_ObjsPersist instance;

    void Awake()
    {
      if (instance == null)
      {
        instance = this;
        DontDestroyOnLoad(gameObject);
      }
      else
      {
        Destroy(gameObject); // Destroy duplicate
      }
    }
  }
Our SenzeBand allows users to write to both .edf and .csv files using functions from NSB_Manager.
- Call the NSB_Manager's
StartRecording(), as seen on line 1532, to write to files. - Both .edf and .csv files will be generated using this function, with the file paths being saved to "{pathToCurrentDirectory}/RawEEG_{formattedDate}.csv" and "{pathToCurrentDirectory}/RawEEG_{formattedDate}.edf" respectively.
- Recording will be automatically stopped when SenzeBand is disconnected or the connection is broken, and the files will be saved.
- The format of each row of the .csv file is as follows: "{DateTime.Now:HH:mm:ss},{StoreRawEEGData},{StoreRawSPO2Data},{StoreRawHRData},{StoreRawPPGStatData},{GetAccelValuesAsString()}".
- Each row of the data record of the .edf file will have 250 samples from channel 0, followed by 250 from channel 1, then 250 from channel 2, and finally 250 from channel 3, with each sample representing 1 second of EEG data sampled at 250 Hz.
The following functions are in NSB_Manager.cs and are related to data receieved and processed from the SenzeBand. They can be used in your app to handle the data from the SenzeBand.
public void sendCommand(String command)
Name: sendCommand
Parameters: String representing the command to send
Possible String commands include:
COMMAND_START- for starting EEGCOMMAND_STOP- for stopping EEGCOMMAND_AC_LEADOFF- for turning ON impedance check modeCOMMAND_DC_LEADOFF- for turning OFF impedance check modeCOMMAND_LIGHT_RED- sets SenzeBand device light to red colorCOMMAND_LIGHT_GREEN- sets SenzeBand device light to green colorCOMMAND_LIGHT_BLUE- sets SenzeBand device light to blue colorCOMMAND_LIGHT_CYAN- sets SenzeBand device light to cyan colorCOMMAND_LIGHT_MAGENTA- sets SenzeBand device light to magenta colorCOMMAND_LIGHT_YELLOW- sets SenzeBand device light to yellow colorCOMMAND_STOP_RGB- stops light commandsCOMMAND_FW_VER- command for getting the firmware version of SenzeBand deviceCOMMAND_CAL_START- start calibration for acceleration and orientation to improve accuracyCOMMAND_CAL_STOP- stop calibration
Output: None
Definition: Sends a command to the currently connected SenzeBand
The following functions are not applicable for SenzeBand 2 and are only applicable for SenzeBand 1
public void SetGammaThreshold(float threshold)
Name: SetGammaThreshold
Parameters: Float representing the value to set the gamma threshold
Output: None
Definition: Sets gamma threshold for filtering useful data, setting the limit for what power is considered high interference.
public void Set5060Threshold(float threshold)
Name: Set5060Threshold
Parameters: Float representing the value to set the 50-60Hz threshold
Output: None
Definition: Sets 50-60Hz threshold for filtering useful data, setting the limit for what power is considered high interference.
public float GetFiftySixtyReading(int channel)
Name: GetFiftySixtyReading
Parameters: Int representing the channel index
SenzeBand channels:
- Center-left
- Center-right
- Right
- Left
Output: Float representing the 50-60Hz noise signal
Definition: Returns a Float stating the 50-60Hz noise signal from power sources based on the channel index given
public float GetGammaReading(int channel)
Name: GetGammaReading
Parameters: Int representing the channel index
SenzeBand channels:
- Center-left
- Center-right
- Right
- Left
Output: Float representing the frequency signal power
Definition: Returns a Float stating the frequency signal power present in naturally-occuring ambient noise based on the channel index given
public float GetMeanReading(int channel)
Name: GetMeanReading
Parameters: Int representing the channel index
SenzeBand channels:
- Center-left
- Center-right
- Right
- Left
Output: Float representing the average signal power
Definition: Returns a Float stating the mean signal power based on the channel index given
This file consists of calls to the NSB_BLE as well as functions that the plugins will do callbacks from.
public float assignAuthenticationResultDelegate(boolReturnVoid authenticationResultCallBackFunc)
Name: assignAuthenticationResultDelegate
Parameters: boolReturnVoid representing a CallBack to return the authentication result once its ready. Passes in a delegate to grab the authentication result. Returns only if there is a change in the authentication.
Output: Float representing the change in authentication.
Definition: Returns a Float stating any changes in authentication
public float assignAuthenticationStatusDelegate(boolReturnVoid authenticationCallBackFunc)
Name: assignAuthenticationStatusDelegate
Parameters: boolReturnVoid representing a CallBack to return the authentication result once its ready. Passes in a delegate to grab the authentication value. Returns only if there is no internet connection.
Output: Float representing the change in authentication.
Definition: Returns a Float stating any changes in authentication status value.
public void assignErrorLogDelegate(stringReturnVoid errorLogCallBack)
Name: assignErrorLogDelegate
Parameters: Passes in a delegate to grab the errorLogCallBack value. Returns only if there is no internet connection.
Output: Float representing the change in authentication.
Definition: Returns errorLogCallBack
public void assignScanCallBack(boolReturnVoid scanCallBackIn)
Name: assignScanCallBack
Parameters: A delegate that will be called to pass the address of the SenzeBand found
Output: None
Definition: Adds in delegates that will be called during scanning, when an available (unconnected) SenzeBand is found.
bool connectBT(string blueToothID, stringReturnVoid connectionSuccessCallBack = null, stringReturnVoid connectionBrokenCallBack = null, stringReturnVoid connectionFailCallBack = null)
Name: connectBT
Parameters:
- string blueToothID - The blueToothID of the device you want to connect to. This can be gotten in the GetDeviceList function
- stringReturnVoid connectionSuccessCallBack = null, - A callback that is executed upon a successful connection. Will be set to null after its called.
- stringReturnVoid connectionBrokenCallBack = null, - A callback that is executed upon a successful connection. Will be set to null after its called.
- stringReturnVoid connectionFailCallBack = null - A callback that is executed when the connection has been disconnected or if it fails to connect. Will be set to null after its called.
Output: Boolean representing whether Bluetooth connection was successful
Definition: Adds in delegates that will be called during scanning, when an available (unconnected) SenzeBand is found.
string getBTStatus()
Name: connectBT
Parameters: None
Output: String representing Bluetooth connection status
Definition: Get the status of the Bluetooth connection. If bluetooth is disabled on the device, then this will be Device_Off.
string getConnectedString()
Name: getConnectedString
Parameters: None
Output: String representing current SenzeBand connection state.
Definition: Gets the string that is returned when the Neeuro SenzeBand is connected.
string getConnectingString()
Name: getConnectingString
Parameters: None
Output: String representing current SenzeBand connection state.
Definition: Gets the string that is returned when the Neeuro SenzeBand is connecting.
string getCurrentConnectedDevice()
Name: getCurrentConnectedDevice
Parameters: None
Output: String representing current SenzeBand device name.
Definition: Gets the string that is that gets the status of the Neeuro device connection.
void getMCUID(String address)
Name: getMCUID
Parameters: String representing address of deive
Output: None
Definition: Gets the MCUID of the Neeuro device. This will only work if there is a device connected.
void getNotConnectedString()
Name: getNotConnectedString
Parameters: None
Output: None
Definition: Gets the string that is returned when the Neeuro SenzeBand is not connected.
void populateBLE_BluetoothStatusUpdateCallBack(boolReturnVoid BLE_BluetoothStatusCallBack, bool unpopulate = false)
Name: populateBLE_BluetoothStatusUpdateCallBack
Parameters:
- BLE_BluetoothStatusCallBack- A delegate that will be called if there is any change in the bluetooth connection.
- unpopulate = false- If this is set to true, then the delegate will be removed instead of being added instead.
Output: None
Definition: Adds in delegates that will be called if there is any change in the bluetooth status. To be used together with initializeBT()
void populateBLE_BreakConnection(stringReturnVoid callBackFunction, bool unpopulate = false)
Name: callBackFunction
Parameters:
- callBackFunction- A delegate that will be called if there is any change in the bluetooth connection.
- unpopulate = false- If this is set to true, then the delegate will be removed instead of being added instead.
Output: None
Definition: Adds in delegates that will be called if the connection to the Neeuro device has been disconnected.
void populateBLE_DeviceStatusUpdateCallBack(stringReturnVoid BLE_DeviceStatusUpdate, bool unpopulate = false)
Name: populateBLE_DeviceStatusUpdateCallBack
Parameters:
- BLE_BluetoothStatusCallBack- A delegate that will be called if there is any change in the Neeuro device connection.
- unpopulate = false- If this is set to true, then the delegate will be removed instead of being added instead.
Output: None
Definition: Adds in delegates that will be called if there is any change in the Neeuro device connection To be used together with initializeBT()
void populateBLE_FailConnection(stringReturnVoid callBackFunction, bool unpopulate = false)
Name: populateBLE_FailConnection
Parameters:
- callBackFunction- The delegate you want to add.
- unpopulate = false- If this is set to true, then the delegate will be removed instead of being added instead.
Output: None
Definition: Adds in delegates that will be called if the connection to the Neeuro device has been disconnected.
void populateBLE_FinishConnecting(stringReturnVoid callBackFunction, bool unpopulate = false)
Name: populateBLE_FailConnection
Parameters:
- callBackFunction- The delegate you want to add.
- unpopulate = false- If this is set to true, then the delegate will be removed instead of being added instead.
Output: None
Definition: Adds in delegates that will be called if the connection to the Neeuro device is successful.
void populateInitFinishCallBack(voidReturnVoid BTInitFinishCallBack, bool unpopulate = false)
Name: populateInitFinishCallBack
Parameters:
- BTInitFinishCallBack- A delegate that will be called once the initialization process has been done. Will be set to null once its called
- unpopulate = false- If this is set to true, then the delegate will be removed instead of being added instead.
Output: None
Definition: Adds in delegates that will be called if the connection to the Neeuro device is successful.
void startStopScanning(bool toStart)
Name: startStopScanning
Parameters: toStart Flag to start or stop the scanning.
Output: None
Definition: Toggles the scanning of bluetooth devices.
This file consists of calls to the NSB_EEG as well as functions that the plugins will do callbacks from.
void assignABDTDelegate(EEGController.btFloat2DArrayCallback callBackFunc)
Name: assignABDTDelegate
Parameters: The callBack function to execute
Output: None
Definition: The assigned delegate will be called when the ABDT(Alpha, Beta, Delta..) signal is ready. This is a 2D array of 4x5 floats.
void assignAccDelegate(EEGController.btFloatArrayCallback callBackFunc)
Name: assignABDTDelegate
Parameters: The callBack function to execute
Output: None
Definition: The assigned delegate will be called when accelerometer updates. This is an array of 3 floats.
void assignAttentionDelegate(EEGController.btFloatCallback callBackFunc)
Name: assignABDTDelegate
Parameters: The callBack function to execute
Output: None
Definition: The assigned delegate will be called when the attention signal is ready.
void assignBatteryStatus(EEGController.EEGStringCallBack batteryStatusCallBack)
Name: assignBatteryStatus
Parameters: CallBack to return the battery status once its ready
Output: None
Definition: Gets the battery status of the Neeuro device. The callBack will be called as frequent as the EEG data.
void assignChannelDelegate(EEGController.btBoolArrayCallback callBackFunc)
Name: assignChannelDelegate
Parameters: The callBack function to execute
Output: None
Definition: The assigned delegate will be called each time the 4 channels update.
void assignEEGImpedanceDelegate(EEGController.btFloatArrayCallback callBackFunc)
Name: assignEEGImpedanceDelegate
Parameters: The callBack function to execute
Output: None
Definition: The assigned delegate will be called when the EEG impedance is ready.
void assignEnvironmentDataDelegate(EEGController.EEGStringCallBack callBackFunc)
Name: assignEnvironmentDataDelegate
Parameters: The callBack function to execute
Output: None
Definition: The assigned delegate will be called when the raw Environment data is ready. The input string will have the following format: environmentString = std::string("SMOOTHED_GAMMA,") + ToString(sbInstance.EEG_smoothedGamma[0]) + "," + ToString(sbInstance.EEG_smoothedGamma[1]) + "," + ToString(sbInstance.EEG_smoothedGamma[2]) + "," + ToString(sbInstance.EEG_smoothedGamma[3]) + "," + std::string("SMOOTHED_MEAN,") + ToString(sbInstance.EEG_smoothedMean[0]) + "," + ToString(sbInstance.EEG_smoothedMean[1]) + "," + ToString(sbInstance.EEG_smoothedMean[2]) + "," + ToString(sbInstance.EEG_smoothedMean[3]);.
void assignGoodConnectionCheckDelegate(EEGController.btBoolCallback callBackFunc)
Name: assignGoodConnectionCheckDelegate
Parameters: The callBack function to execute
Output: None
Definition: The assigned delegate will be called whenever the Neeuro device updates the connection checks.
void assignMentalWorkloadDelegate(EEGController.btFloatCallback callBackFunc)
Name: assignMentalWorkloadDelegate
Parameters: The callBack function to execute
Output: None
Definition: The assigned delegate will be called when the attention signal is ready. This is an array of 4 floats.
void assignPPGDataDelegate(EEGController.btIntArrayCallback callBackFunc)
Name: assignPPGDataDelegate
Parameters: The callBack function to execute
Output: None
Definition: The assigned delegate will be called when the raw PPG signal is ready. The raw signal has is an array of 1000 floats. The first float is IR and the second float is RED.
void assignRawDataDelegate(EEGController.btIntArrayCallback callBackFunc)
Name: assignRawDataDelegate
Parameters: The callBack function to execute
Output: None
Definition: The assigned delegate will be called when the raw EEG signal is ready. The raw signal has is an array of 1000 ints. Each int value ranges from -2048 to 2047. Every 1 unit represents 0.61 microvolt.
void assignRawDataDelegate200ms(EEGController.btFloatArrayCallback callBackFunc)
Name: assignRawDataDelegate200ms
Parameters: The callBack function to execute
Output: None
Definition: The assigned delegate will be called when the raw EEG signal is ready. The raw signal has is an array of 200 floats. The first 50 floats belong to one channel, next 50 floats belong to another channel and so on.
void assignRawDataDelegateFloat(EEGController.btFloatArrayCallback callBackFunc)
Name: assignRawDataDelegateFloat
Parameters: The callBack function to execute
Output: None
Definition: The assigned delegate will be called when the raw EEG signal is ready. The raw signal has is an array of 1000 floats. The first 250 floats belong to one channel, next 250 floats belong to another channel and so on.
void assignRelaxationDelegate(EEGController.btFloatCallback callBackFunc)
Name: assignRelaxationDelegate
Parameters: The callBack function to execute
Output: None
Definition: The assigned delegate will be called when the relaxation signal is ready. This is an array of 4 floats.
void assignSignalReadyStatusDelegate(EEGController.btBoolCallback callBackFunc)
Name: assignSignalReadyStatusDelegate
Parameters: The callBack function to execute
Output: None
Definition: The assigned delegate will be called whenever the Neeuro device receives data from Bluetooth.
void GetEnvironmentData()
Name: GetEnvironmentData
Parameters: None
Output: None
Definition: Returns a string containing environment data
- MCU ID/ MAC
- MCU ID: A unique 32 character identifier String for the SenzeBand device.
- MAC: A unique 12 character identifier String for the SenzeBand device.
- Connection Check
- True/False, shows whether there is good connection on BLE and no data loss.
- Signal Ready
- True/False, shows whether there is sufficient strong EEG signal received for signal processing of mental states.
- Authentication
- True/False, shows whether the SDK has been authenticated. If false, user can only view MCU ID.
- Developer Code
- A String text given by Neeuro to authenticate the SDK.
- Channel Status
- True/False, shows whether the SenzeBand device is in contact with user and receiving EEG data.
- Channel 0 = Center-left, Channel 1 = Center-right, Channel 2 = Right (outer), Channel 3 = Left (outer).
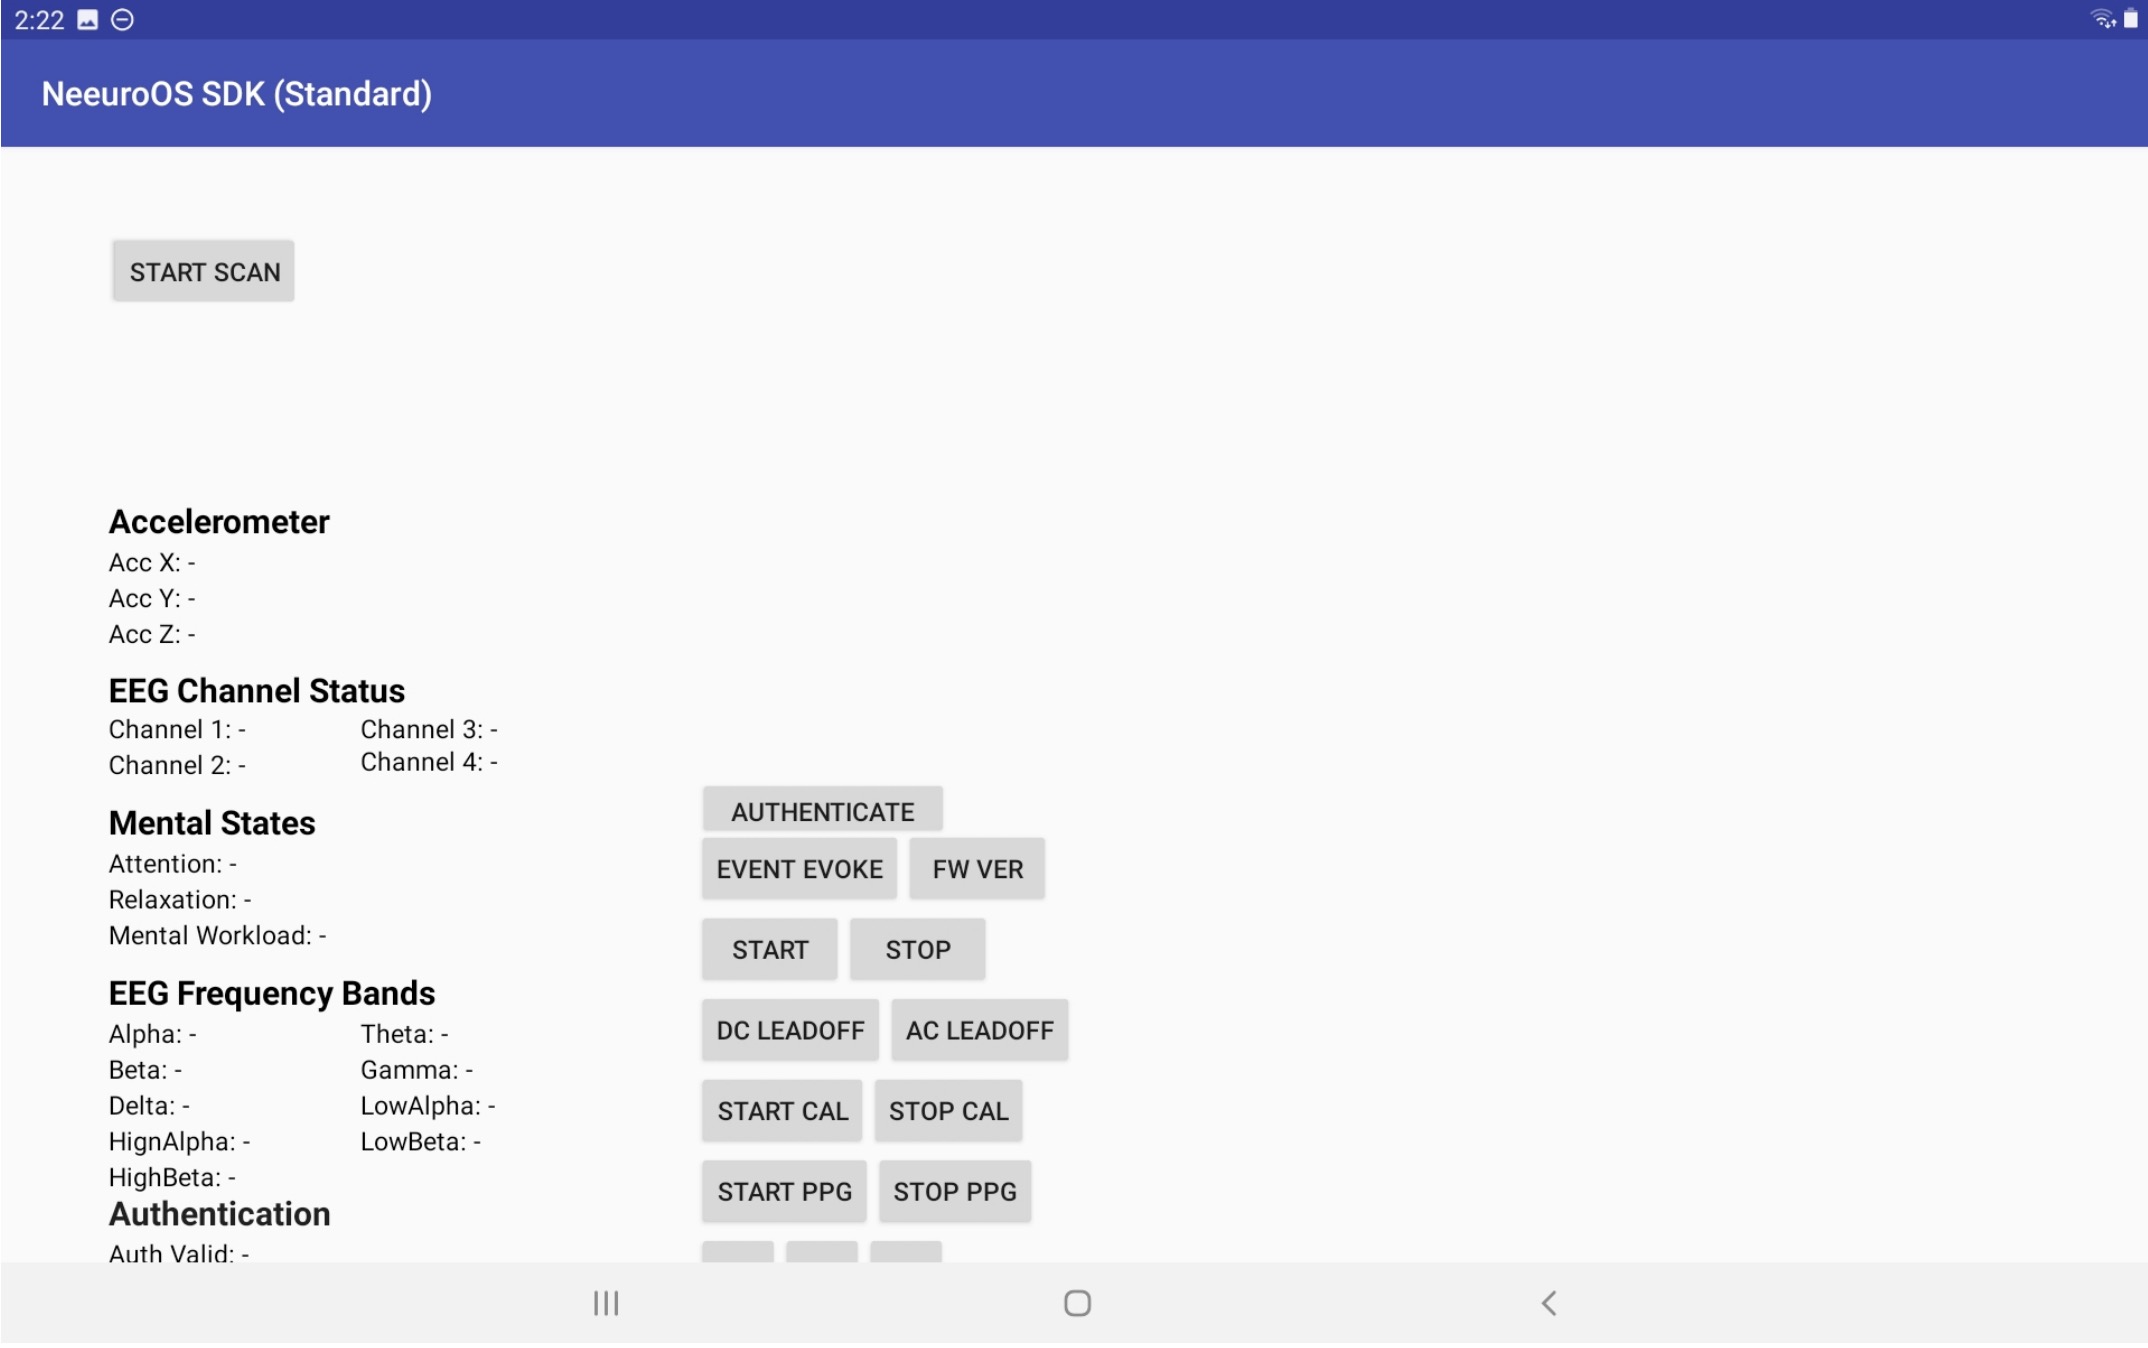
Scanning and connection
Click on the START SCAN button as seen below.
You will see the available SenzeBands in the scanned devices list. If your SenzeBand does not appear, check if its battery has been turned on.
Click on the SenzeBand to connect.
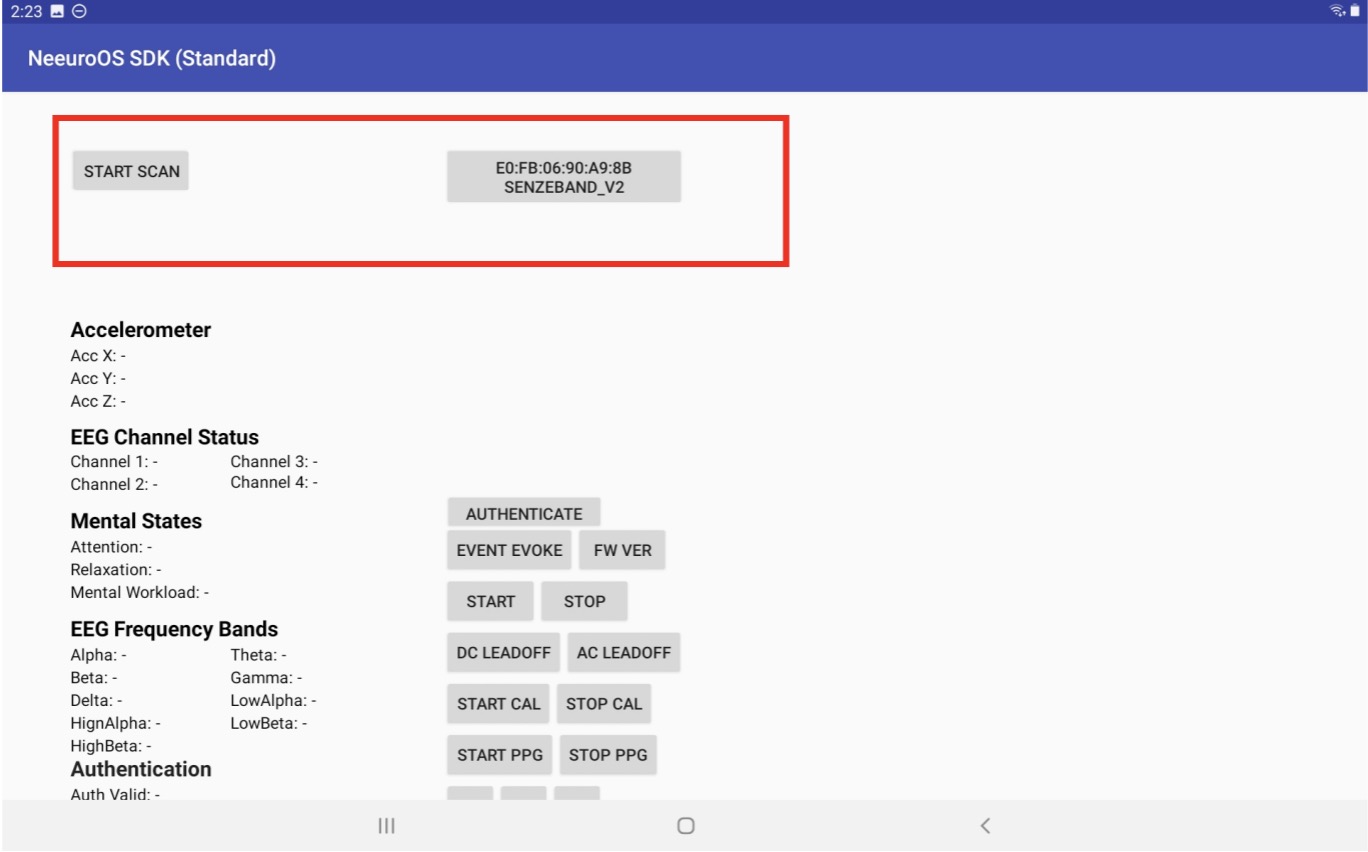
Once the SenzeBand is connected, its status is shown below.
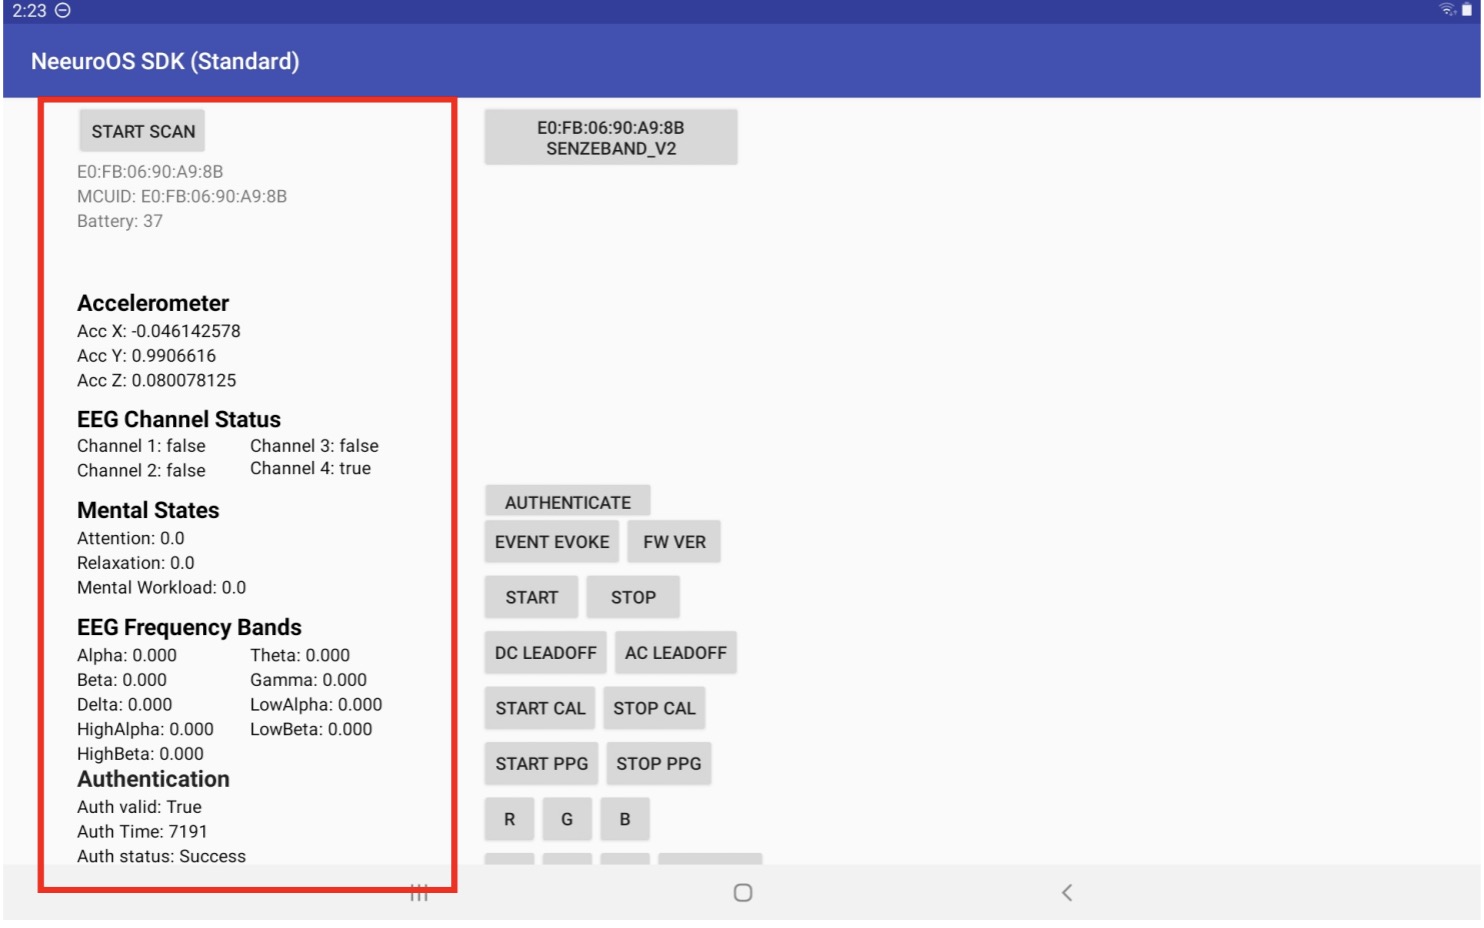
To disconnect a SenzeBand, click on the DISCONNECT button.
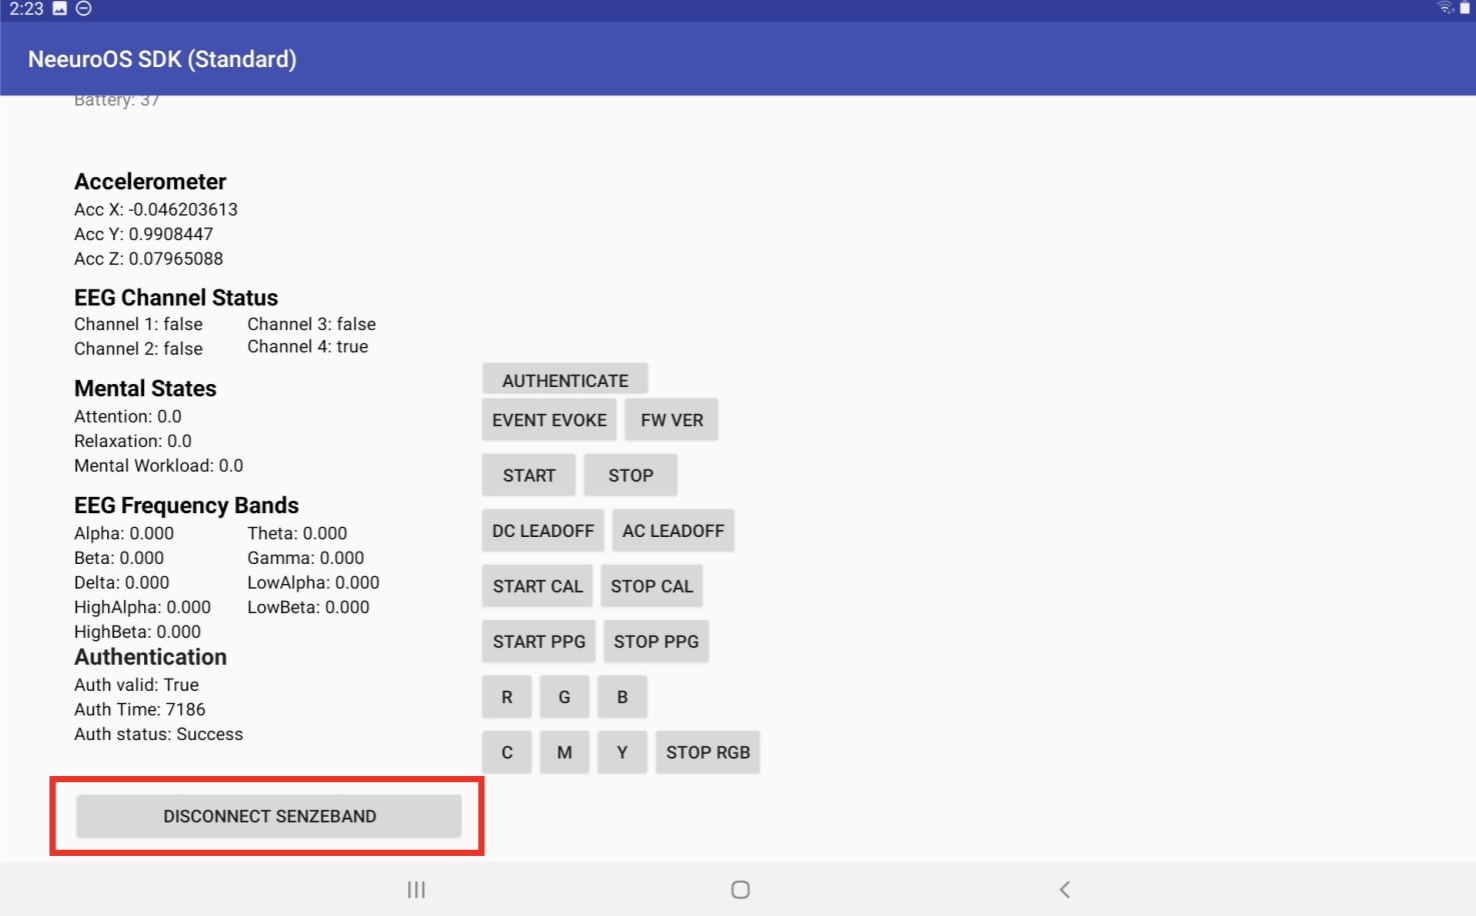
If you wish to connect to another SenzeBand, click on the START SCAN button again.
Authentication
To authenticate, press the AUTHENTICATE button as seen below.
After authenticating, you will be able to see the time remaining in the authentication period.
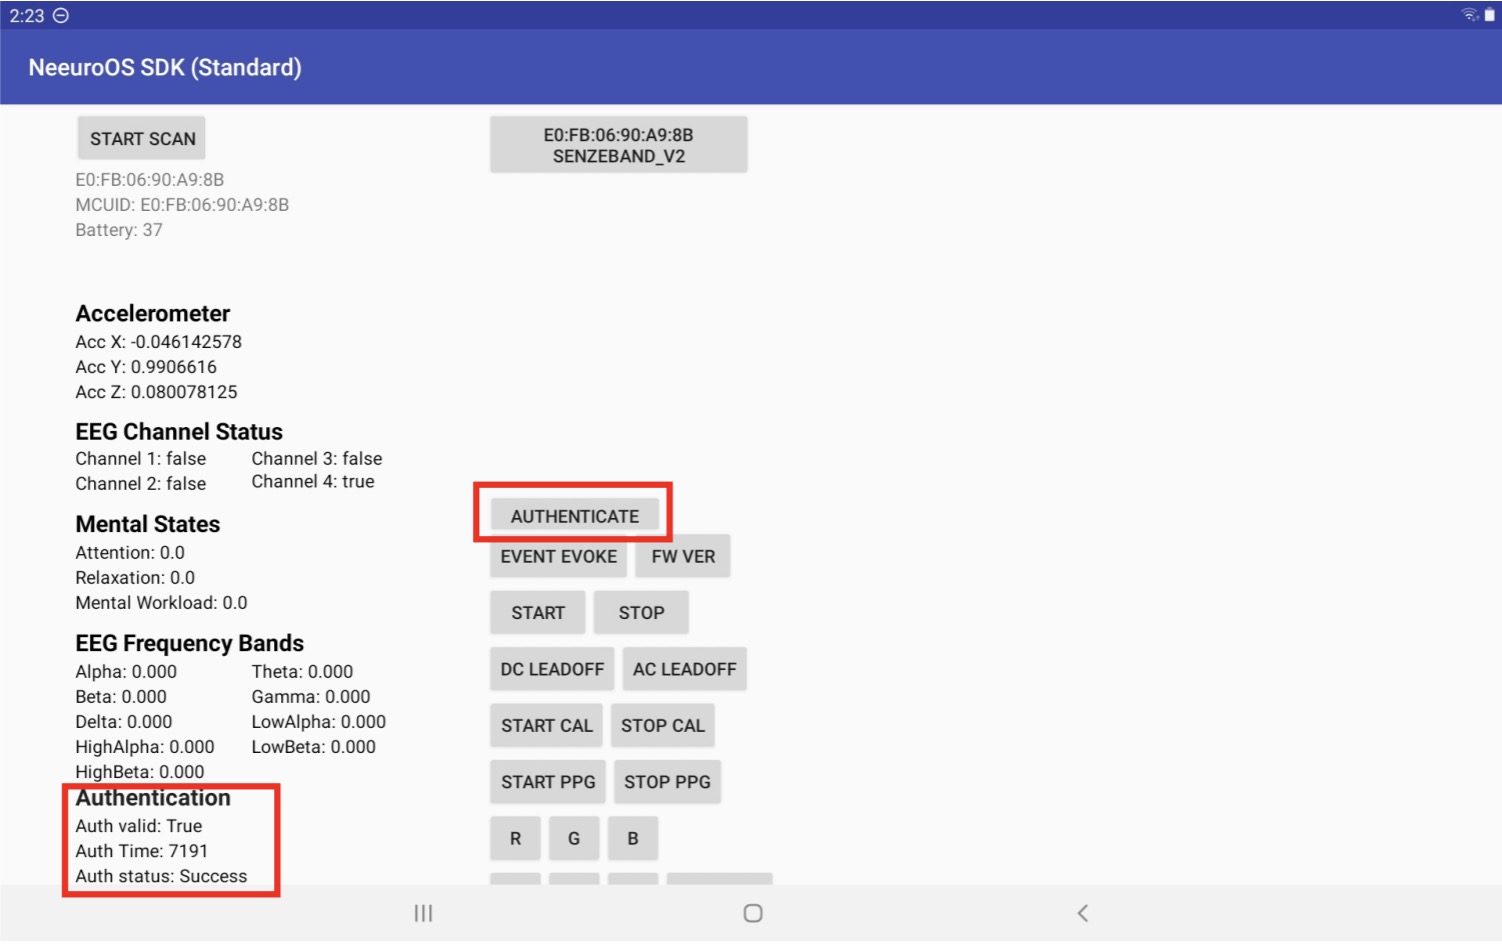
The authentication period lasts 2 hours (7200 seconds) and in order to continue to use the SenzeBand, you will need to reauthenticate when the time is up.
Click on the AUTHENTICATE button once again to reauthenticate.
Event Marker
Click on the EVENT EVOKE button to get the event timestamp.
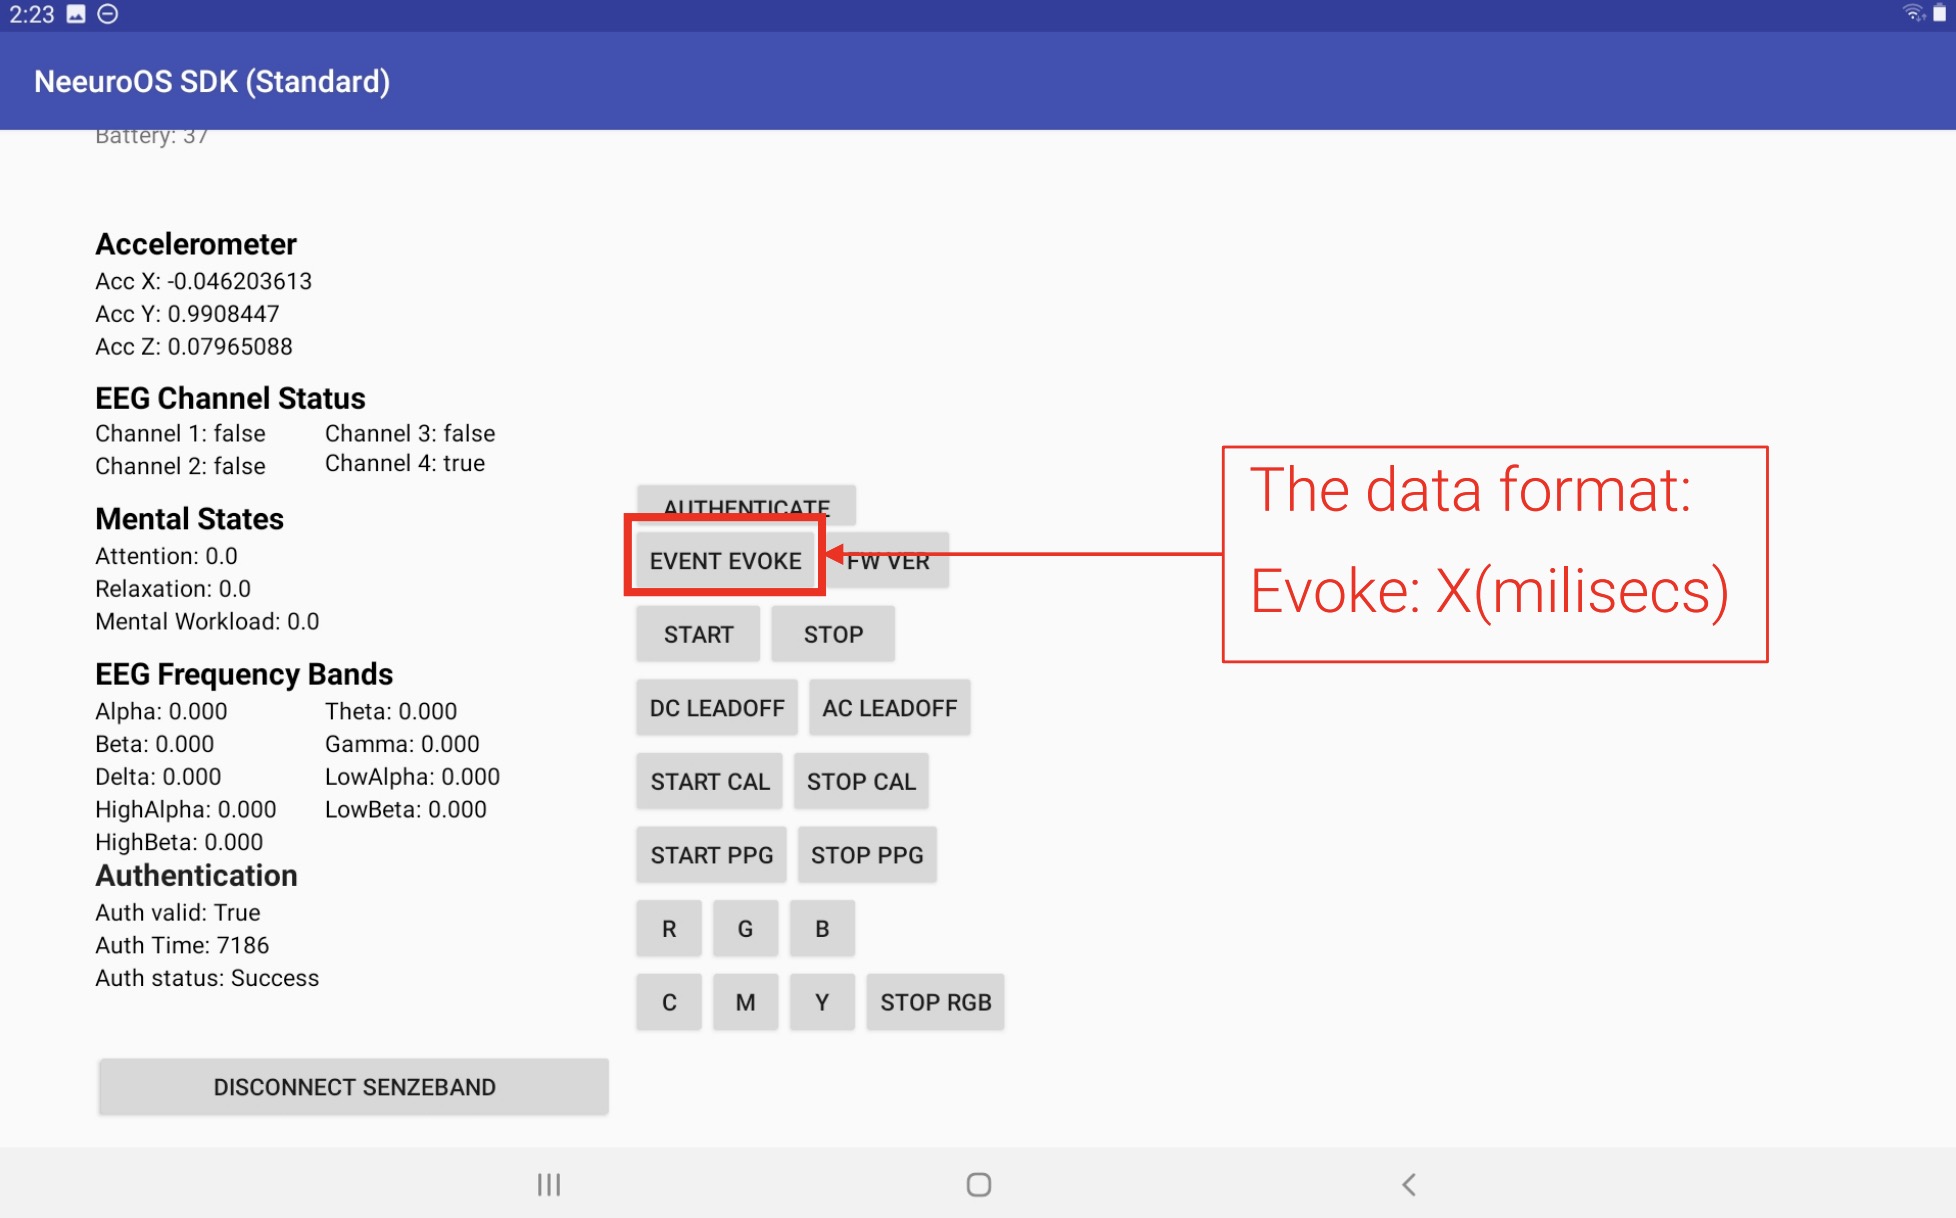
The event marker recalls technical data of the client whenever the EVENT EVOKE button is used.
The data format returned is the timestamp in milliseconds.
Impedance
- Click on the AC LEADOFF button to measure the impedance.
- The ideal impedance should be around 500k Ohms.
- Remember to click on the DC LEADOFF button to switch back to EEG mode.
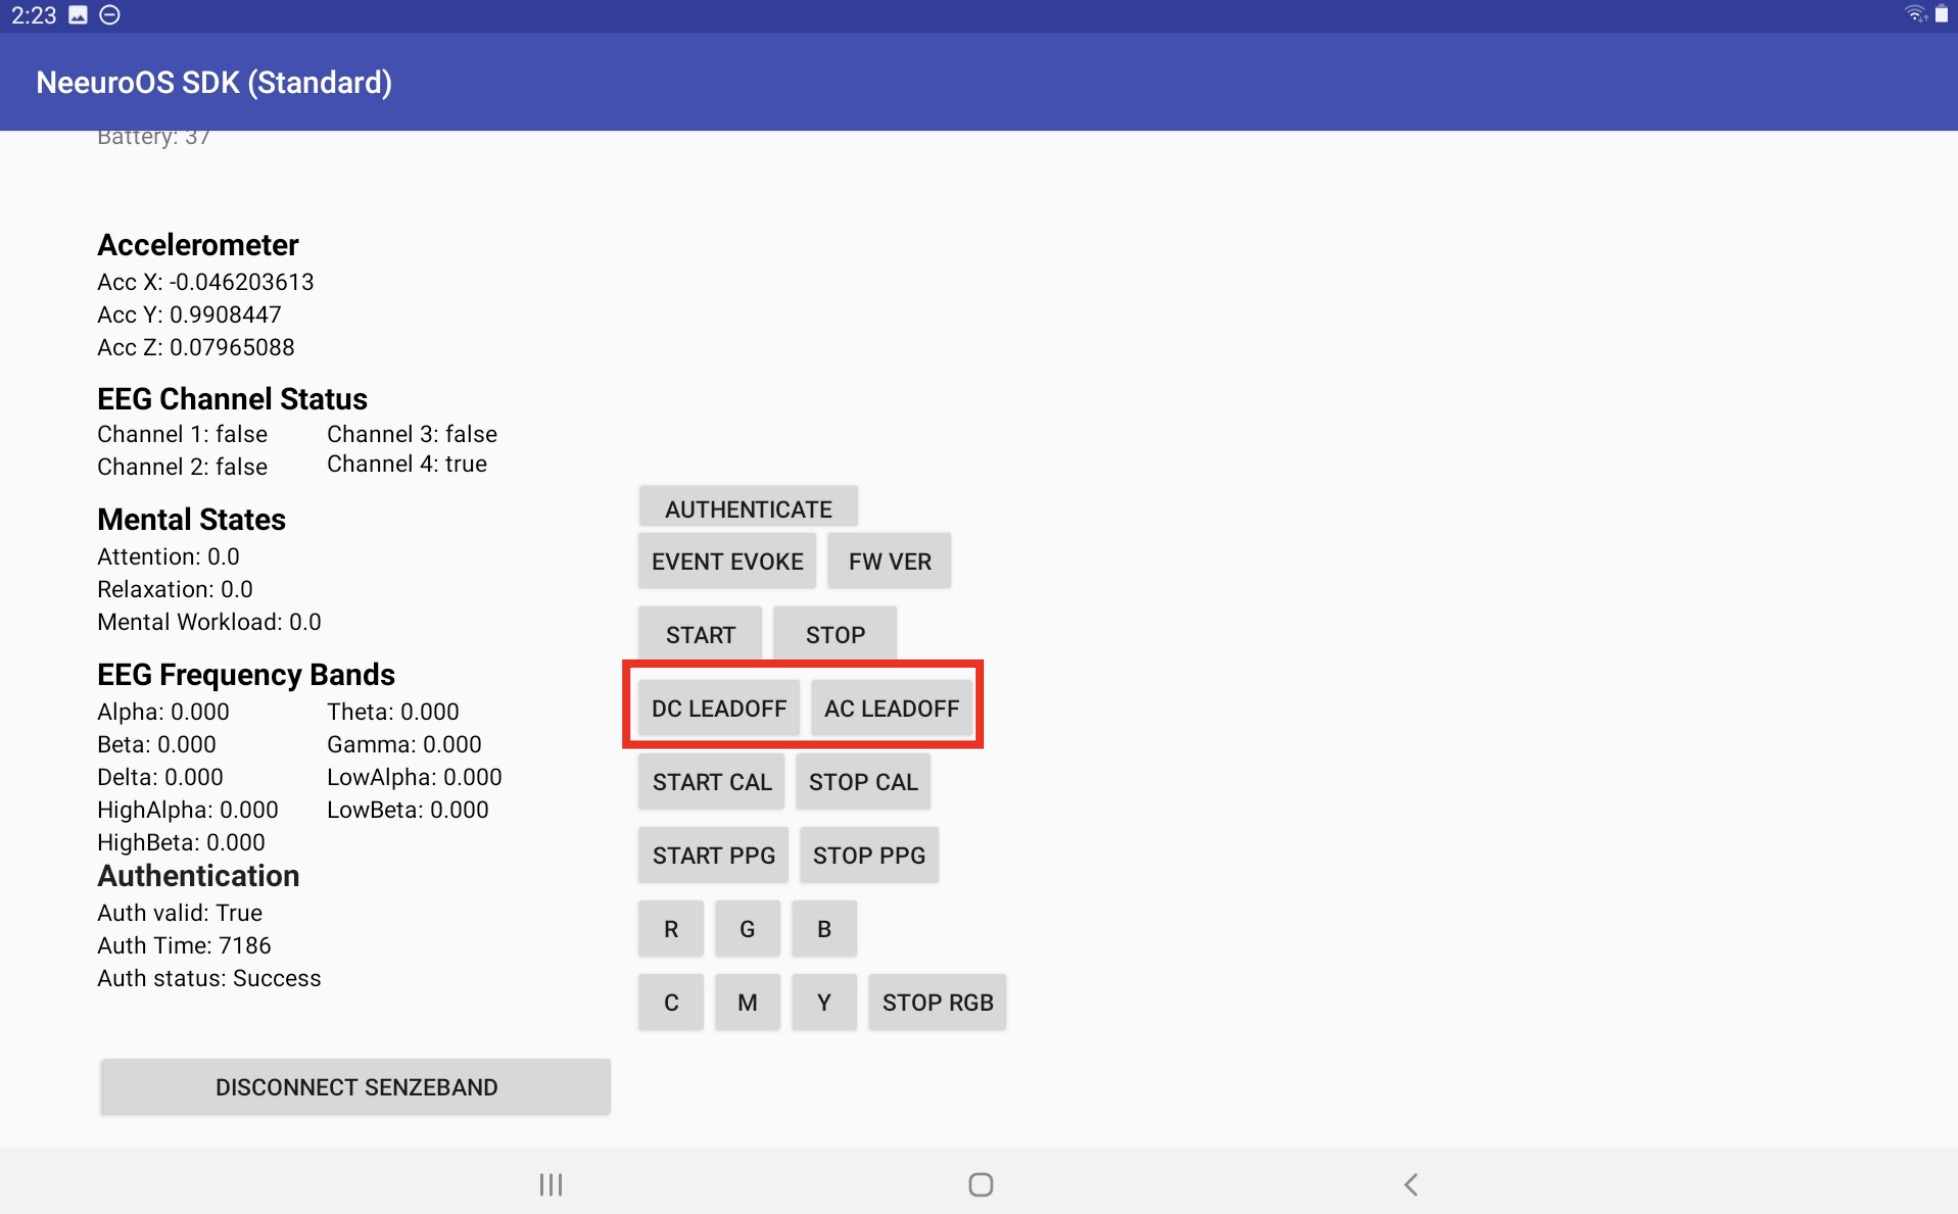
Motion sensor calibration
In order to get an accurate motion sensor data, you will need to calibrate.
Click on CAL START button to start calibrating the Motion sensor.
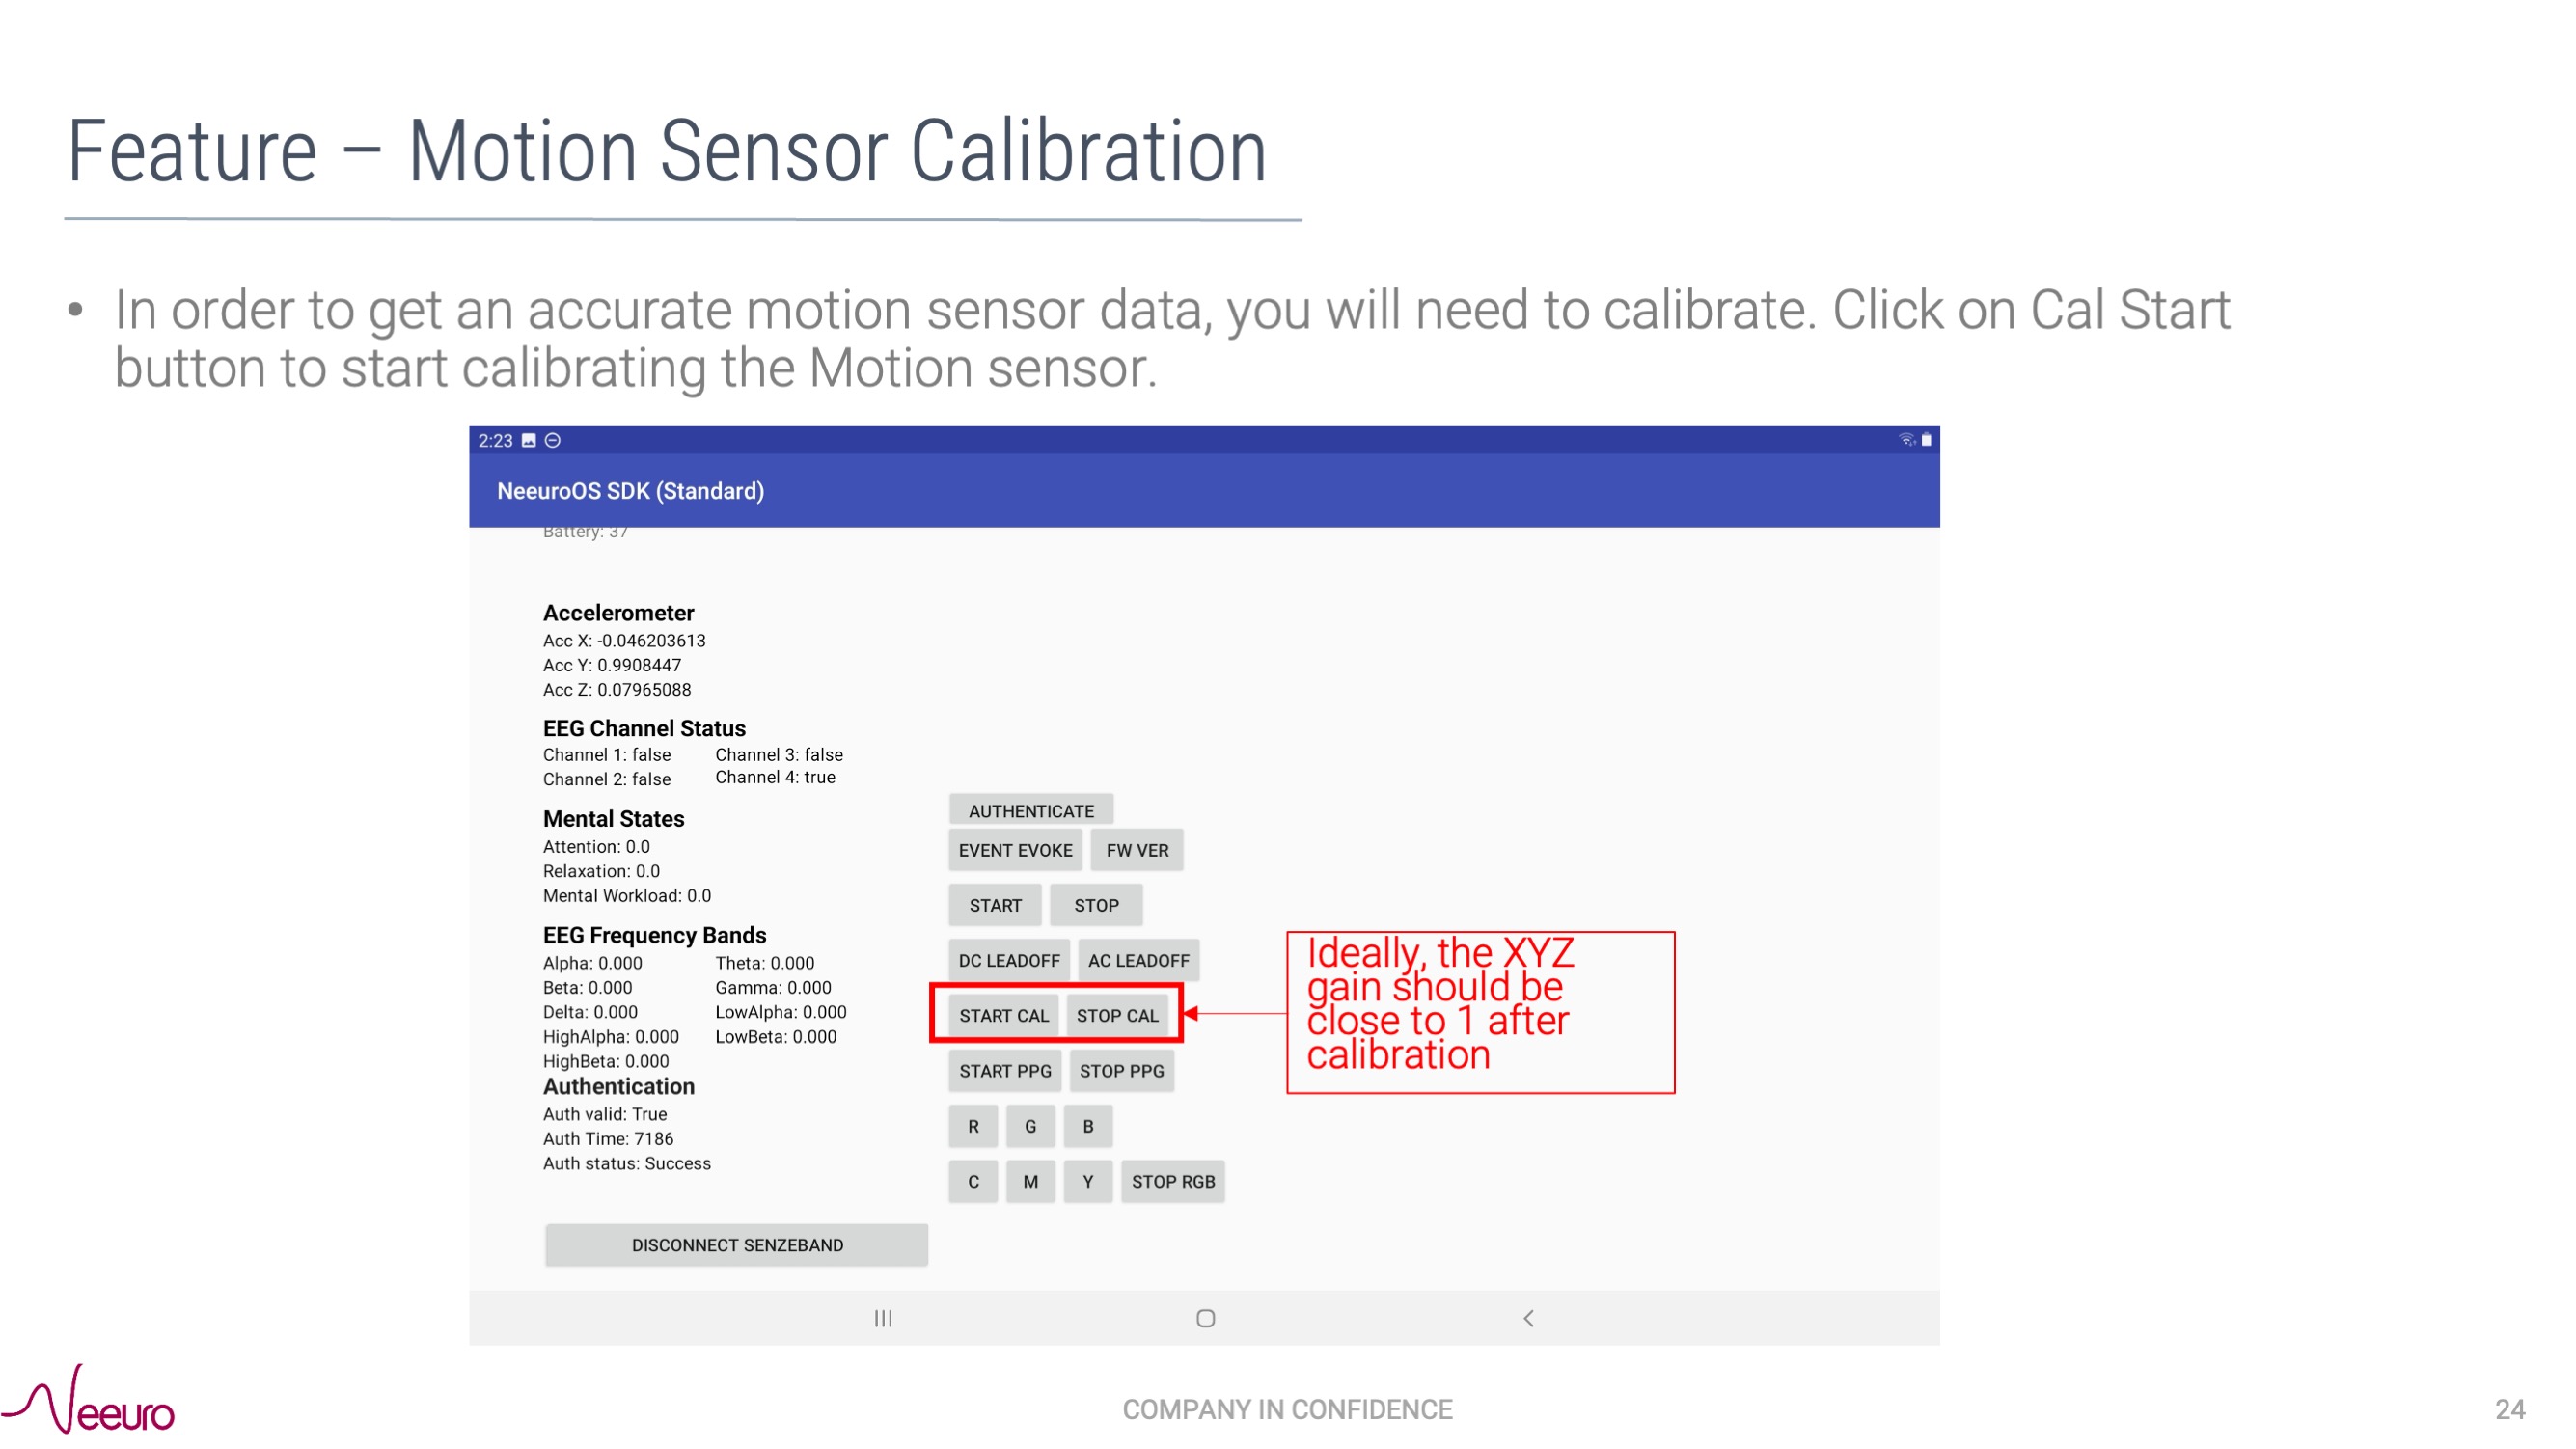
When calibrating, avoid compromising the accuracy of the SenzeBand 2's calibration by moving away from all magnetic sources, like metal items, electronic gadgets and power sockets.
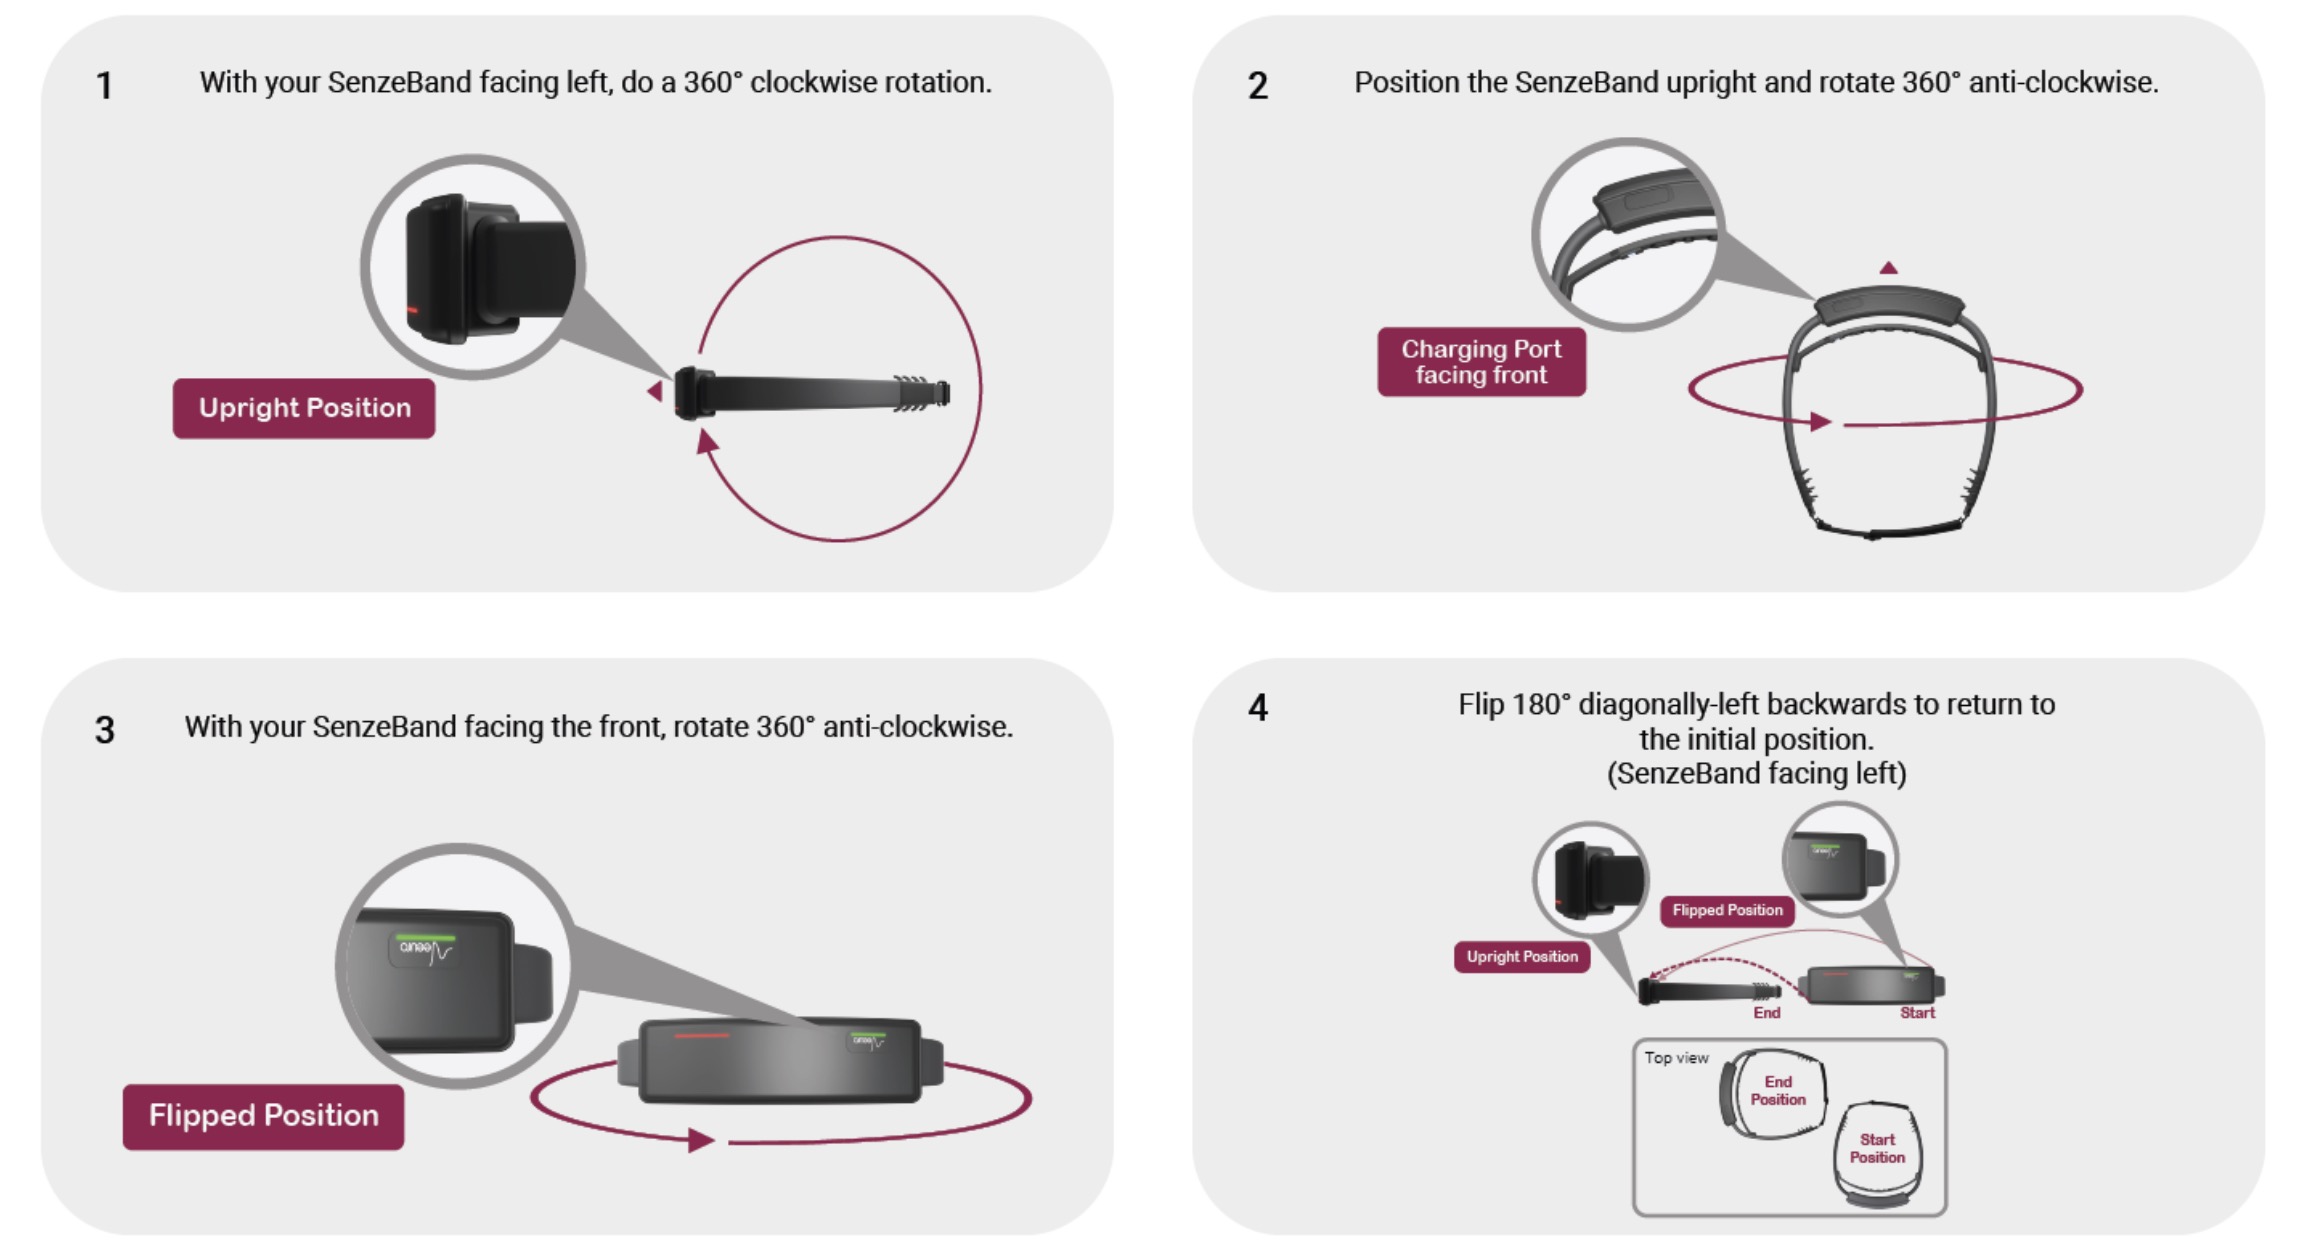
EEG and PPG data
- Click on START and STOP buttons to get EEG data.
- Click on START PPG and STOP PPG buttons to get the raw PPG in IR and RED data.
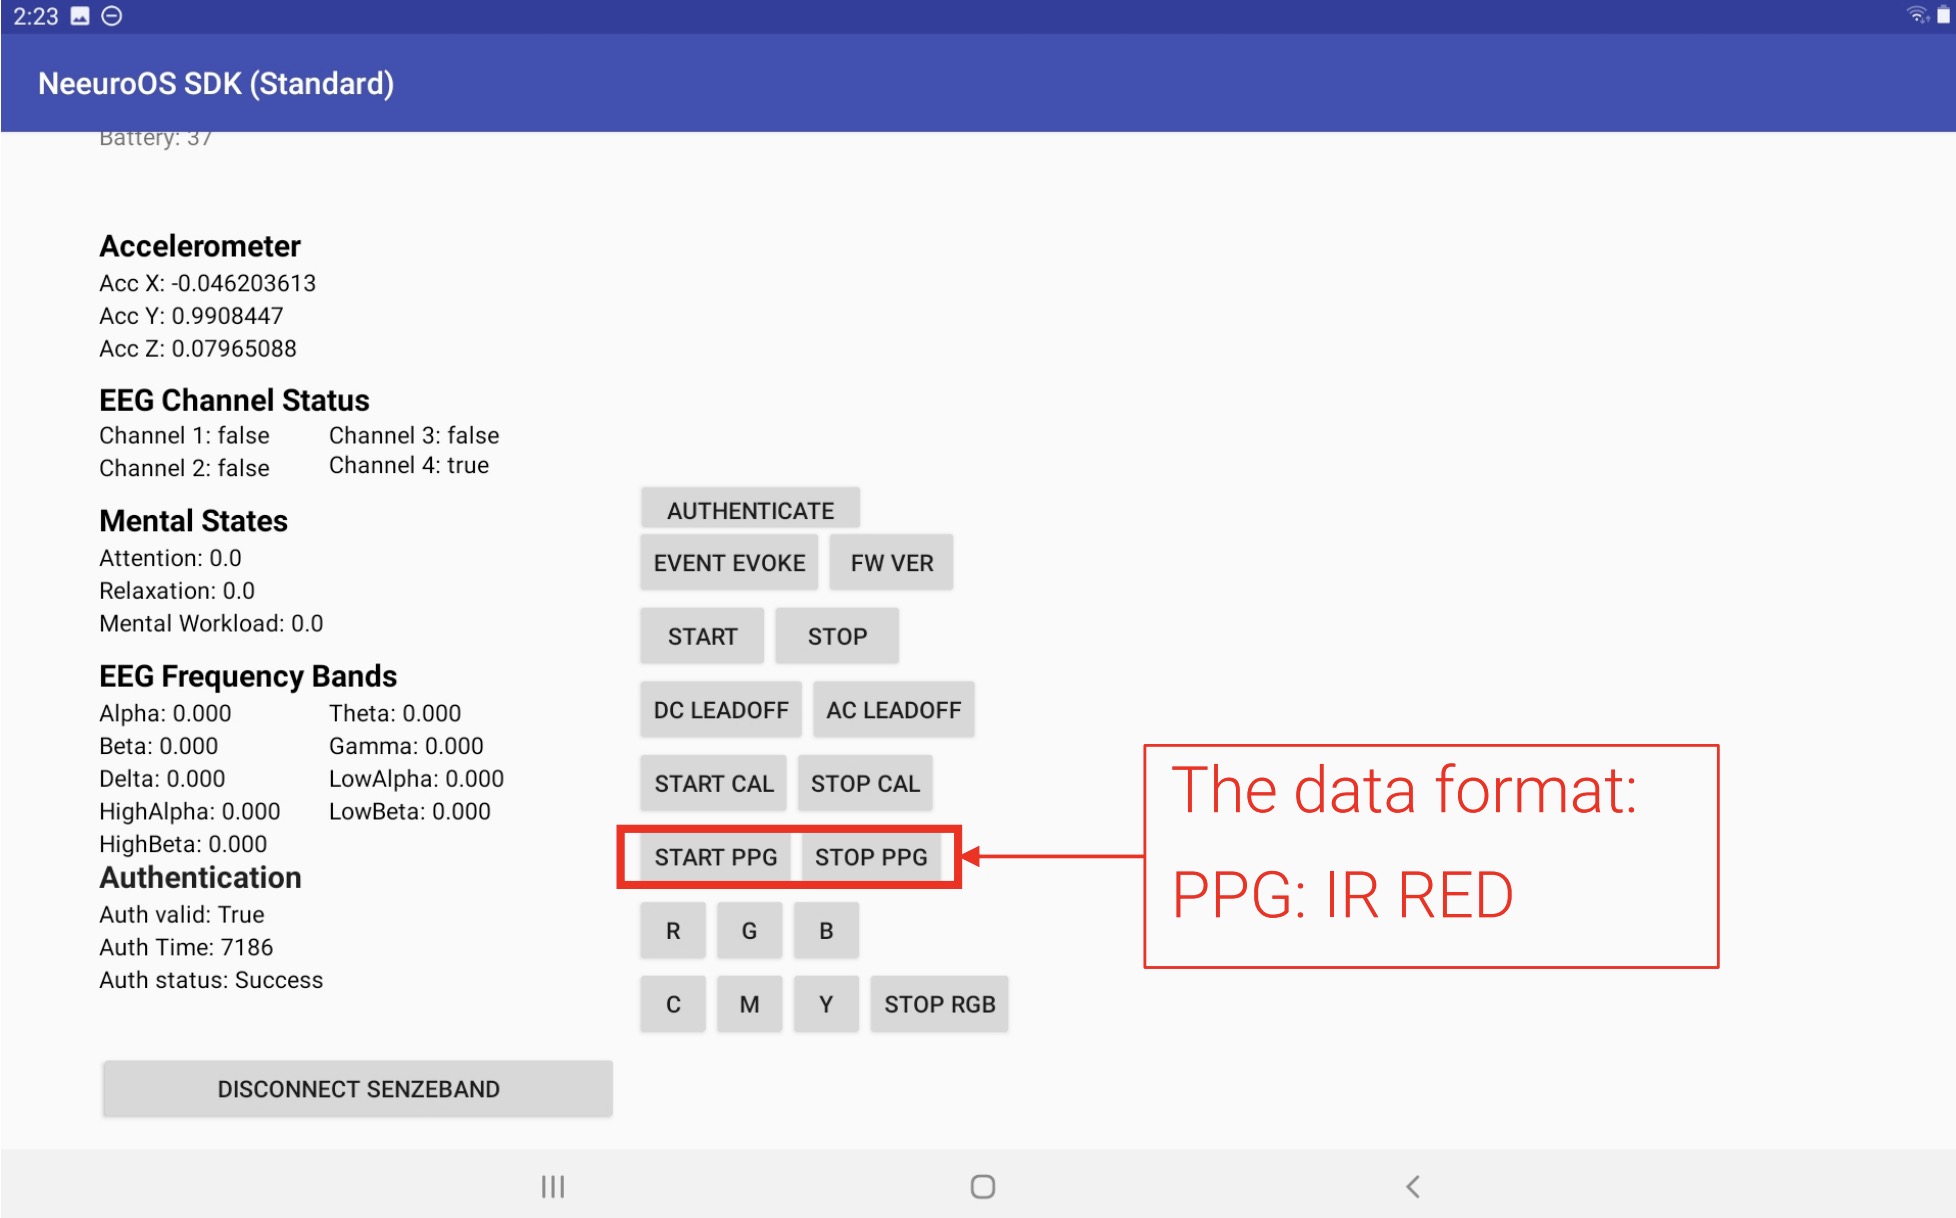
Activity LED
- The Activity LED can be controlled using the RGYCMY buttons.
- There are 6 colours of LED, allowing each to be representative of their a different state, or a paticular shop.
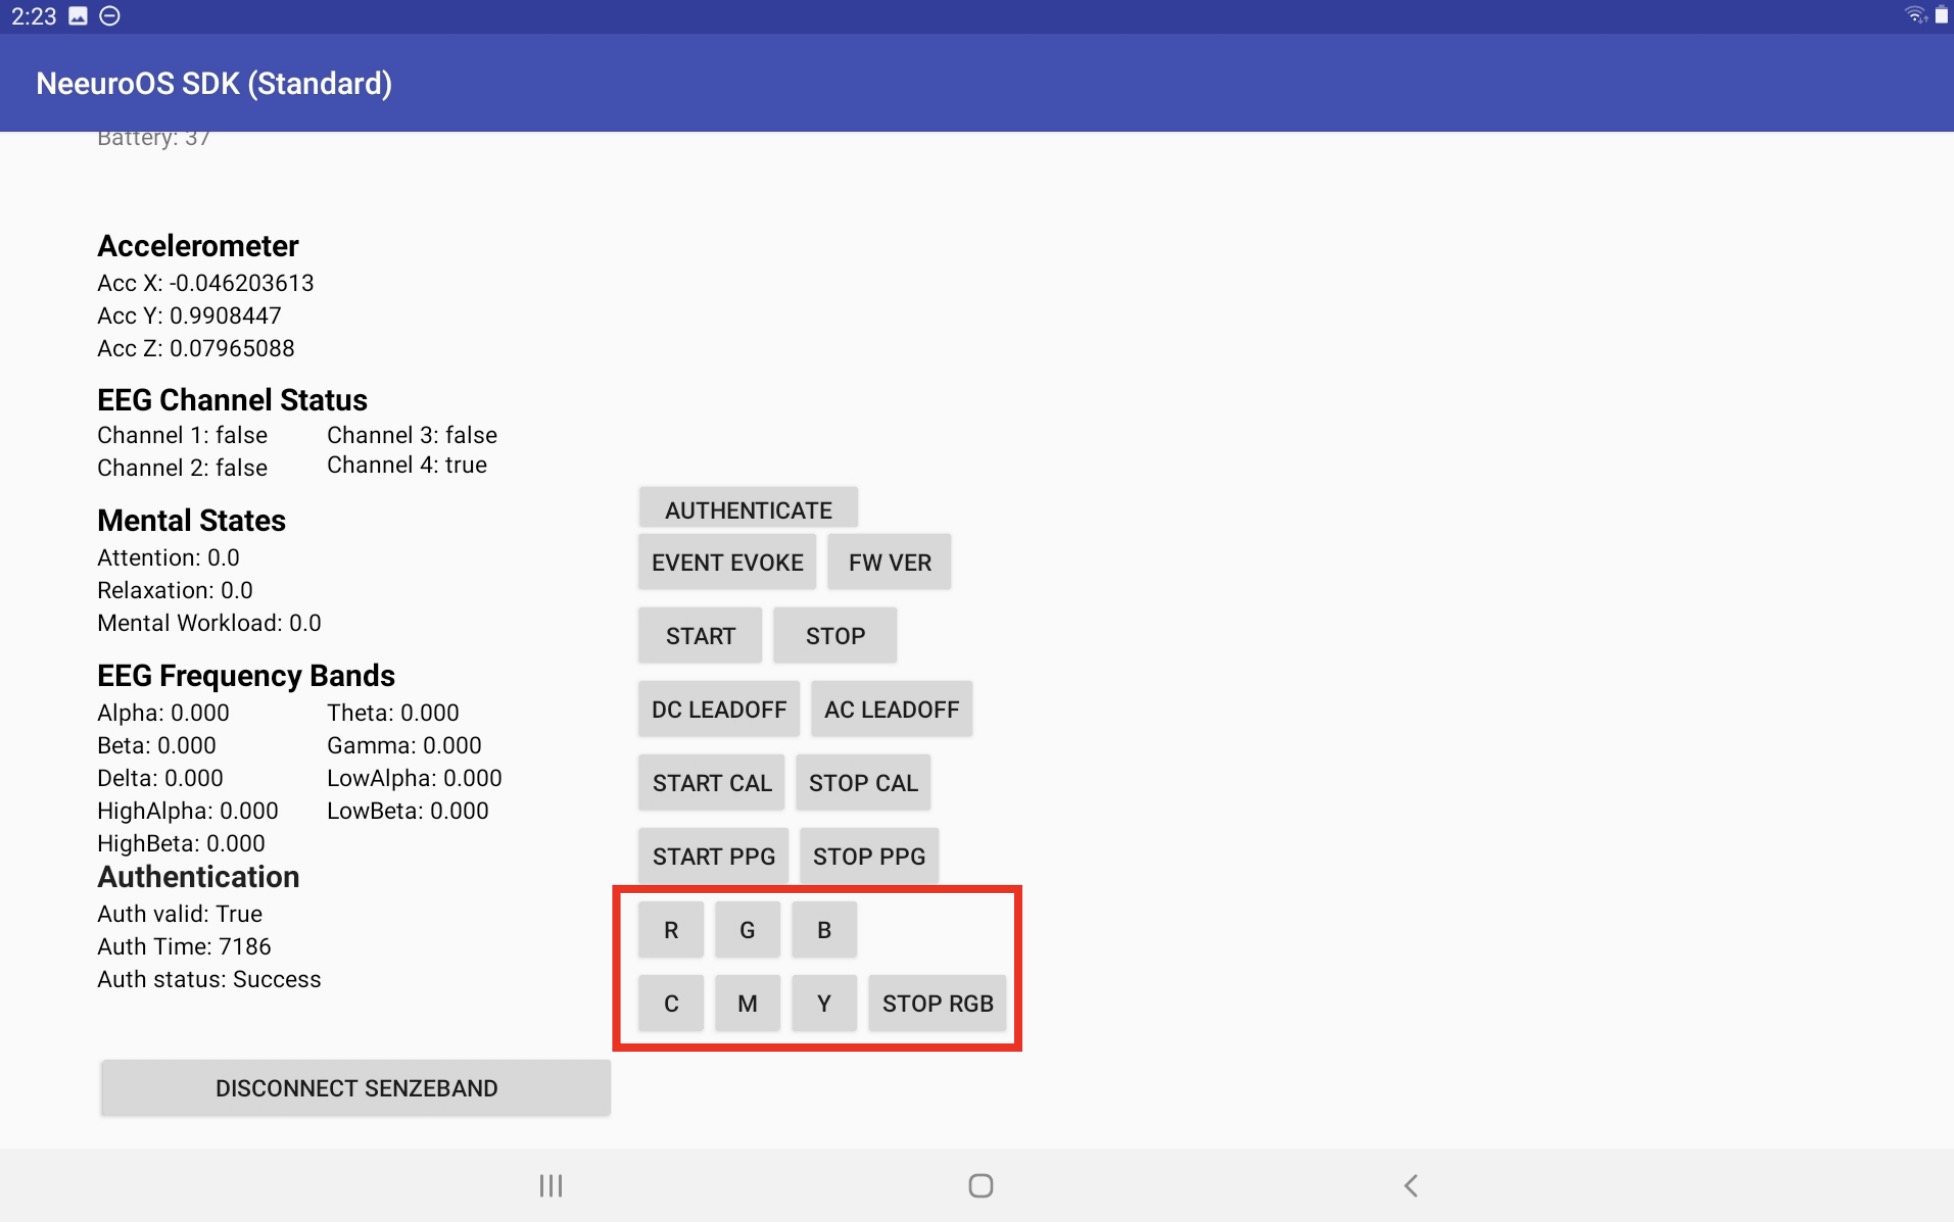
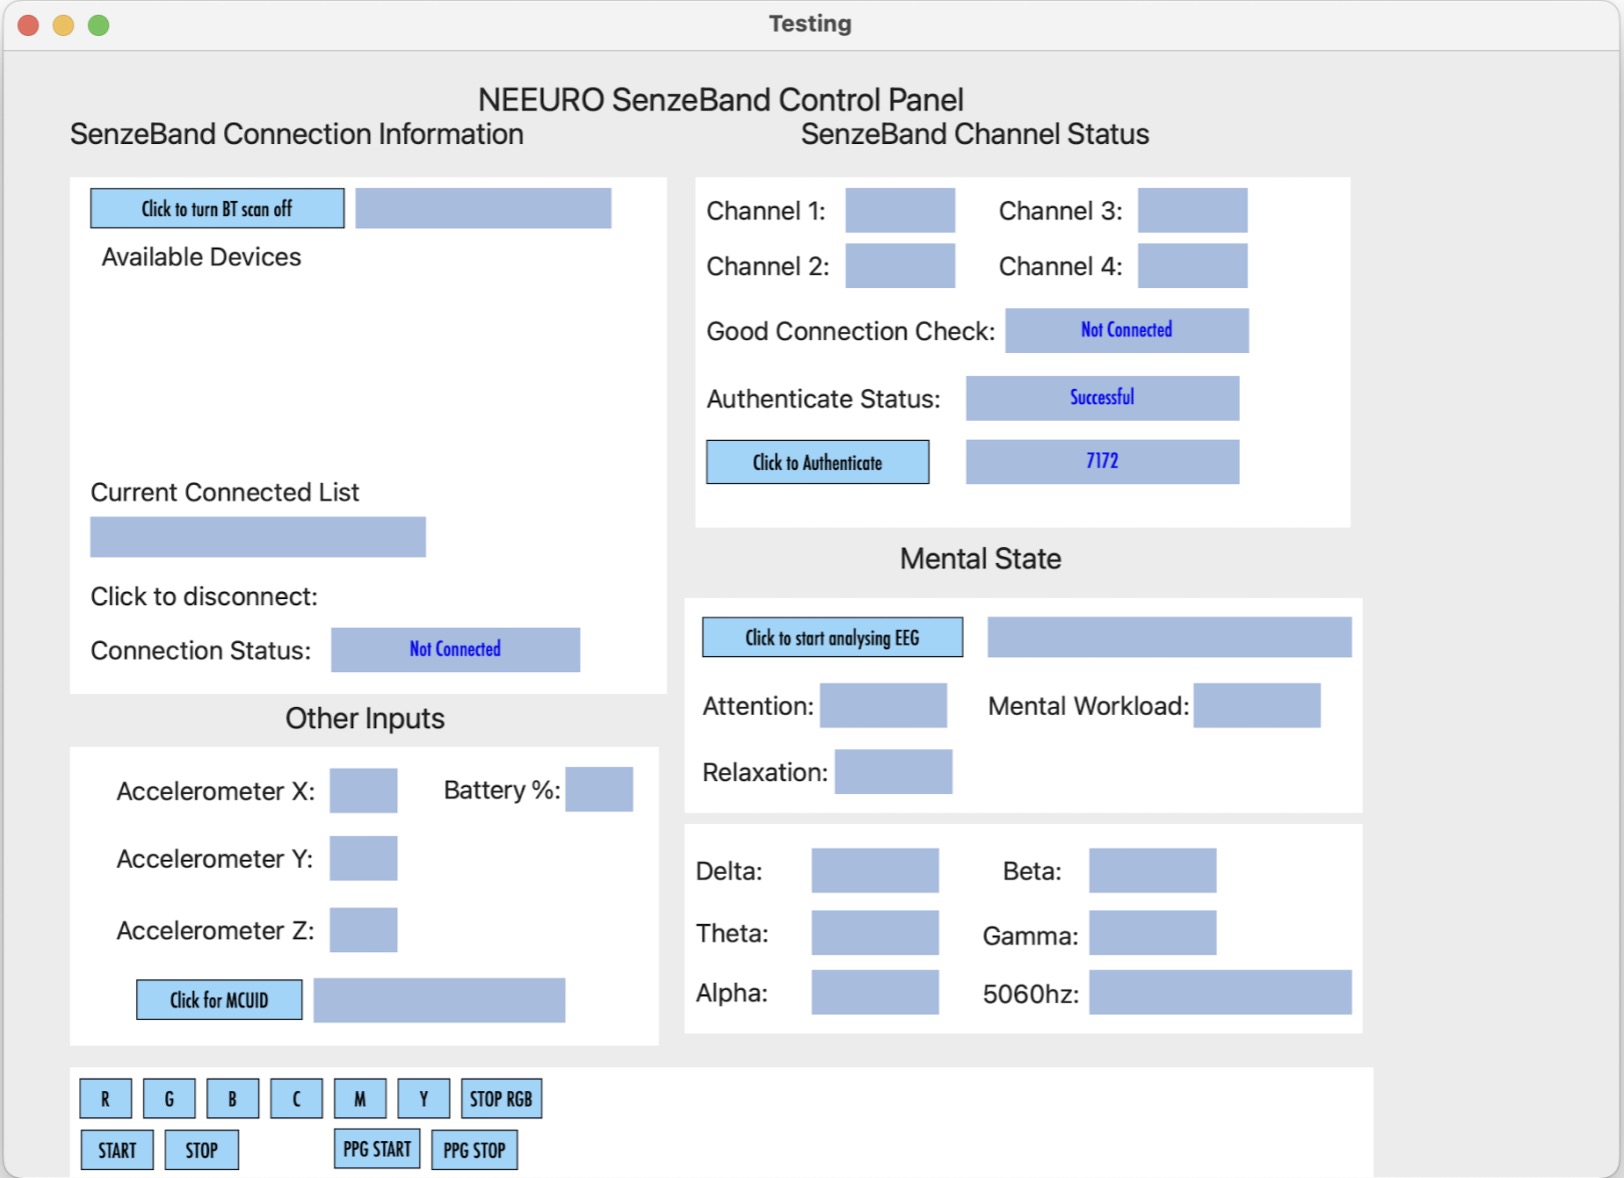
Scanning and connection
Click on the CLICK TO TURN BT SCAN button as seen below.
You will see the available SenzeBands in the scanned devices list. If your SenzeBand does not appear, check if its battery has been turned on.
Click on the SenzeBand to connect.
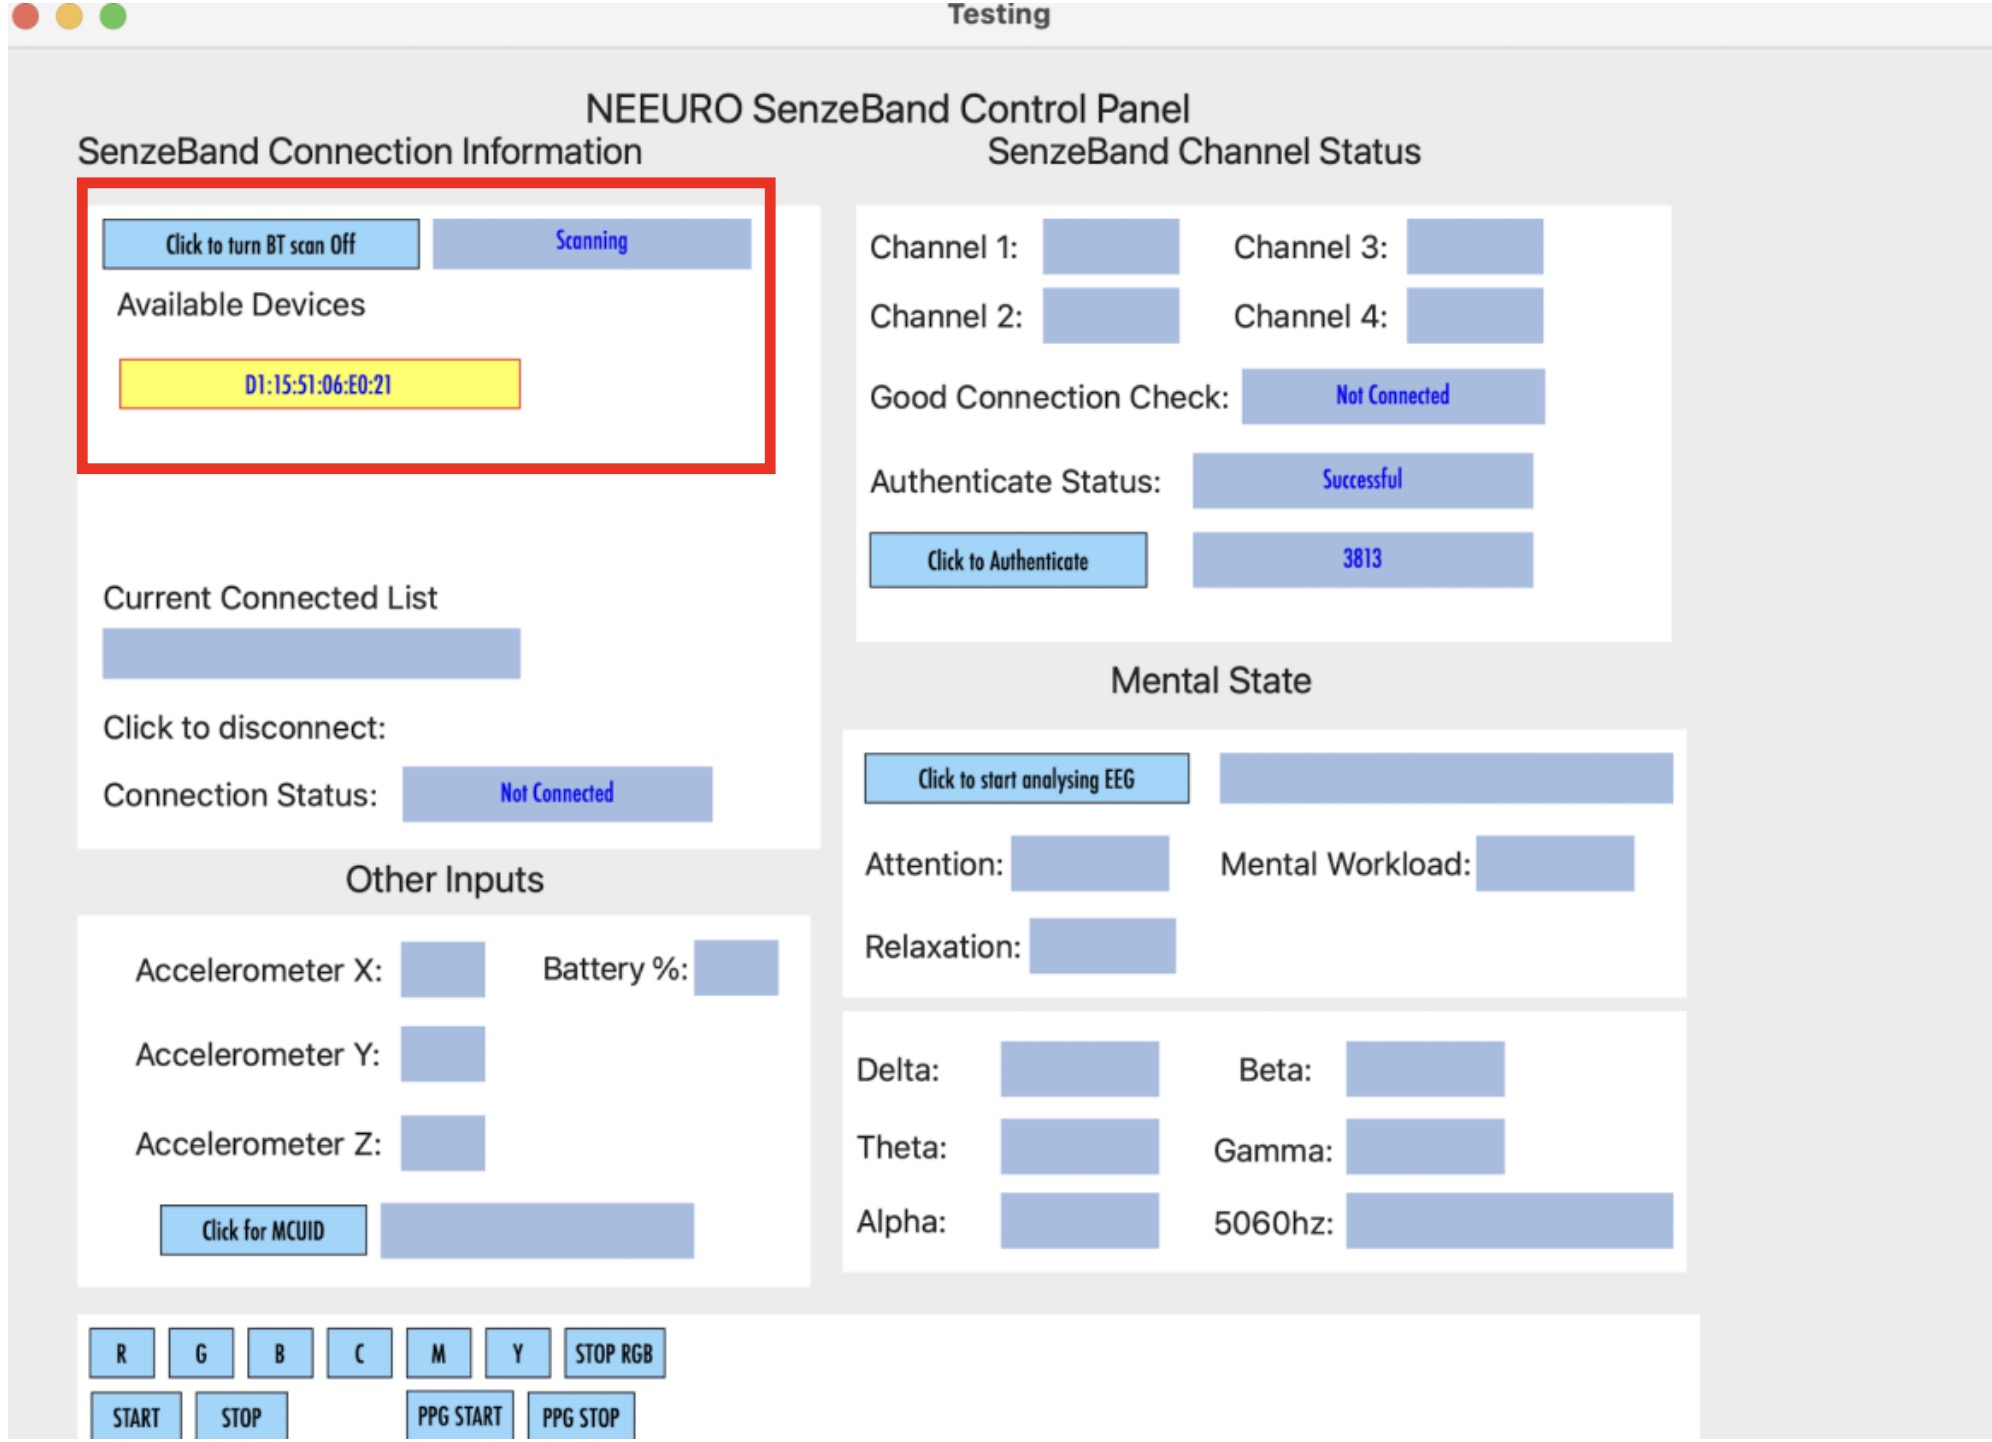
Once the SenzeBand is connected, its status is shown below.
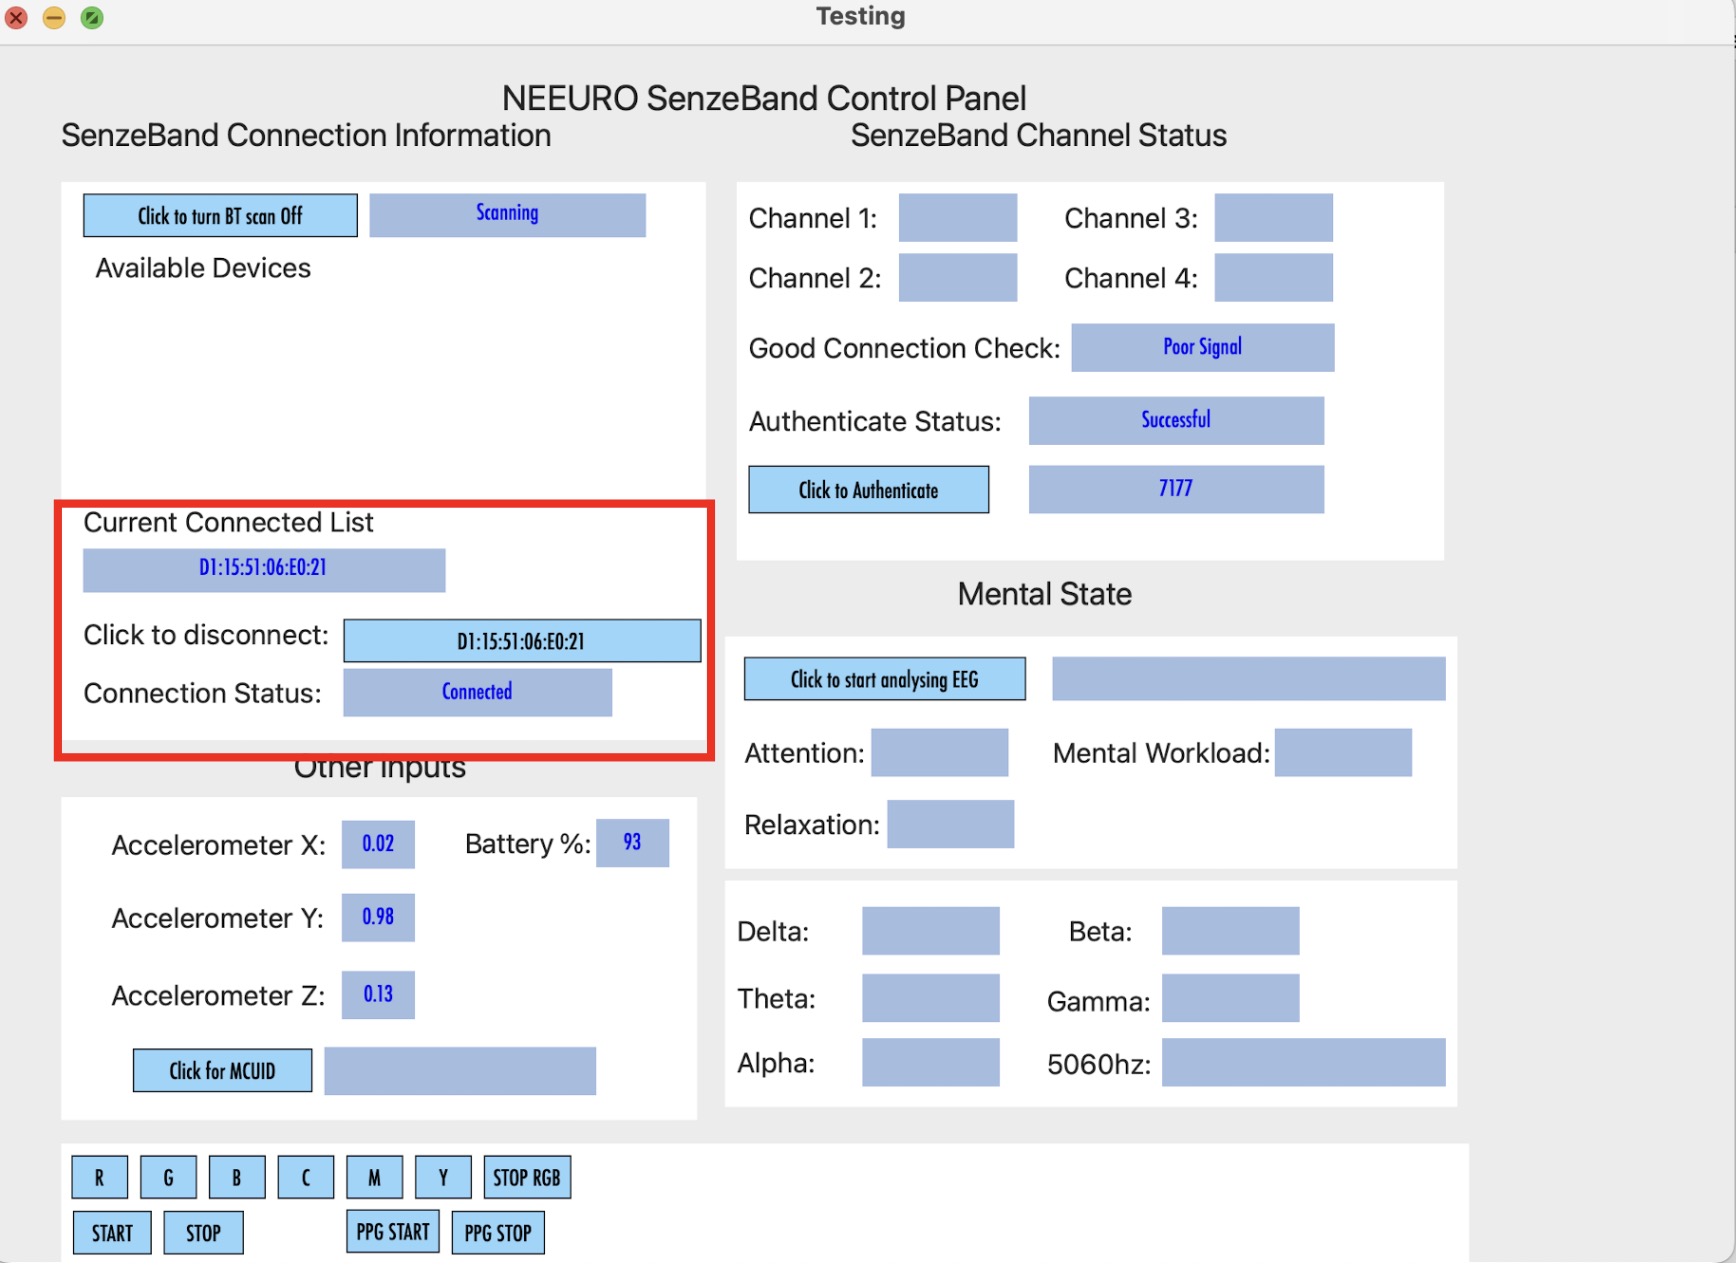
To disconnect a SenzeBand, click on button next to the CLICK TO DISCONNECT text.

If you wish to connect to another SenzeBand, click on the CLICK TO TURN BT SCAN button again.
Authentication
To authenticate, press the CLICK TO AUTHENTICATE button as seen below.
After authenticating, you will be able to see the time remaining in the authentication period.

The authentication period lasts 2 hours (7200 seconds) and in order to continue to use the SenzeBand, you will need to reauthenticate when the time is up.
Click on the CLICK TO AUTHENTICATE button once again to reauthenticate.
Event Marker
Click on the EVENT EVOKE button to get the event timestamp.
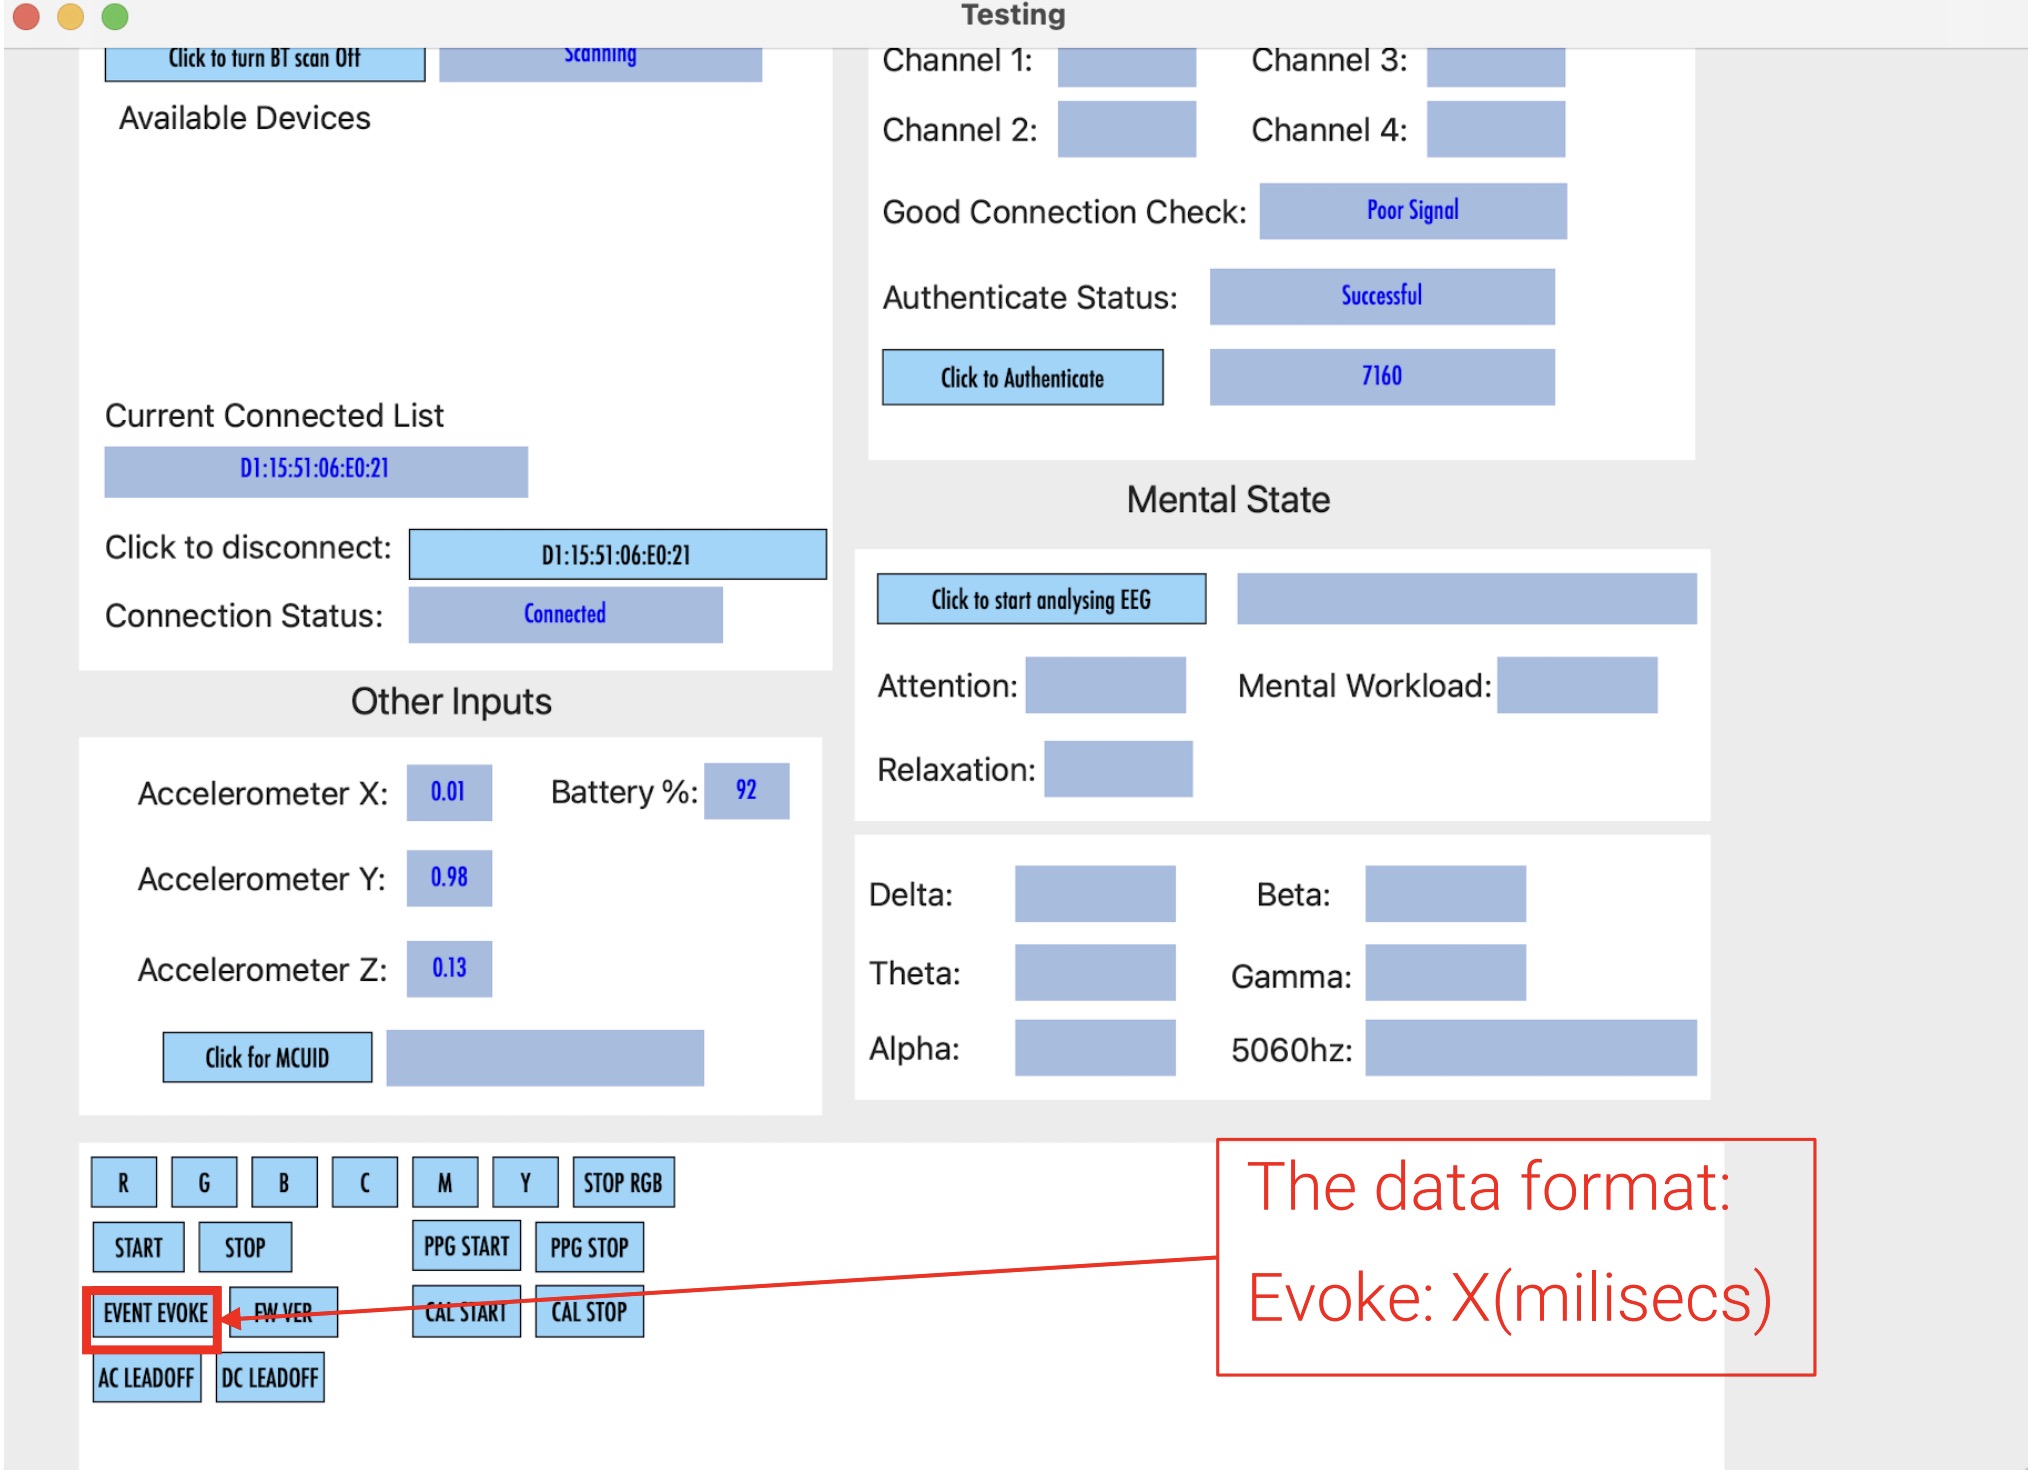
The event marker recalls technical data of the client whenever the EVENT EVOKE button is used.
The data format returned is the timestamp in milliseconds.
Impedance
- Click on the AC LEADOFF button to measure the impedance.
- The ideal impedance should be around 500k Ohms.
- Remember to click on the DC LEADOFF button to switch back to EEG mode.
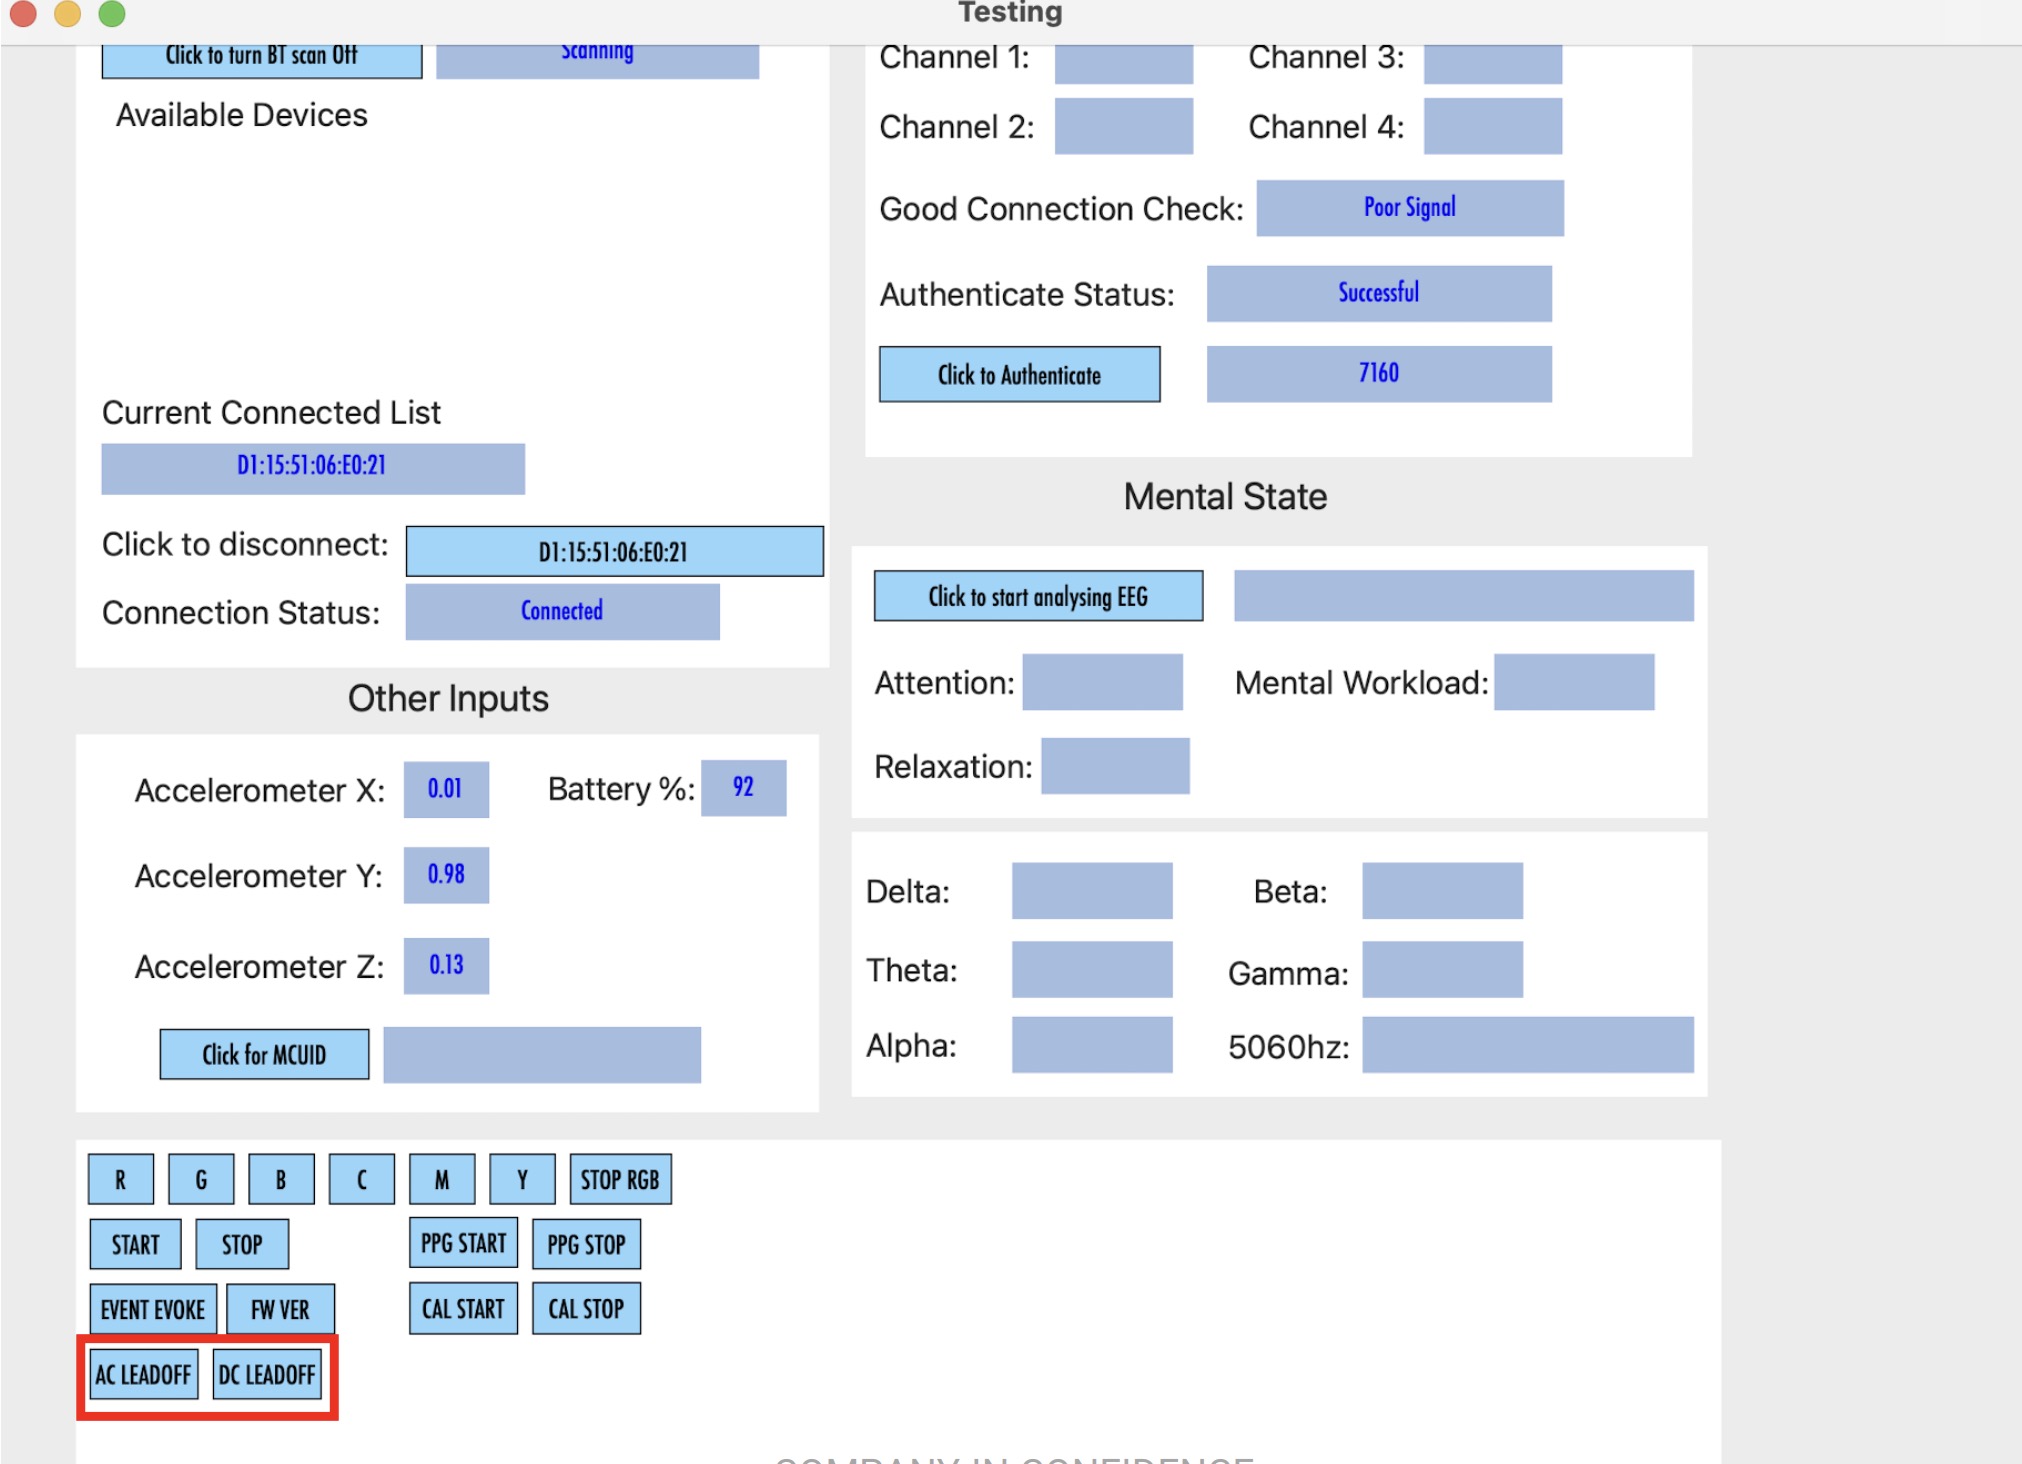
Motion sensor calibration
In order to get an accurate motion sensor data, you will need to calibrate.
Click on CAL START button to start calibrating the Motion sensor.
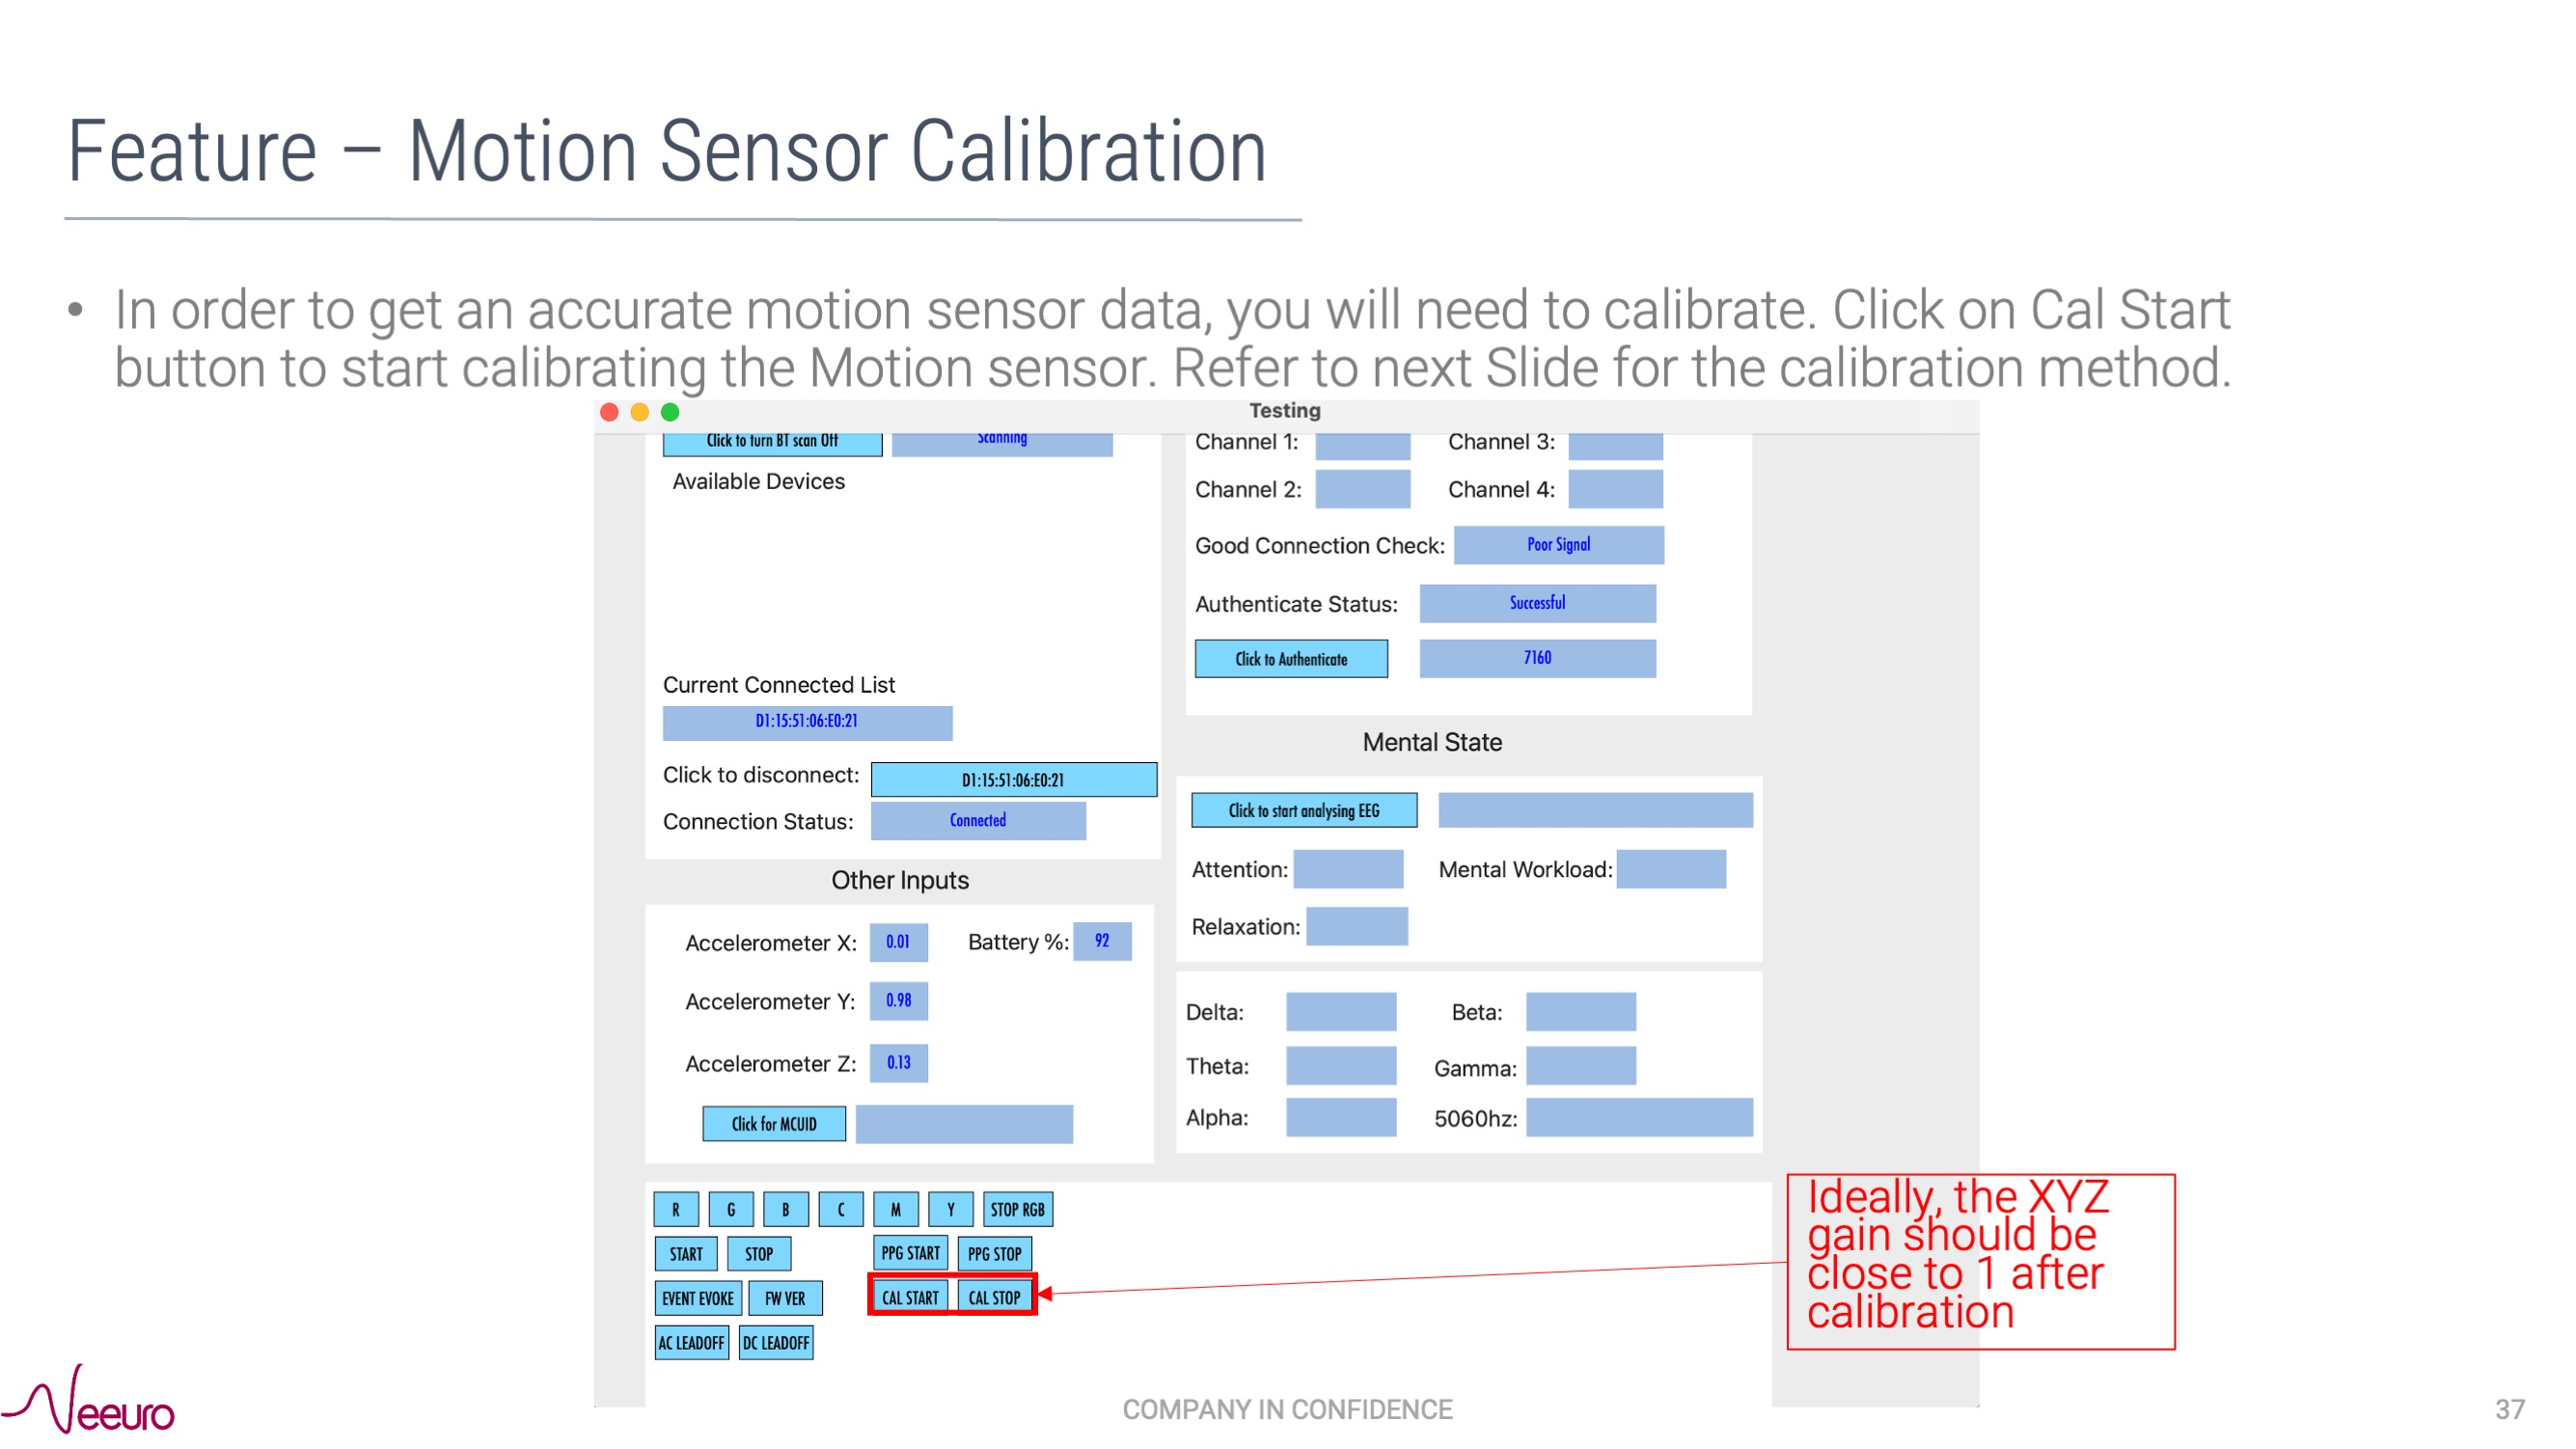
When calibrating, avoid compromising the accuracy of the SenzeBand 2's calibration by moving away from all magnetic sources, like metal items, electronic gadgets and power sockets.
EEG and PPG data
- Click on START and STOP buttons to get EEG data.
- Click on PPG START and PPG STOP buttons to get the raw PPG in IR and RED data.
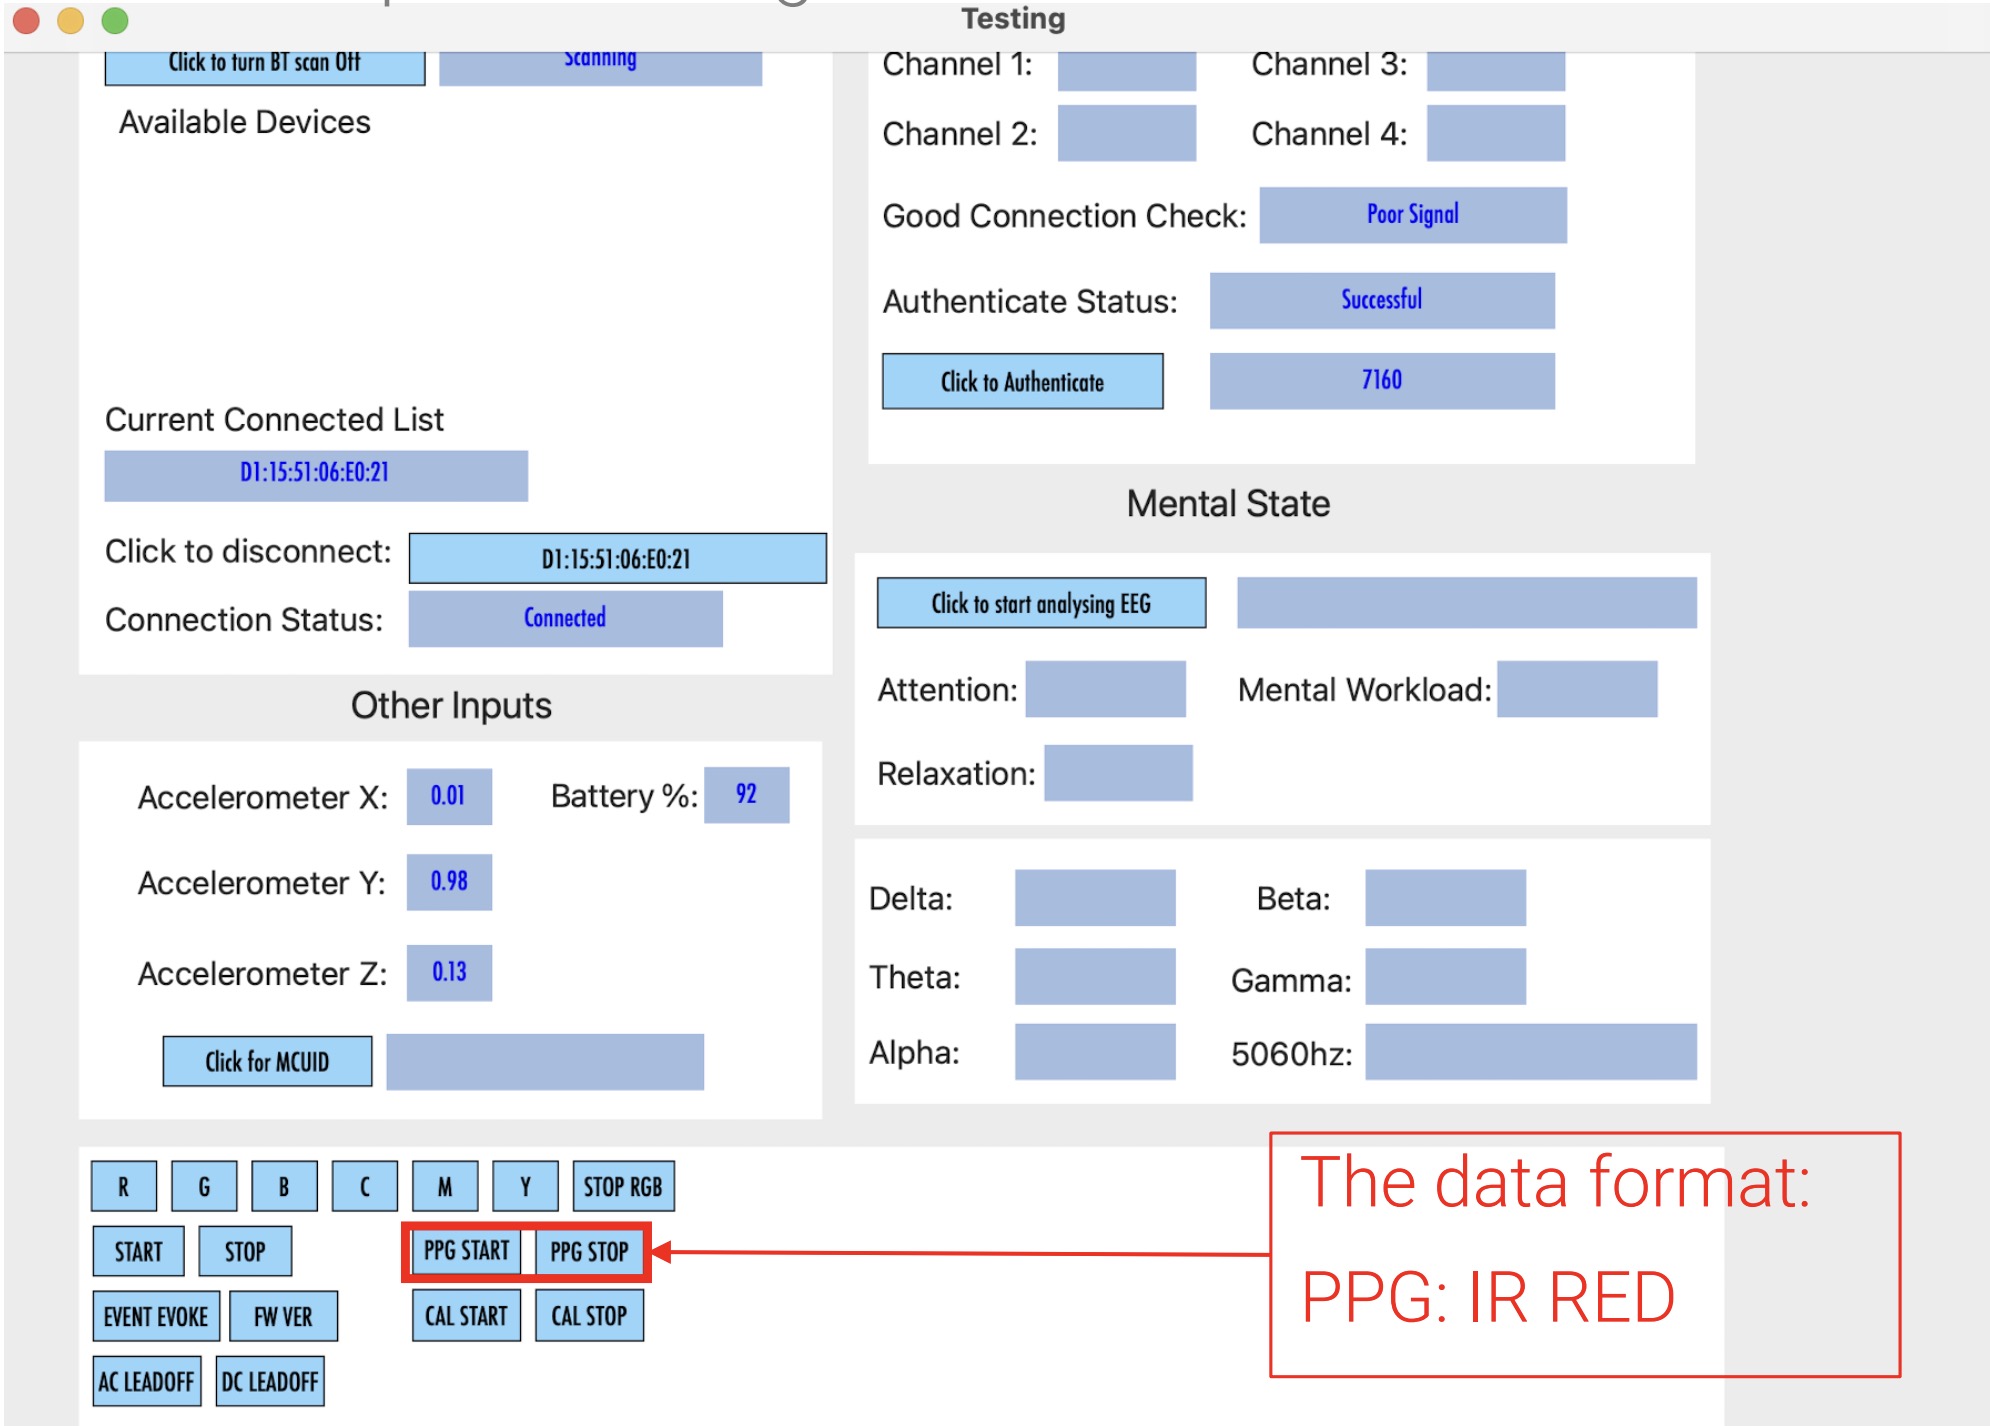
Activity LED
- The Activity LED can be controlled using the RGYCMY buttons.
- There are 6 colours of LED, allowing each to be representative of their a different state, or a paticular shop.
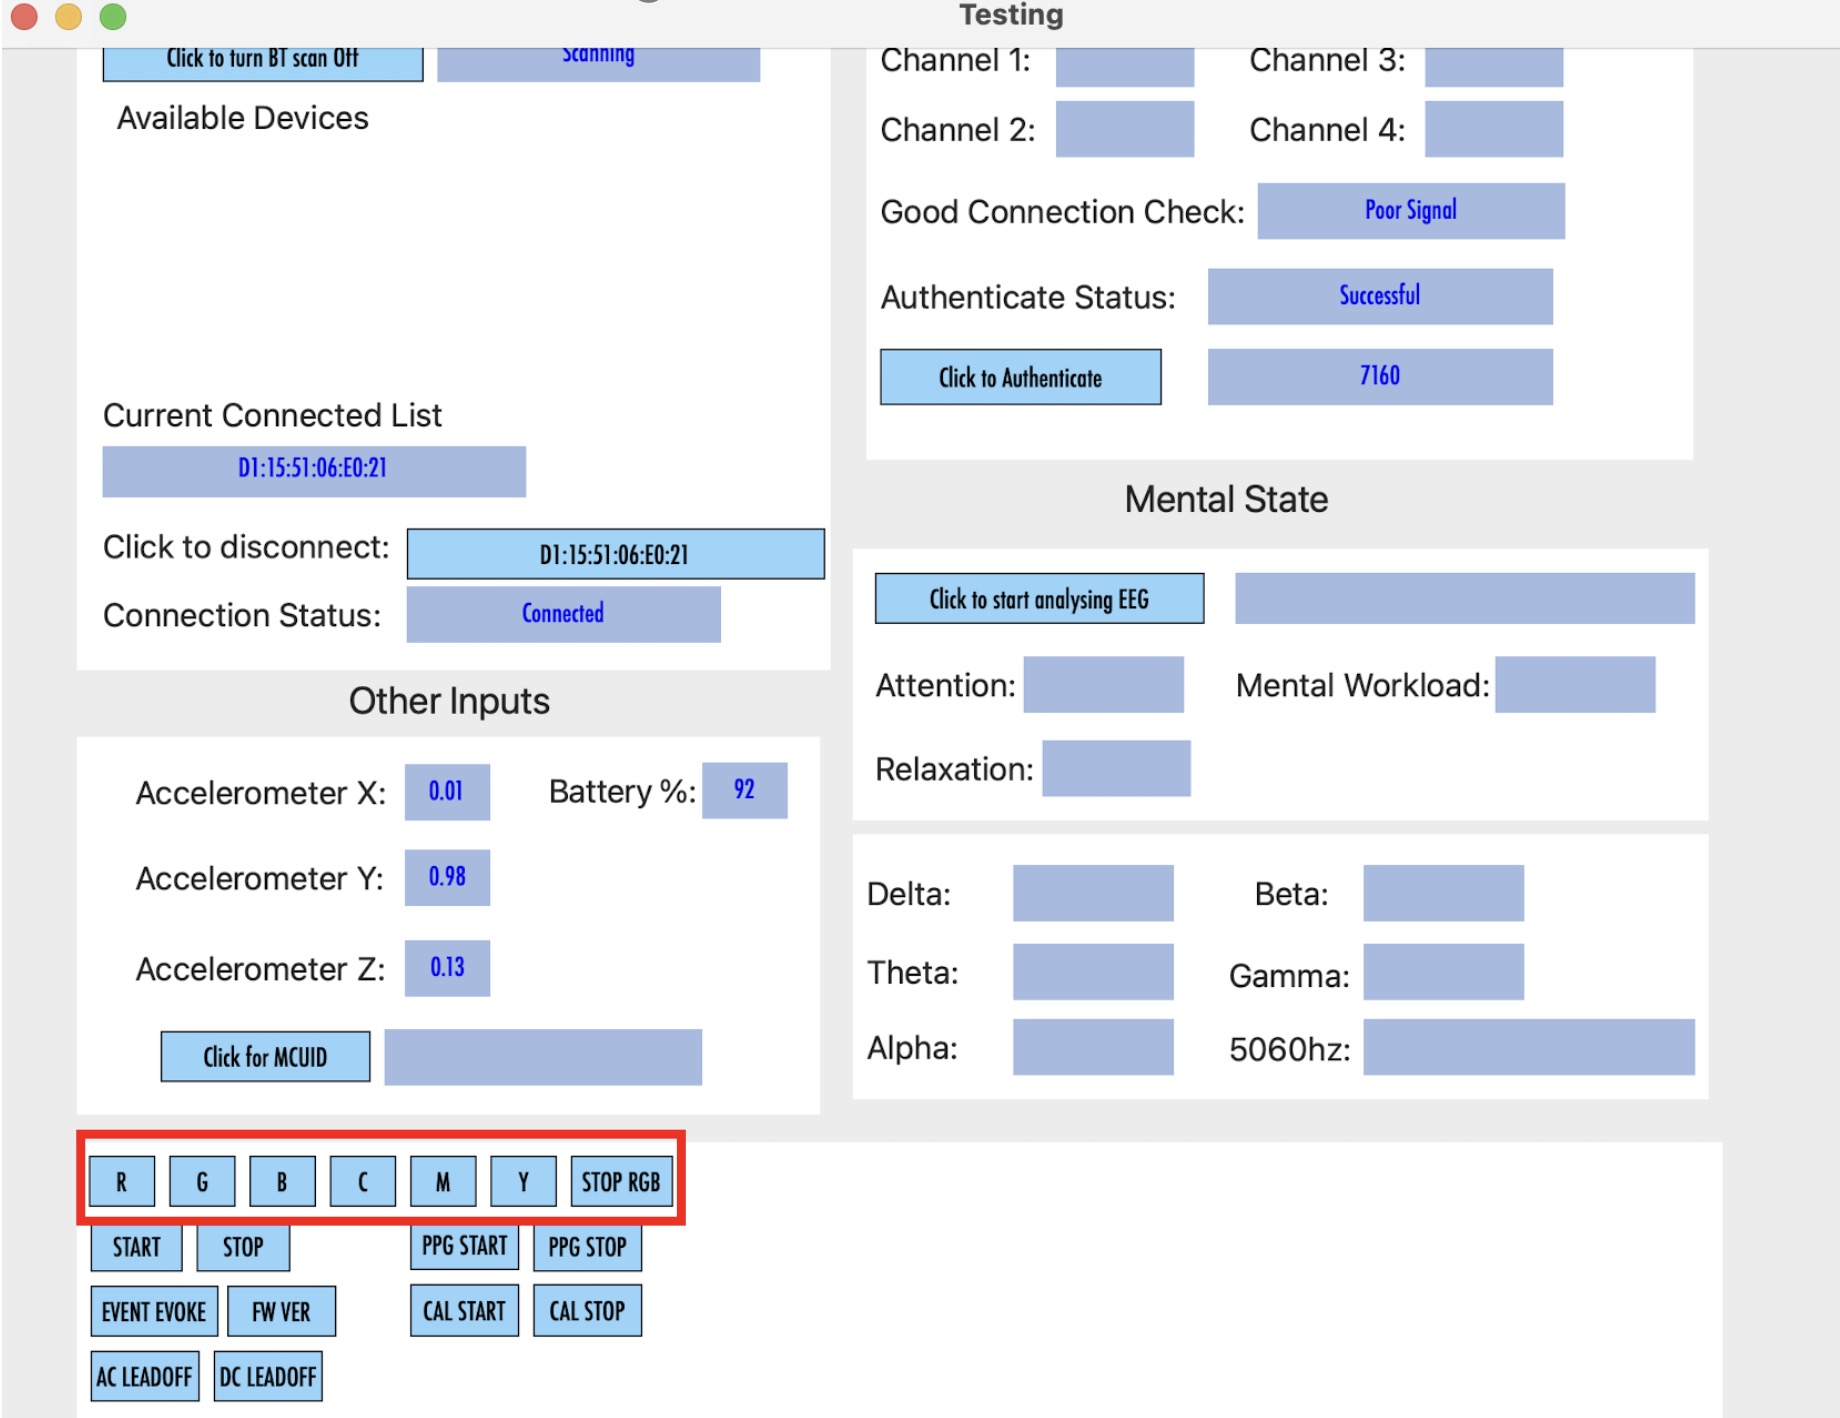
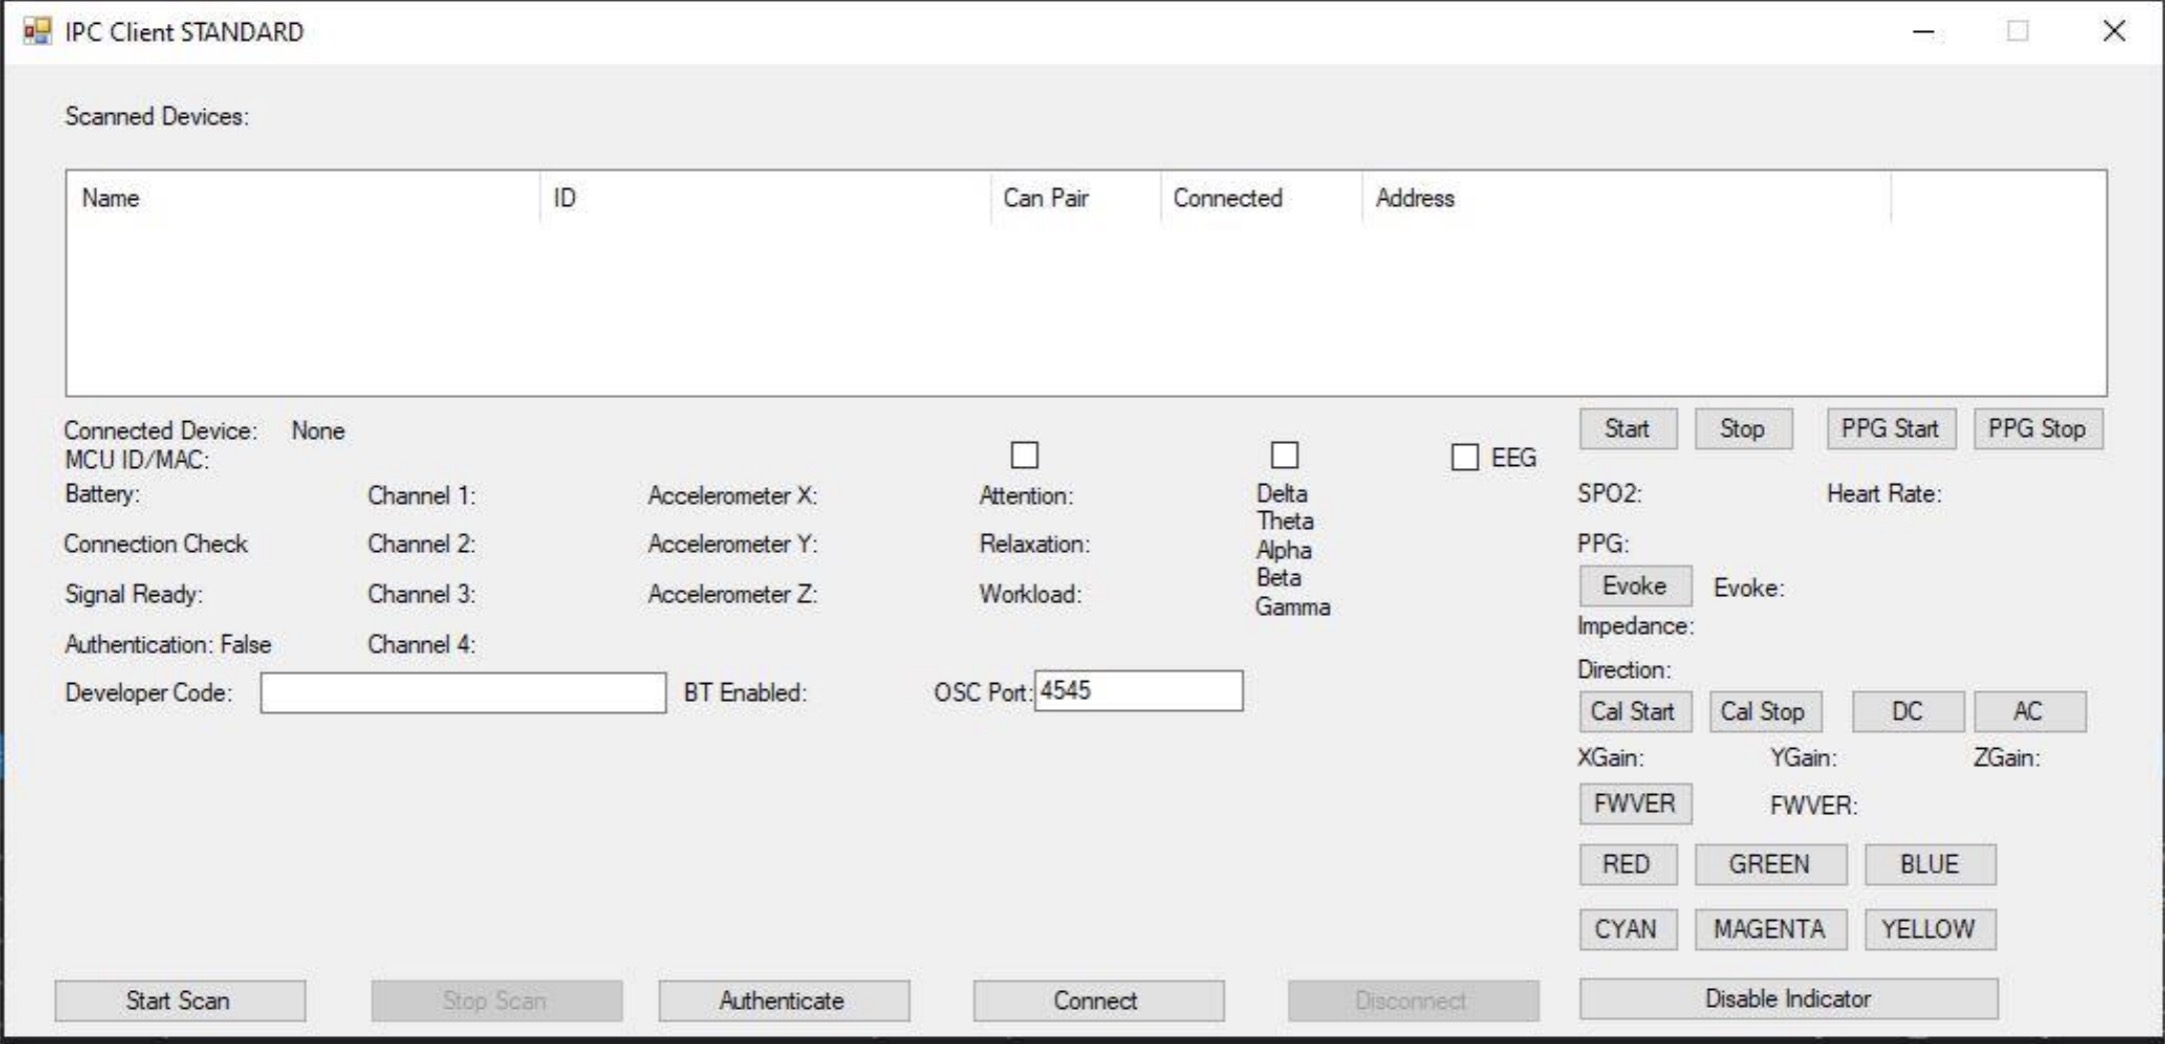
Scanning and connection
Click on the Start Scan button as seen below.
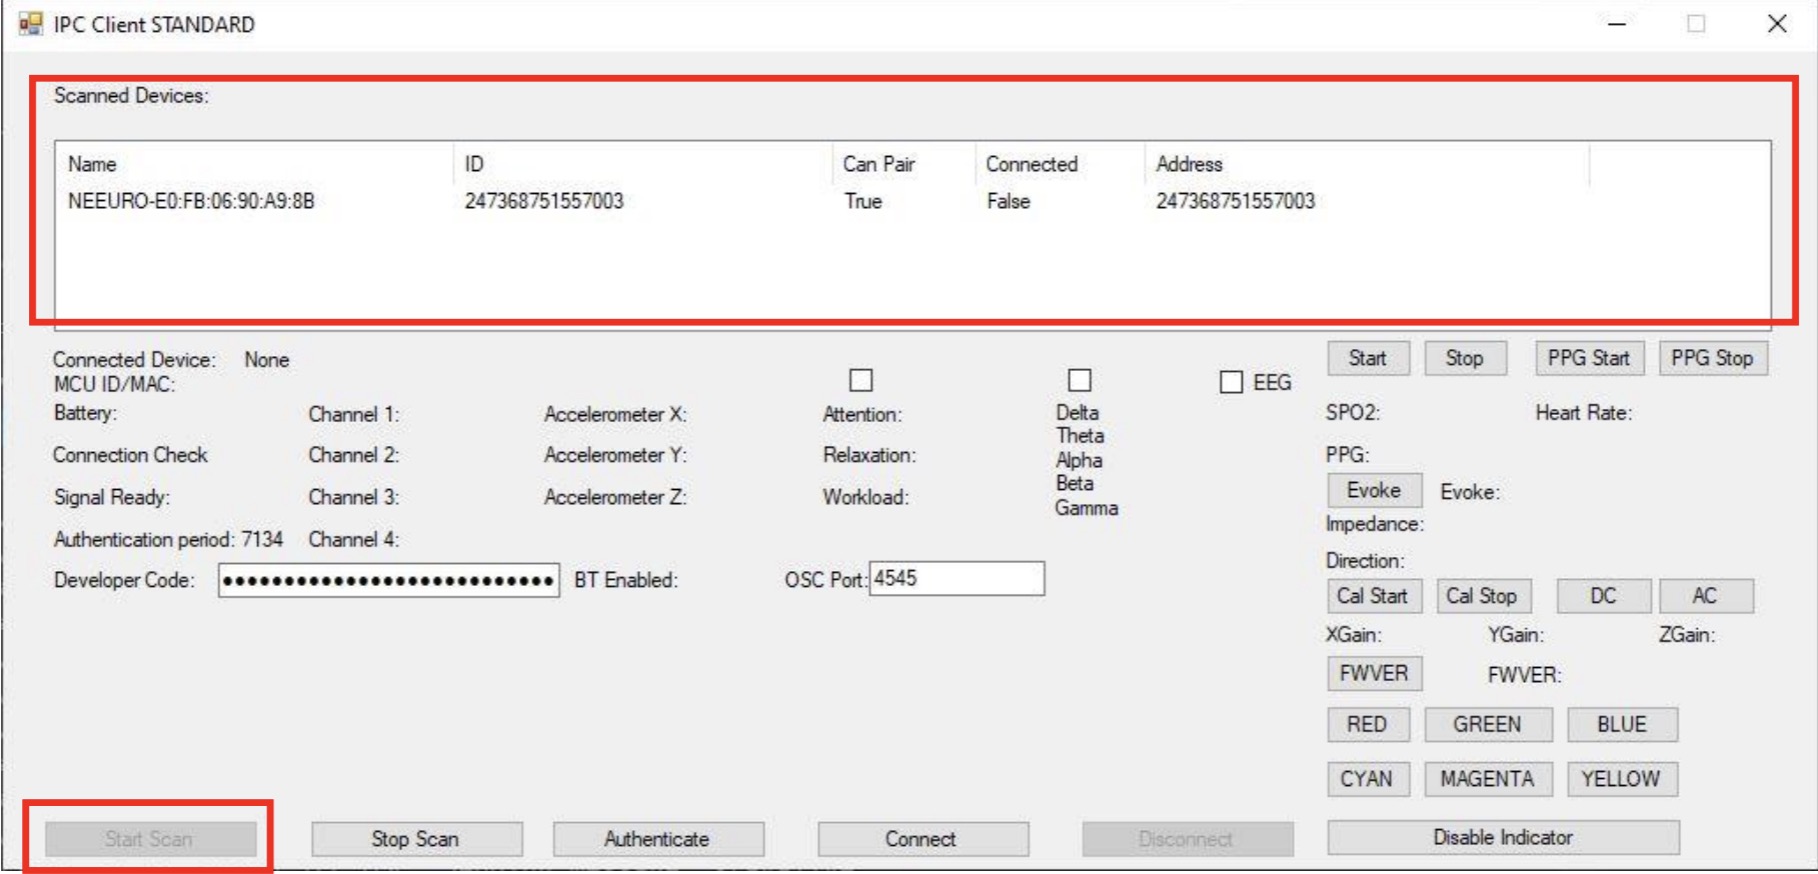
You will see the available SenzeBands in the scanned devices list. If your SenzeBand does not appear, check if its battery has been turned on.
Click on the SenzeBand and press the Connect button to connect.
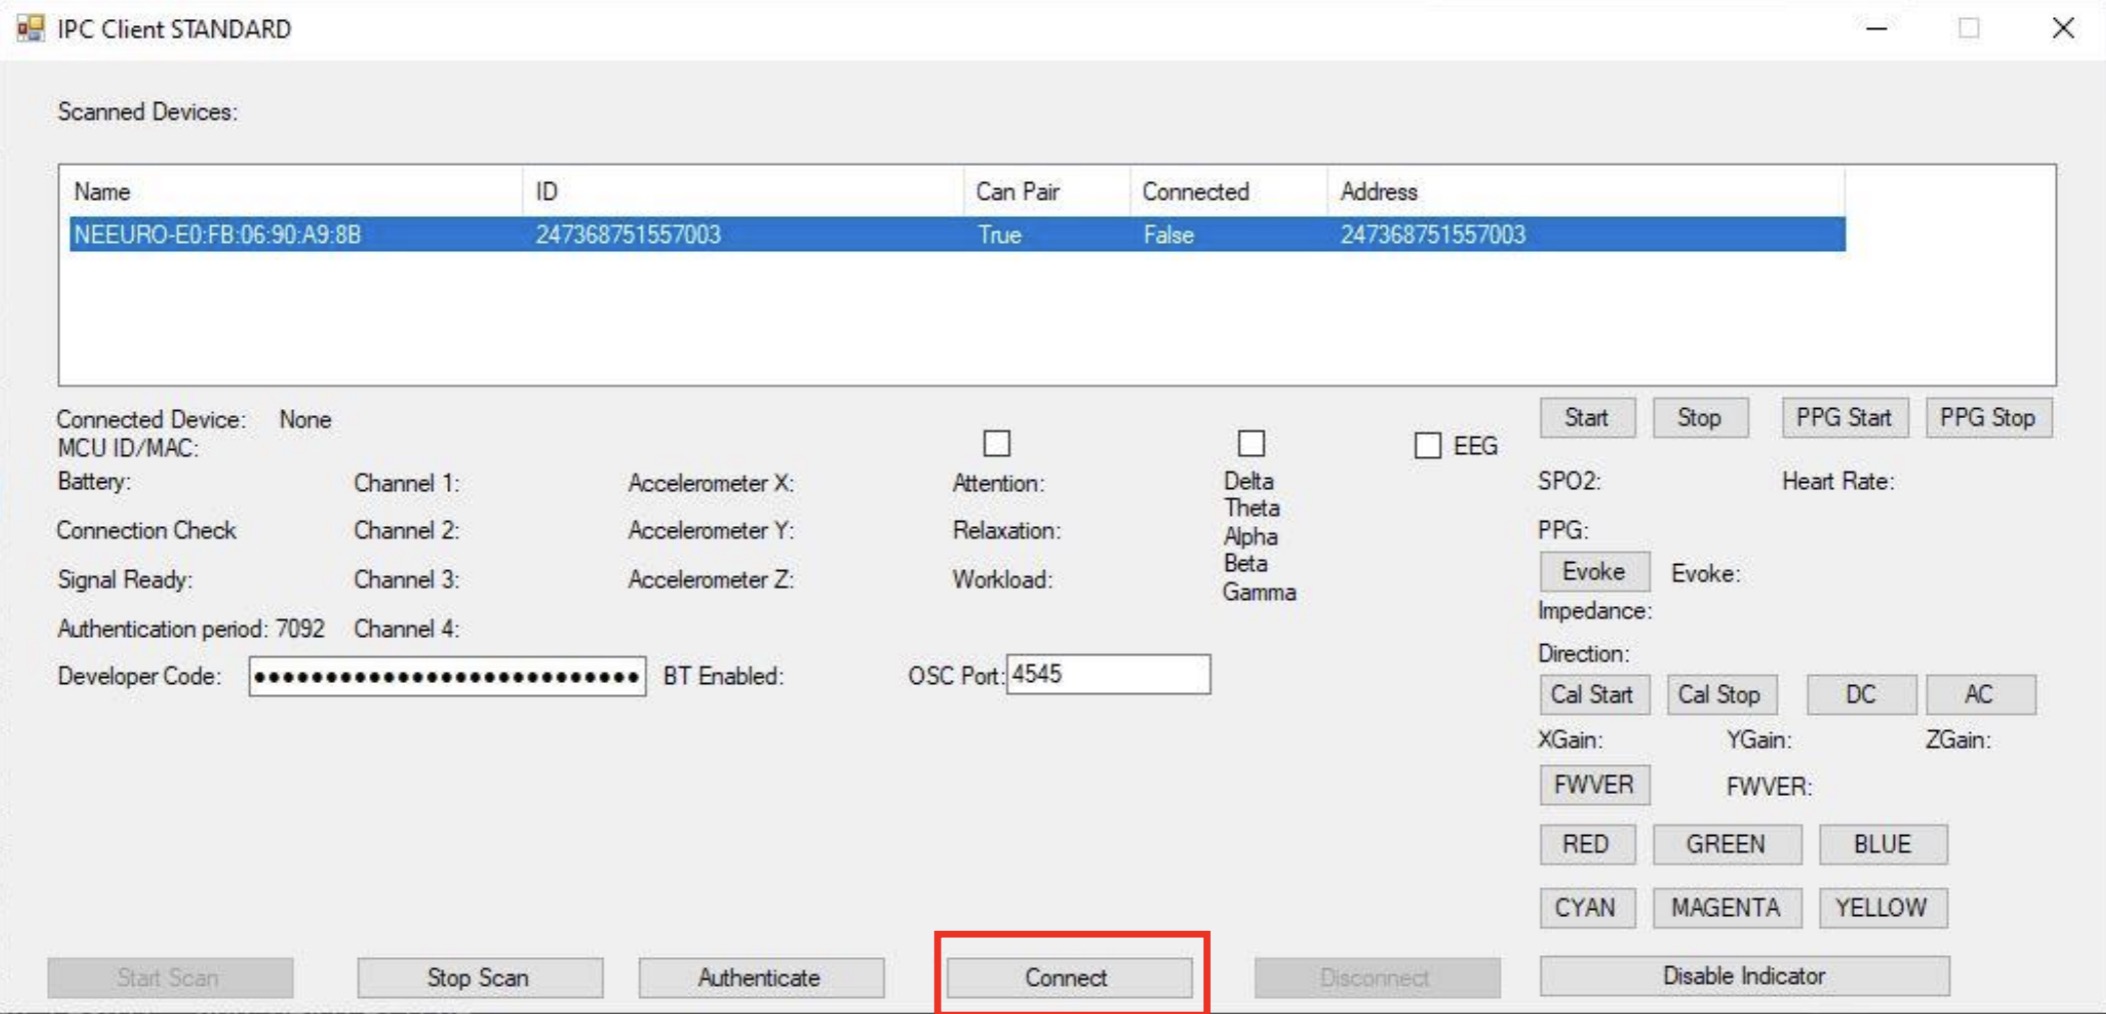
Once the SenzeBand is connected, its status is shown below.
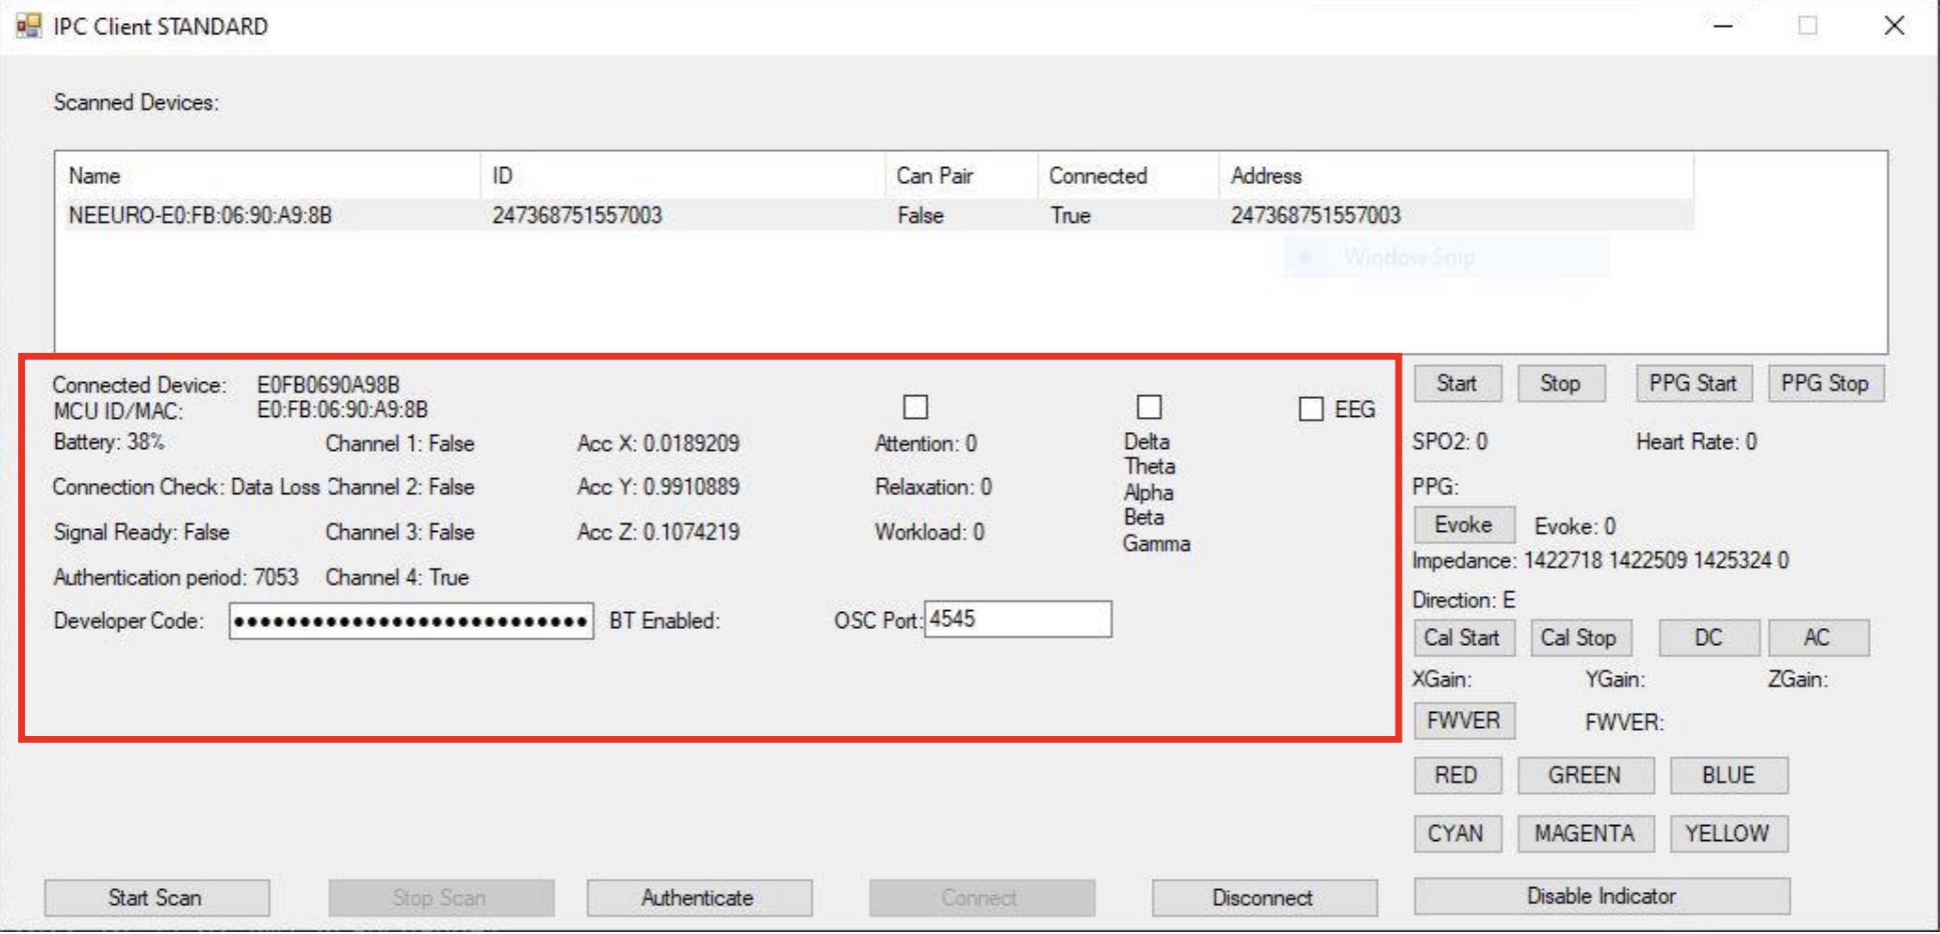
To disconnect a SenzeBand, click on button next to the Disconnect text.
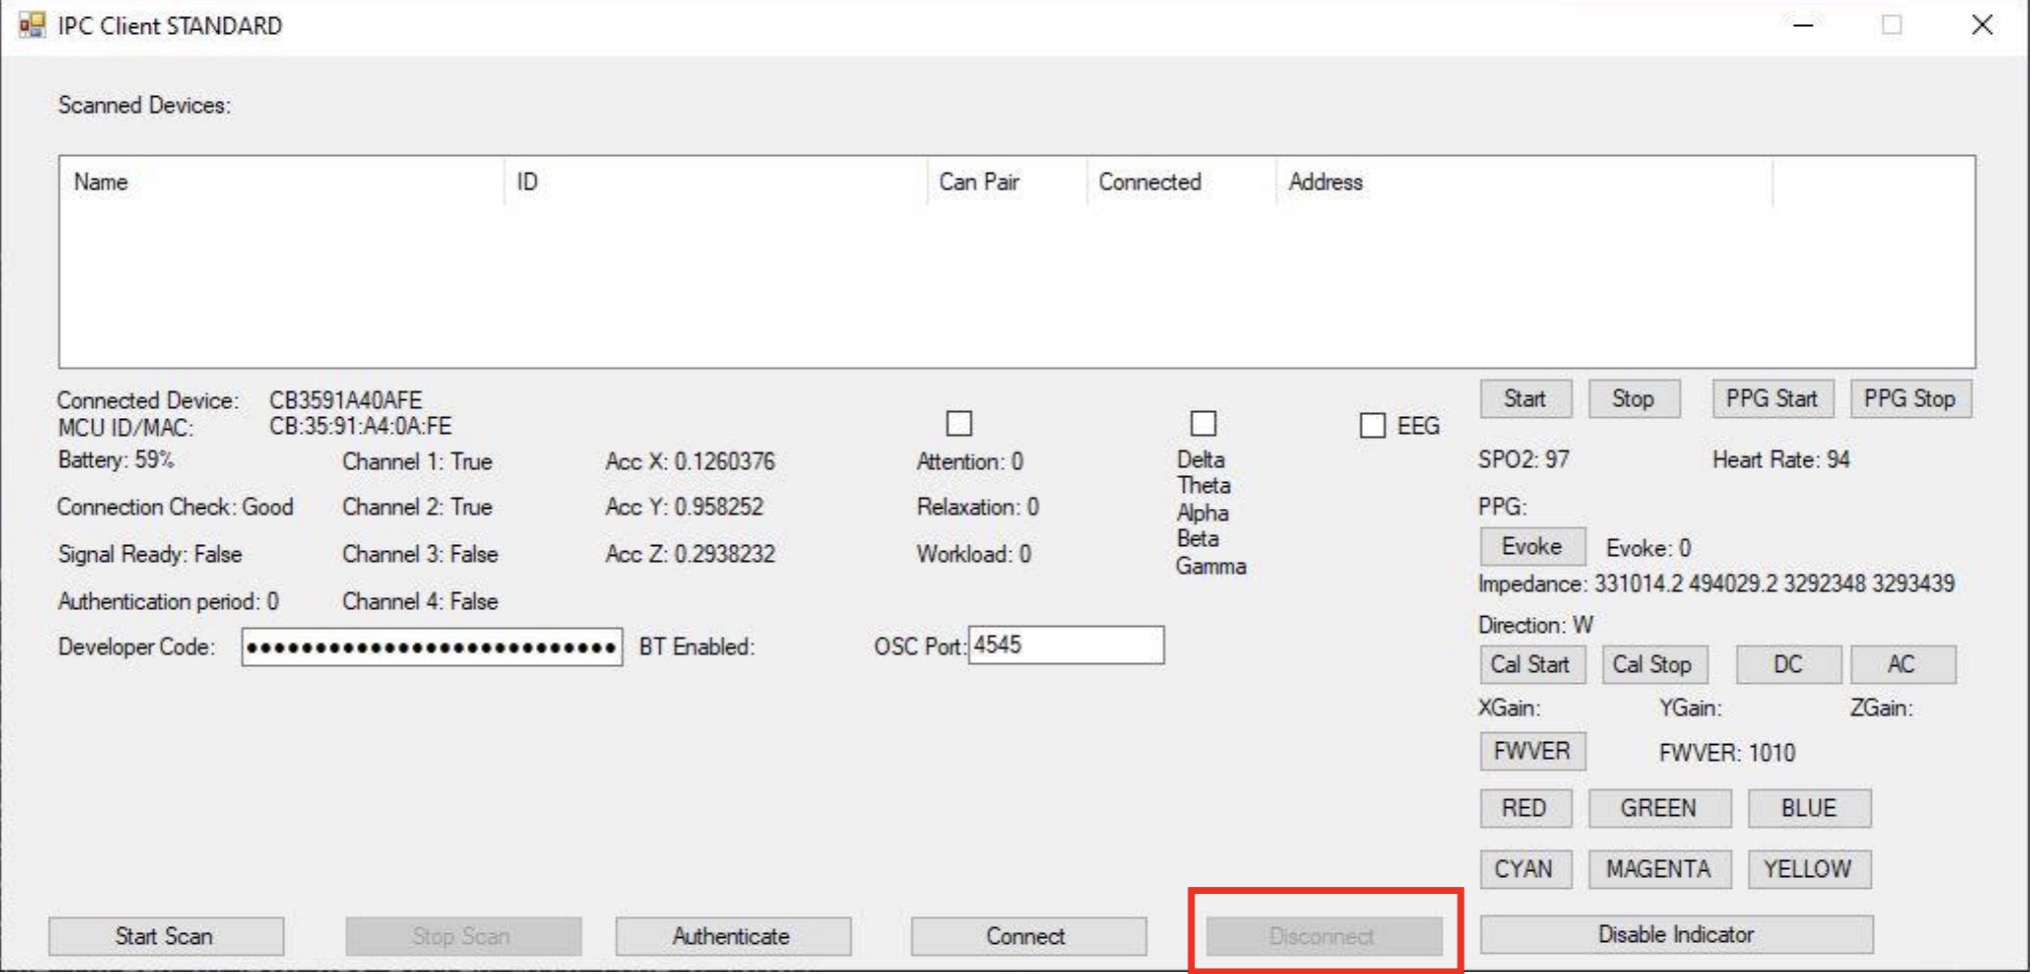
If you wish to connect to another SenzeBand, click on the Start Scan button again.
Authentication
To authenticate, input your Developer Code as seen below, and press ENTER on the keyboard.
After authenticating, you will be able to see the time remaining in the authentication period.
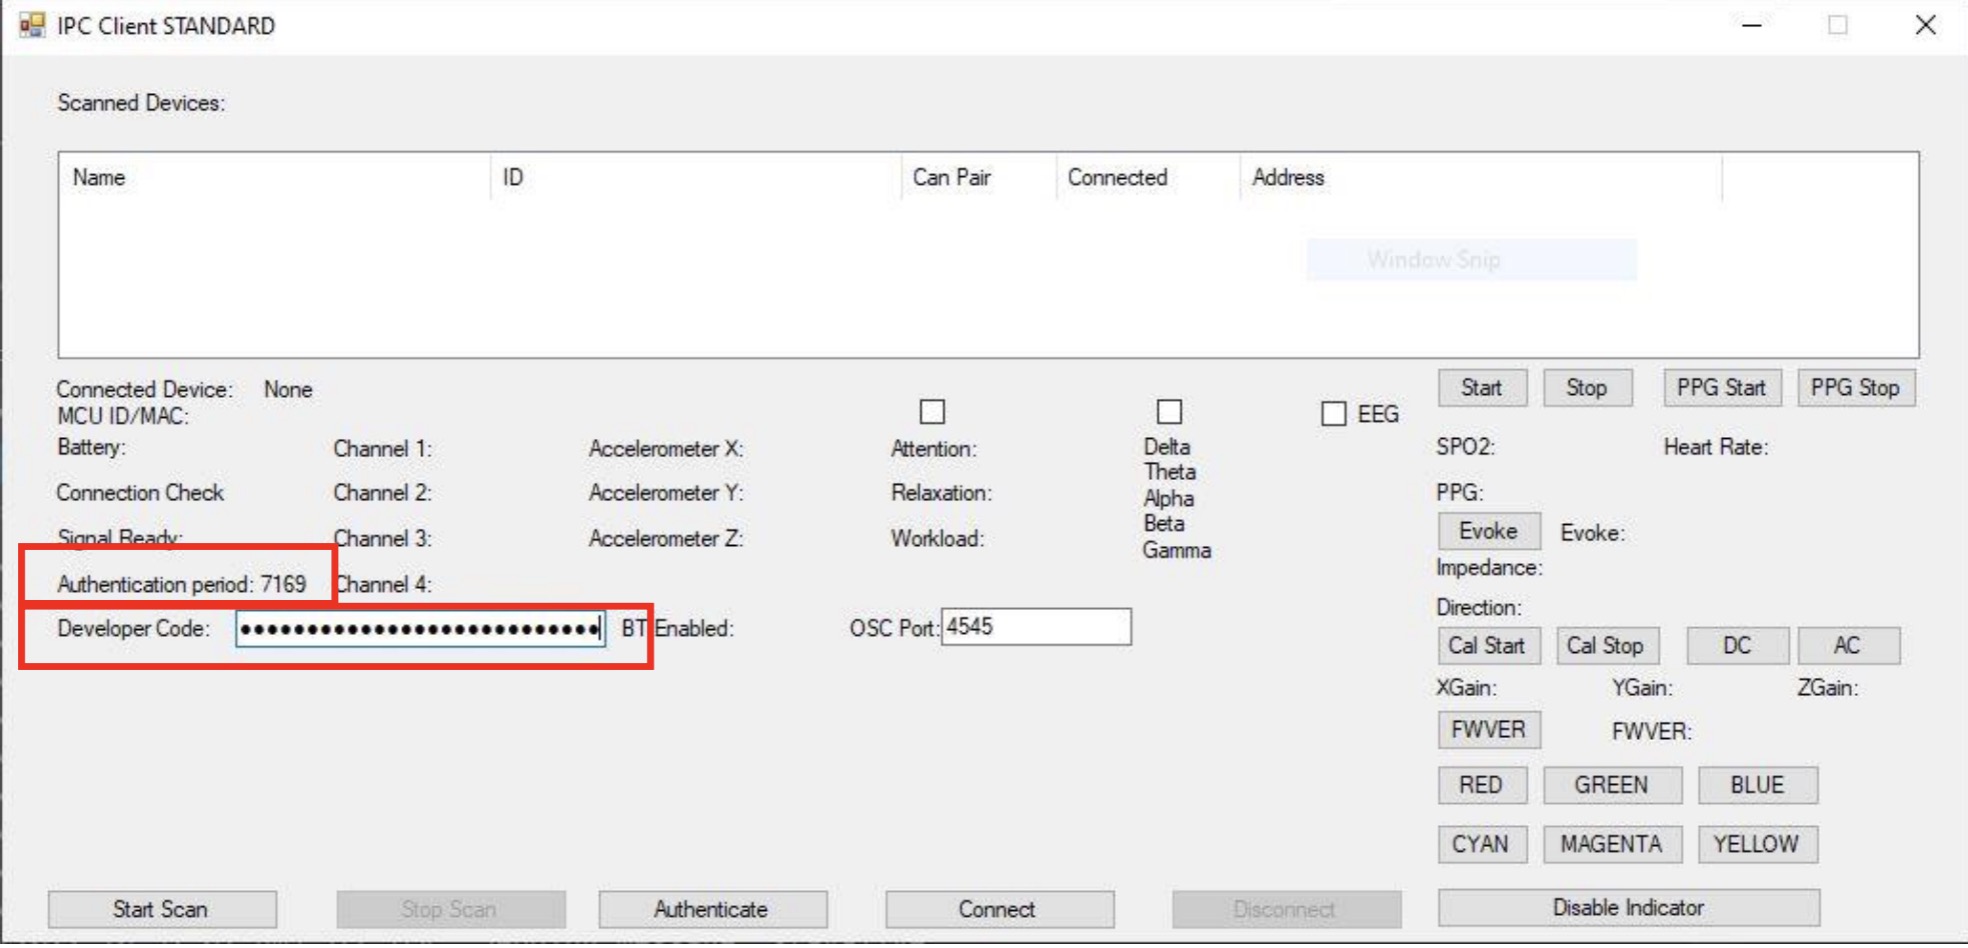
The authentication period lasts 2 hours (7200 seconds) and in order to continue to use the SenzeBand, you will need to reauthenticate when the time is up.
Reinput your Developer Code and press ENTER again to reauthenticate.
Graph View
- Click on the checkbox to view the Graph. To switch Graph, click on the next checkbox.

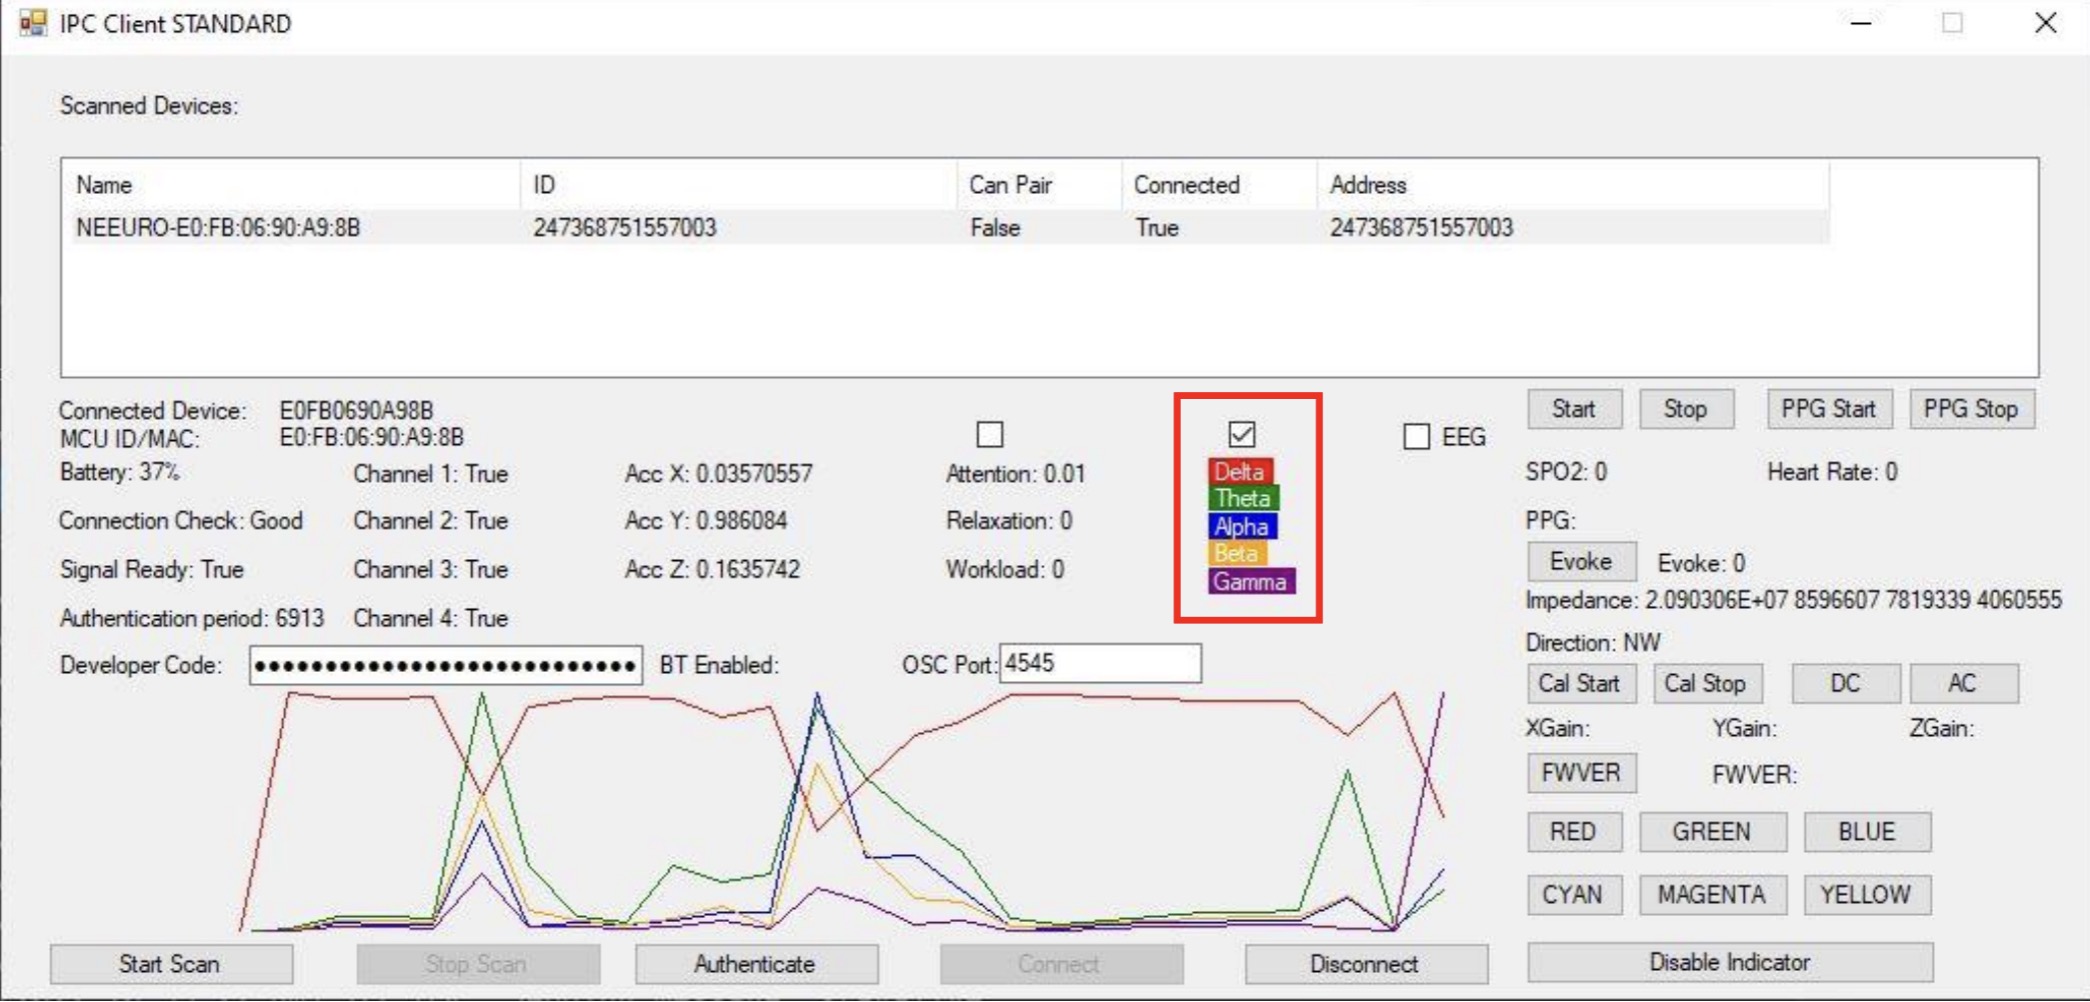
- The EEG graph can be viewed on its own, or concurrently with the mental state of EEG frequency graph.
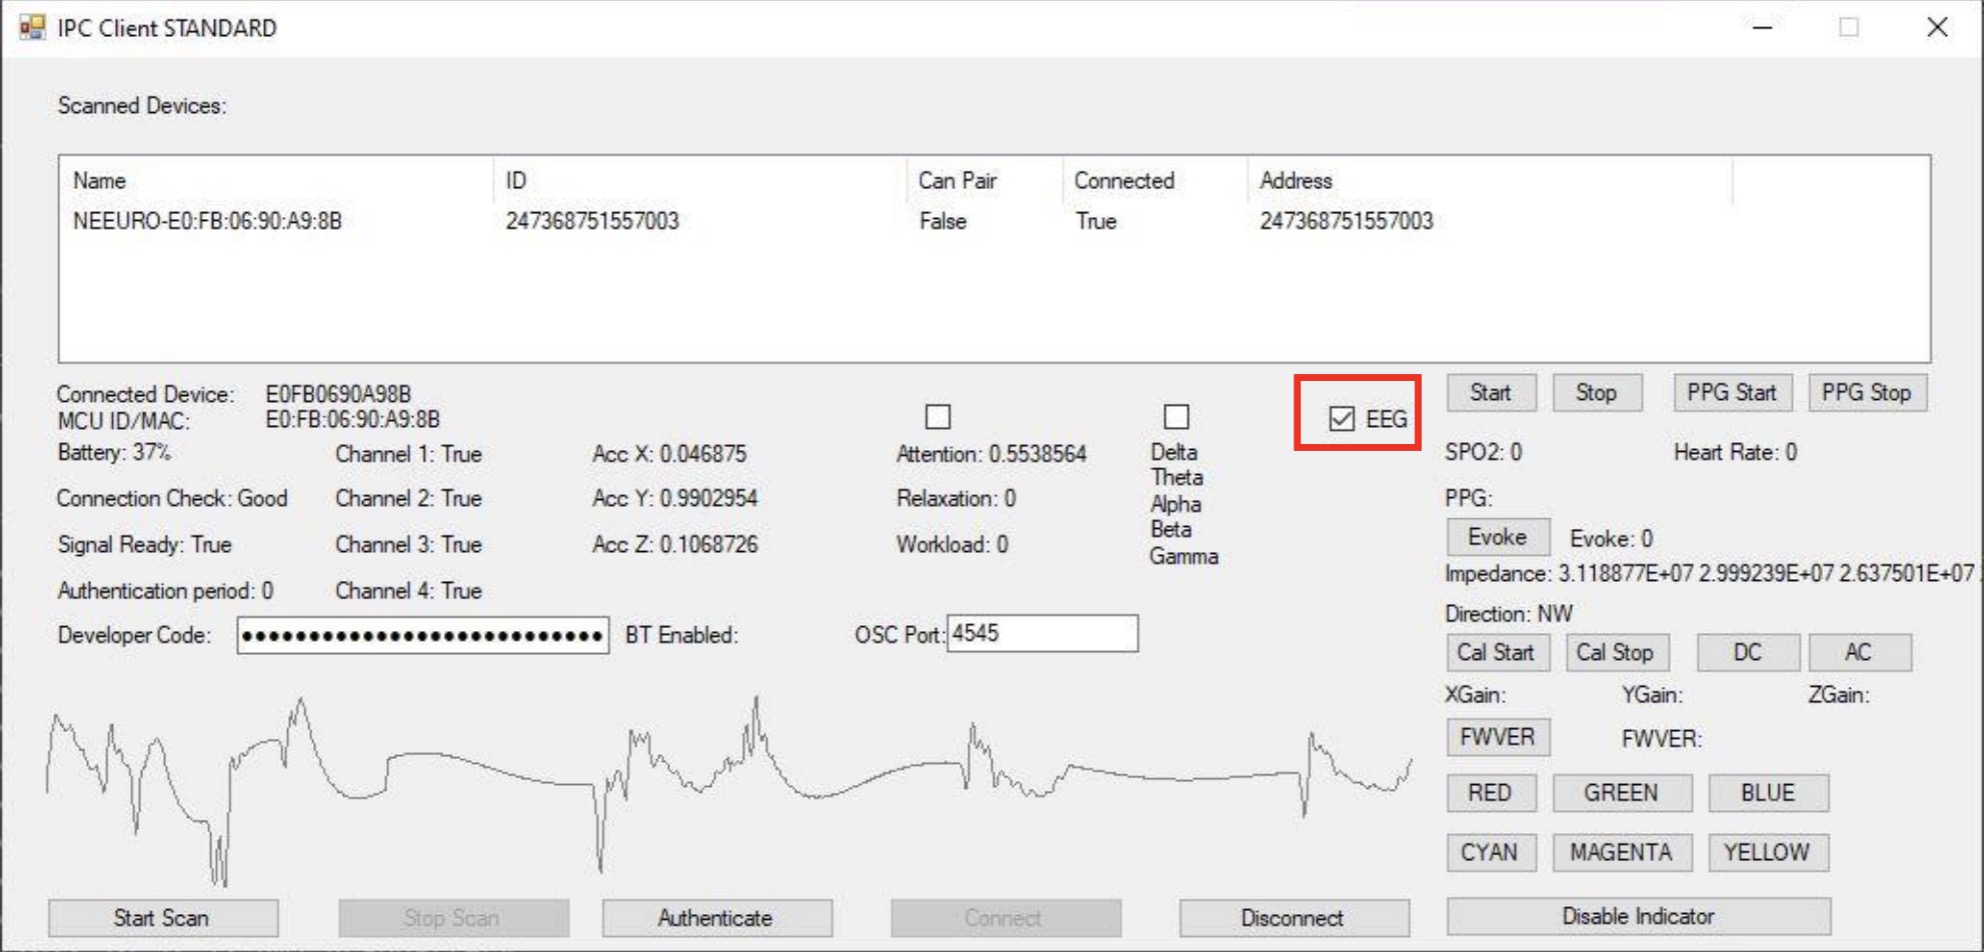
Event Marker
Click on the Evoke button to get the event timestamp.
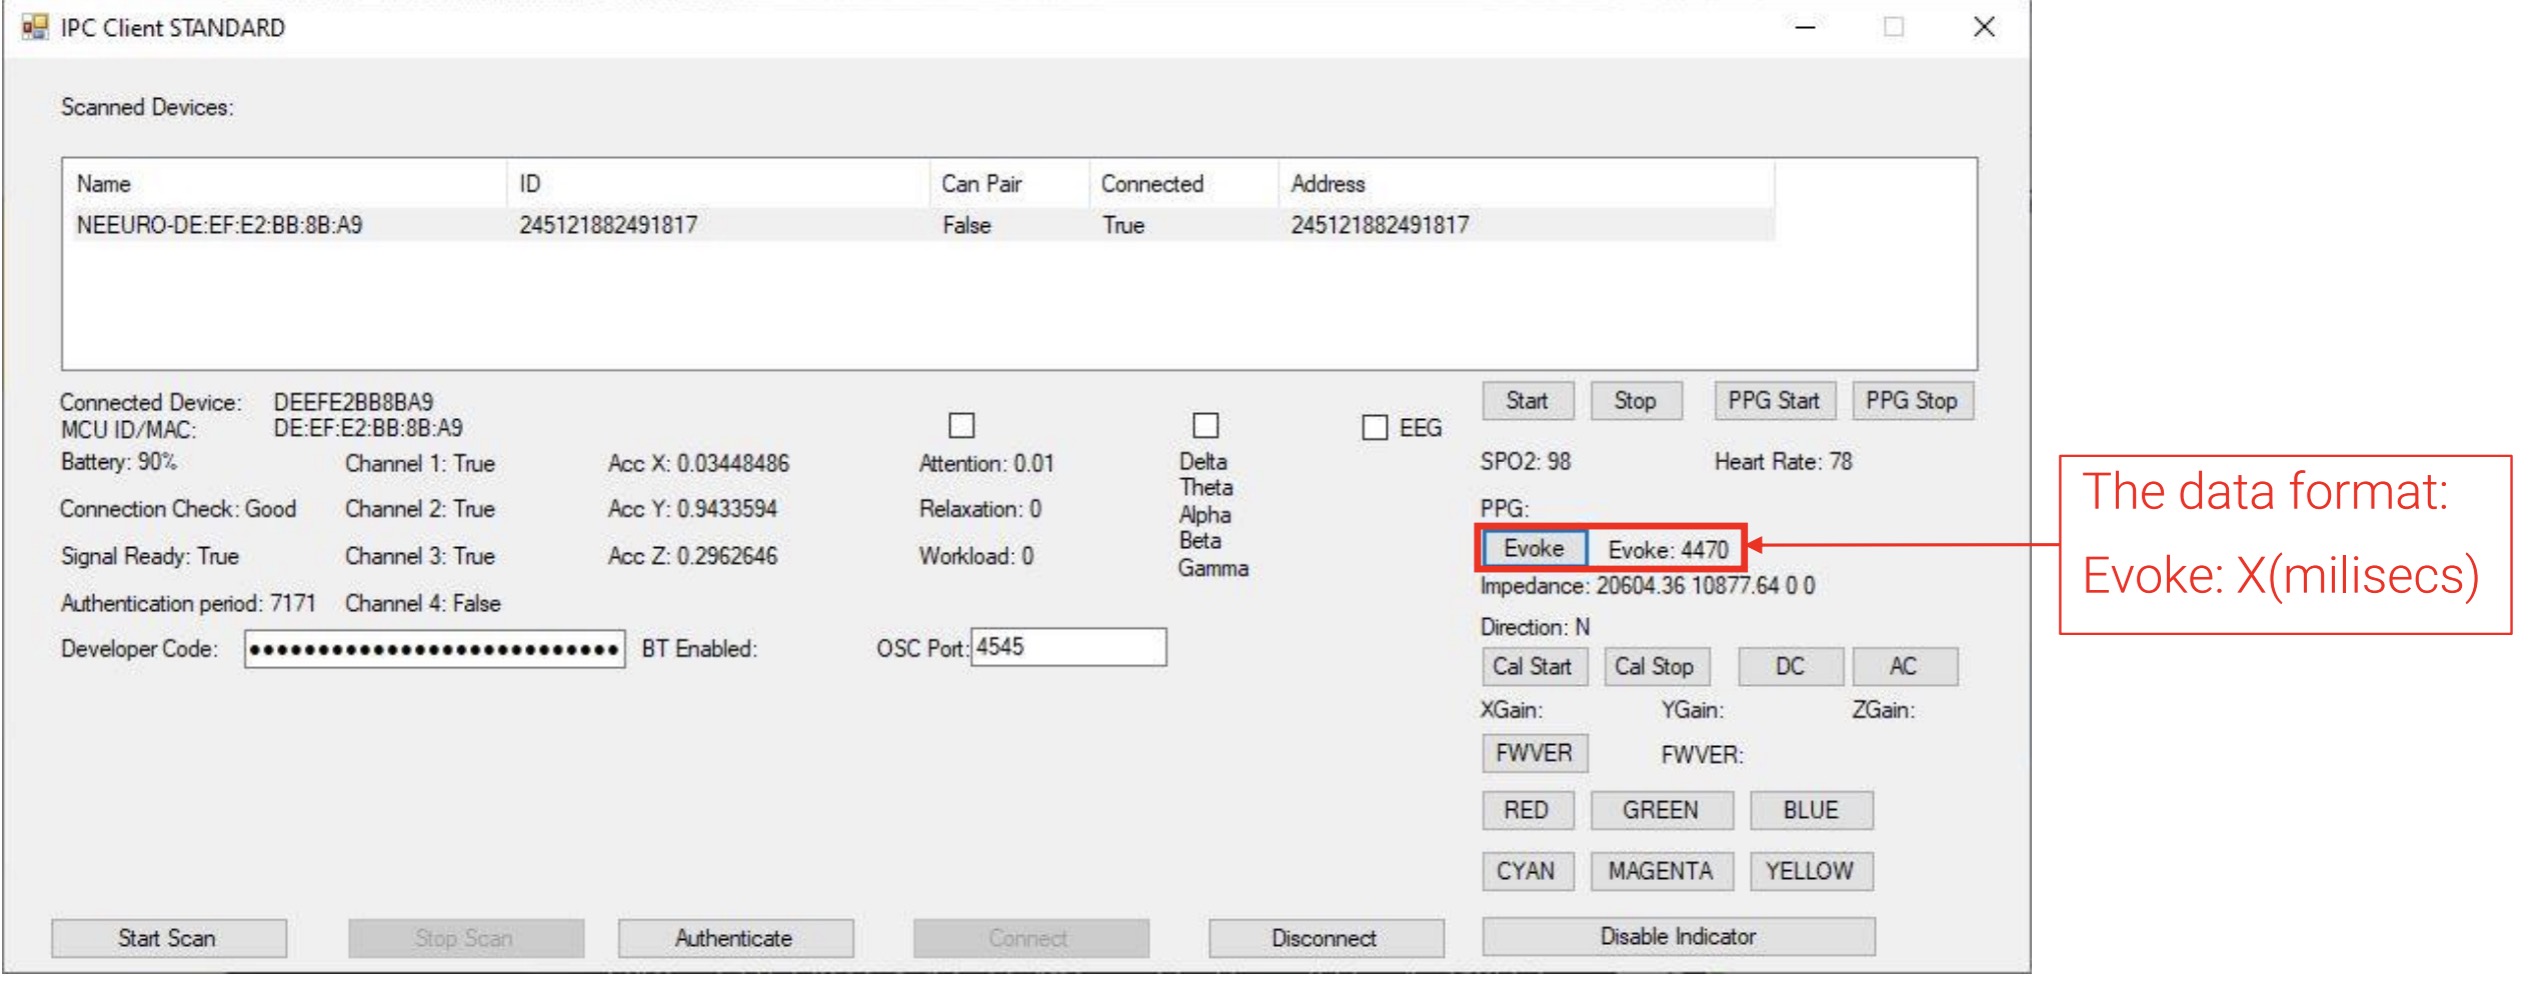
The event marker recalls technical data of the client whenever the Evoke button is used.
The data format returned is the timestamp in milliseconds.
Impedance
- Click on the AC button to measure the impedance.
- The ideal impedance should be around 500k Ohms.
- Remember to click on the DC button to switch back to EEG mode.

Motion sensor calibration
In order to get an accurate motion sensor data, you will need to calibrate.
Click on Cal Start button to start calibrating the Motion sensor.
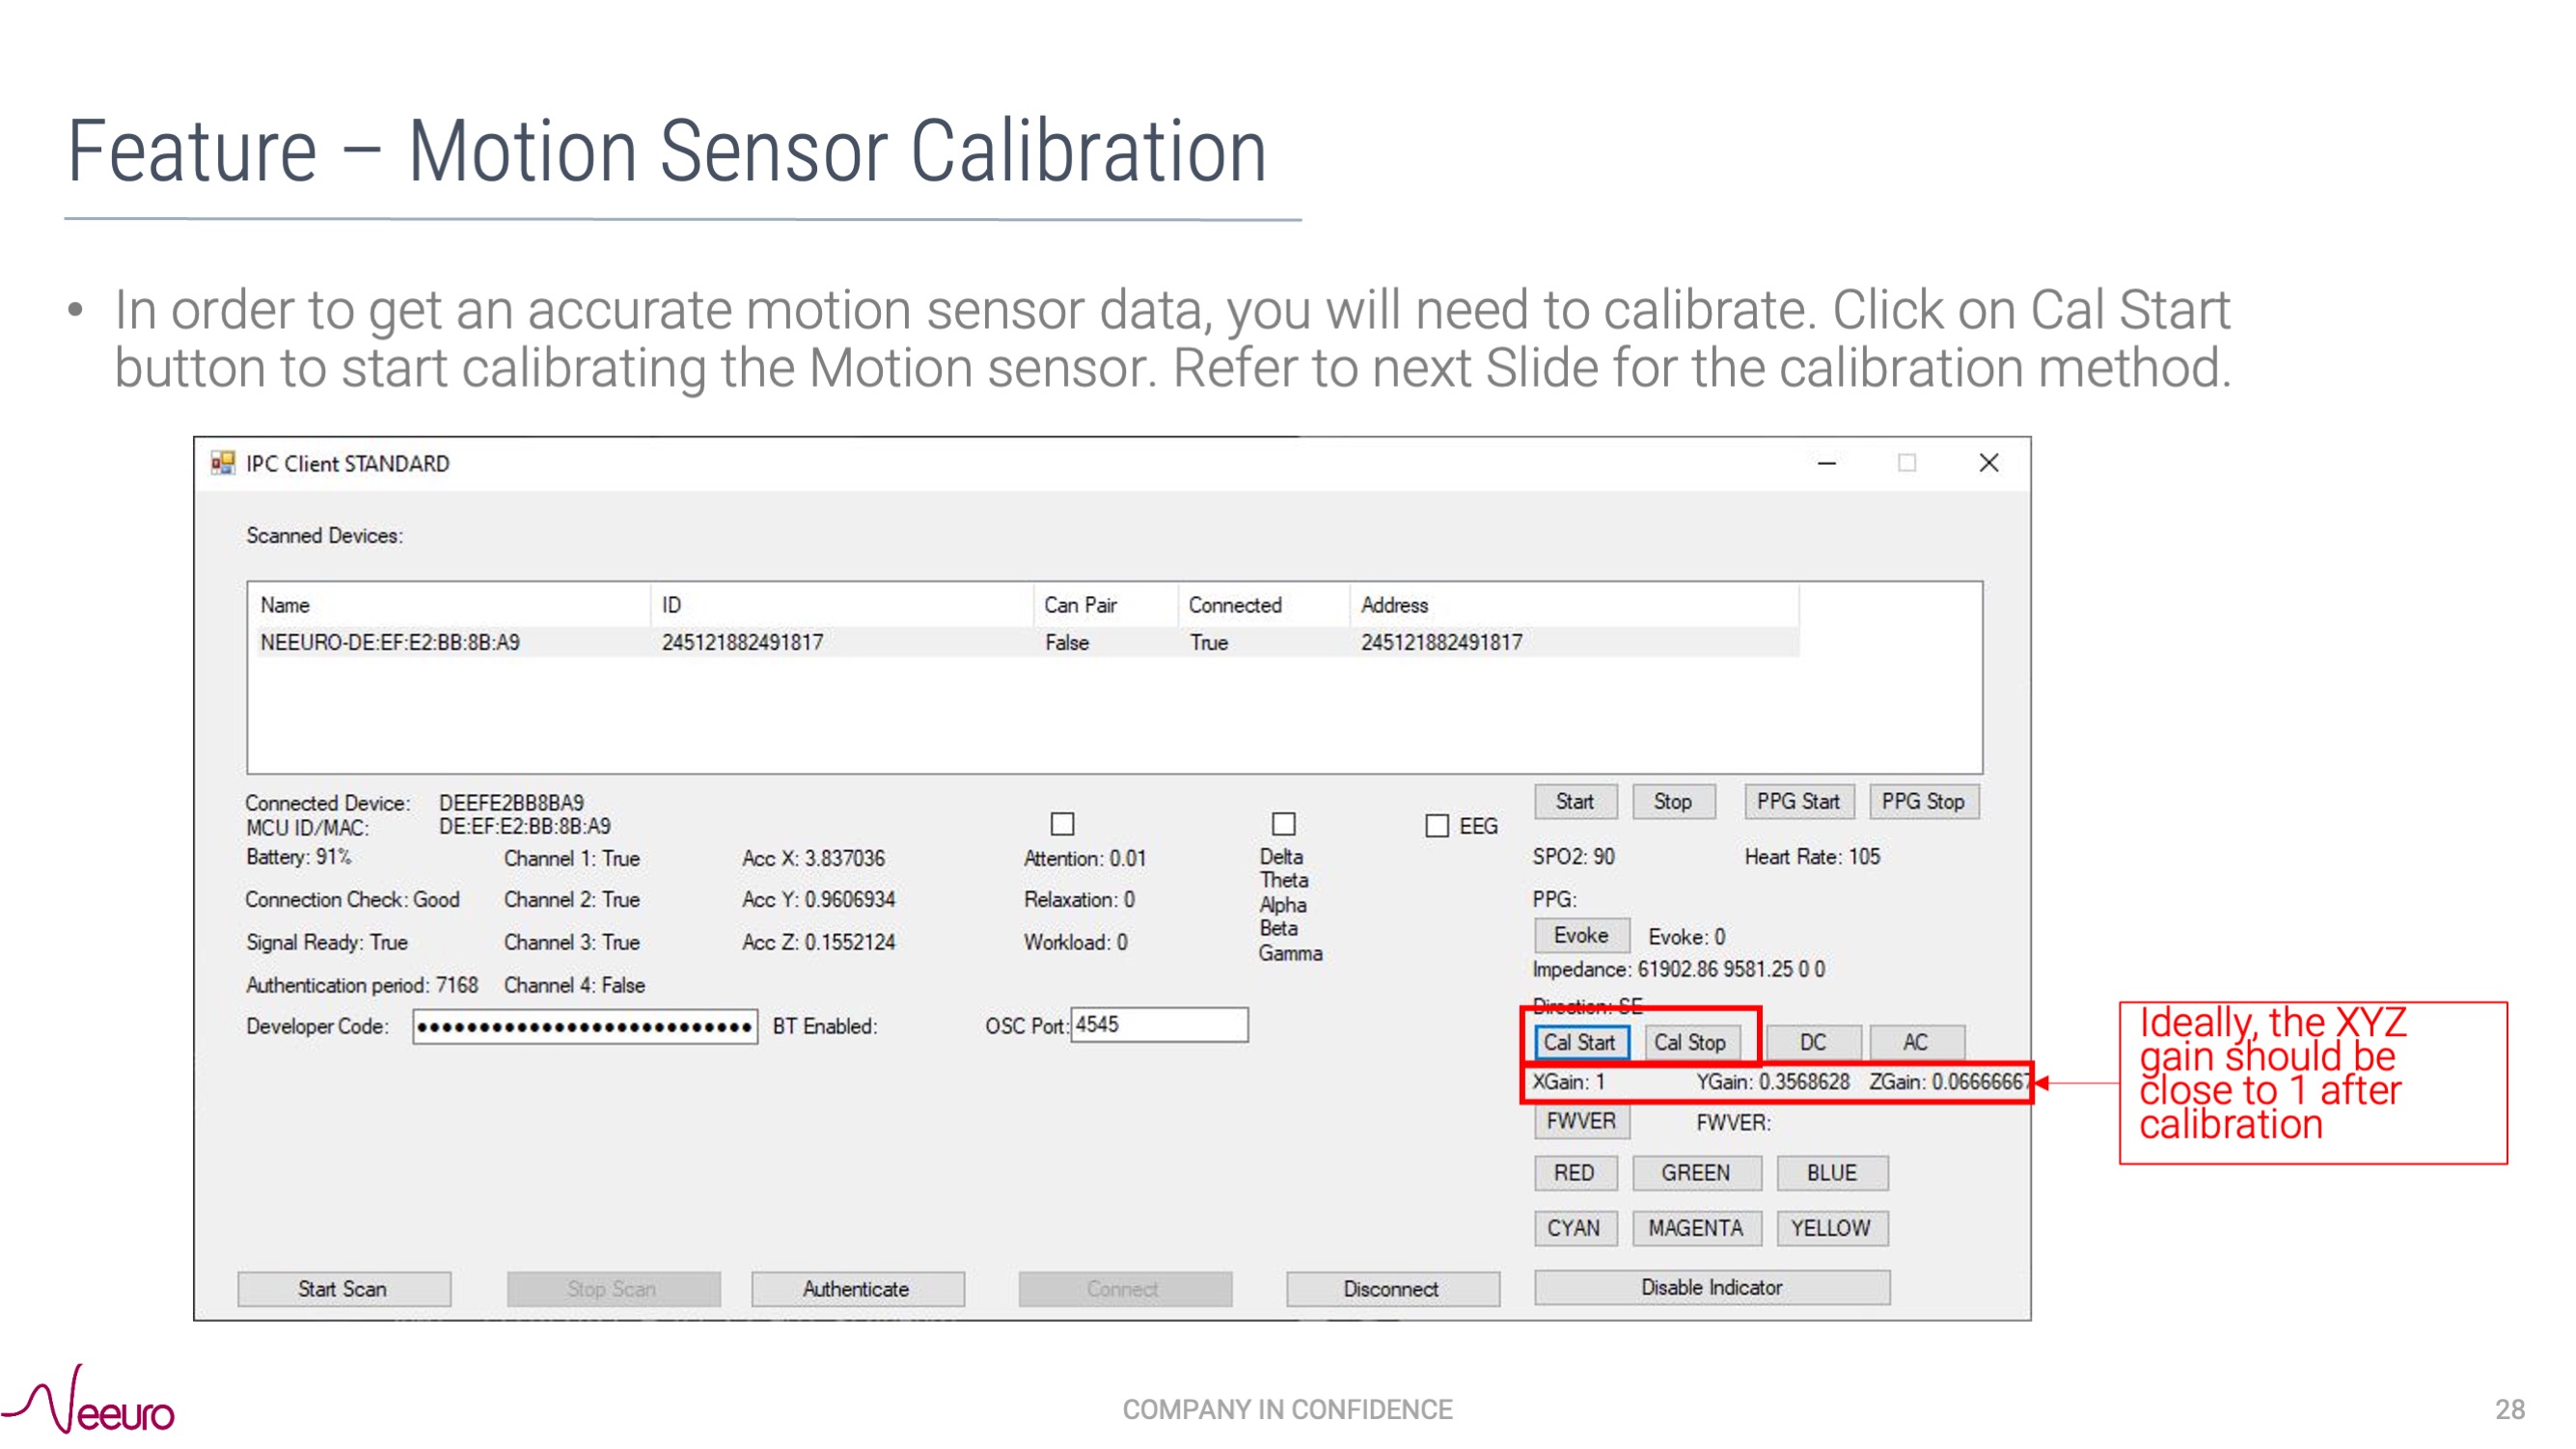
When calibrating, avoid compromising the accuracy of the SenzeBand 2's calibration by moving away from all magnetic sources, like metal items, electronic gadgets and power sockets.
EEG and PPG data
- Click on Start and Stop buttons to get EEG data.
- Click on PPG Start and PPG Stop buttons to get the raw PPG in IR and RED data.
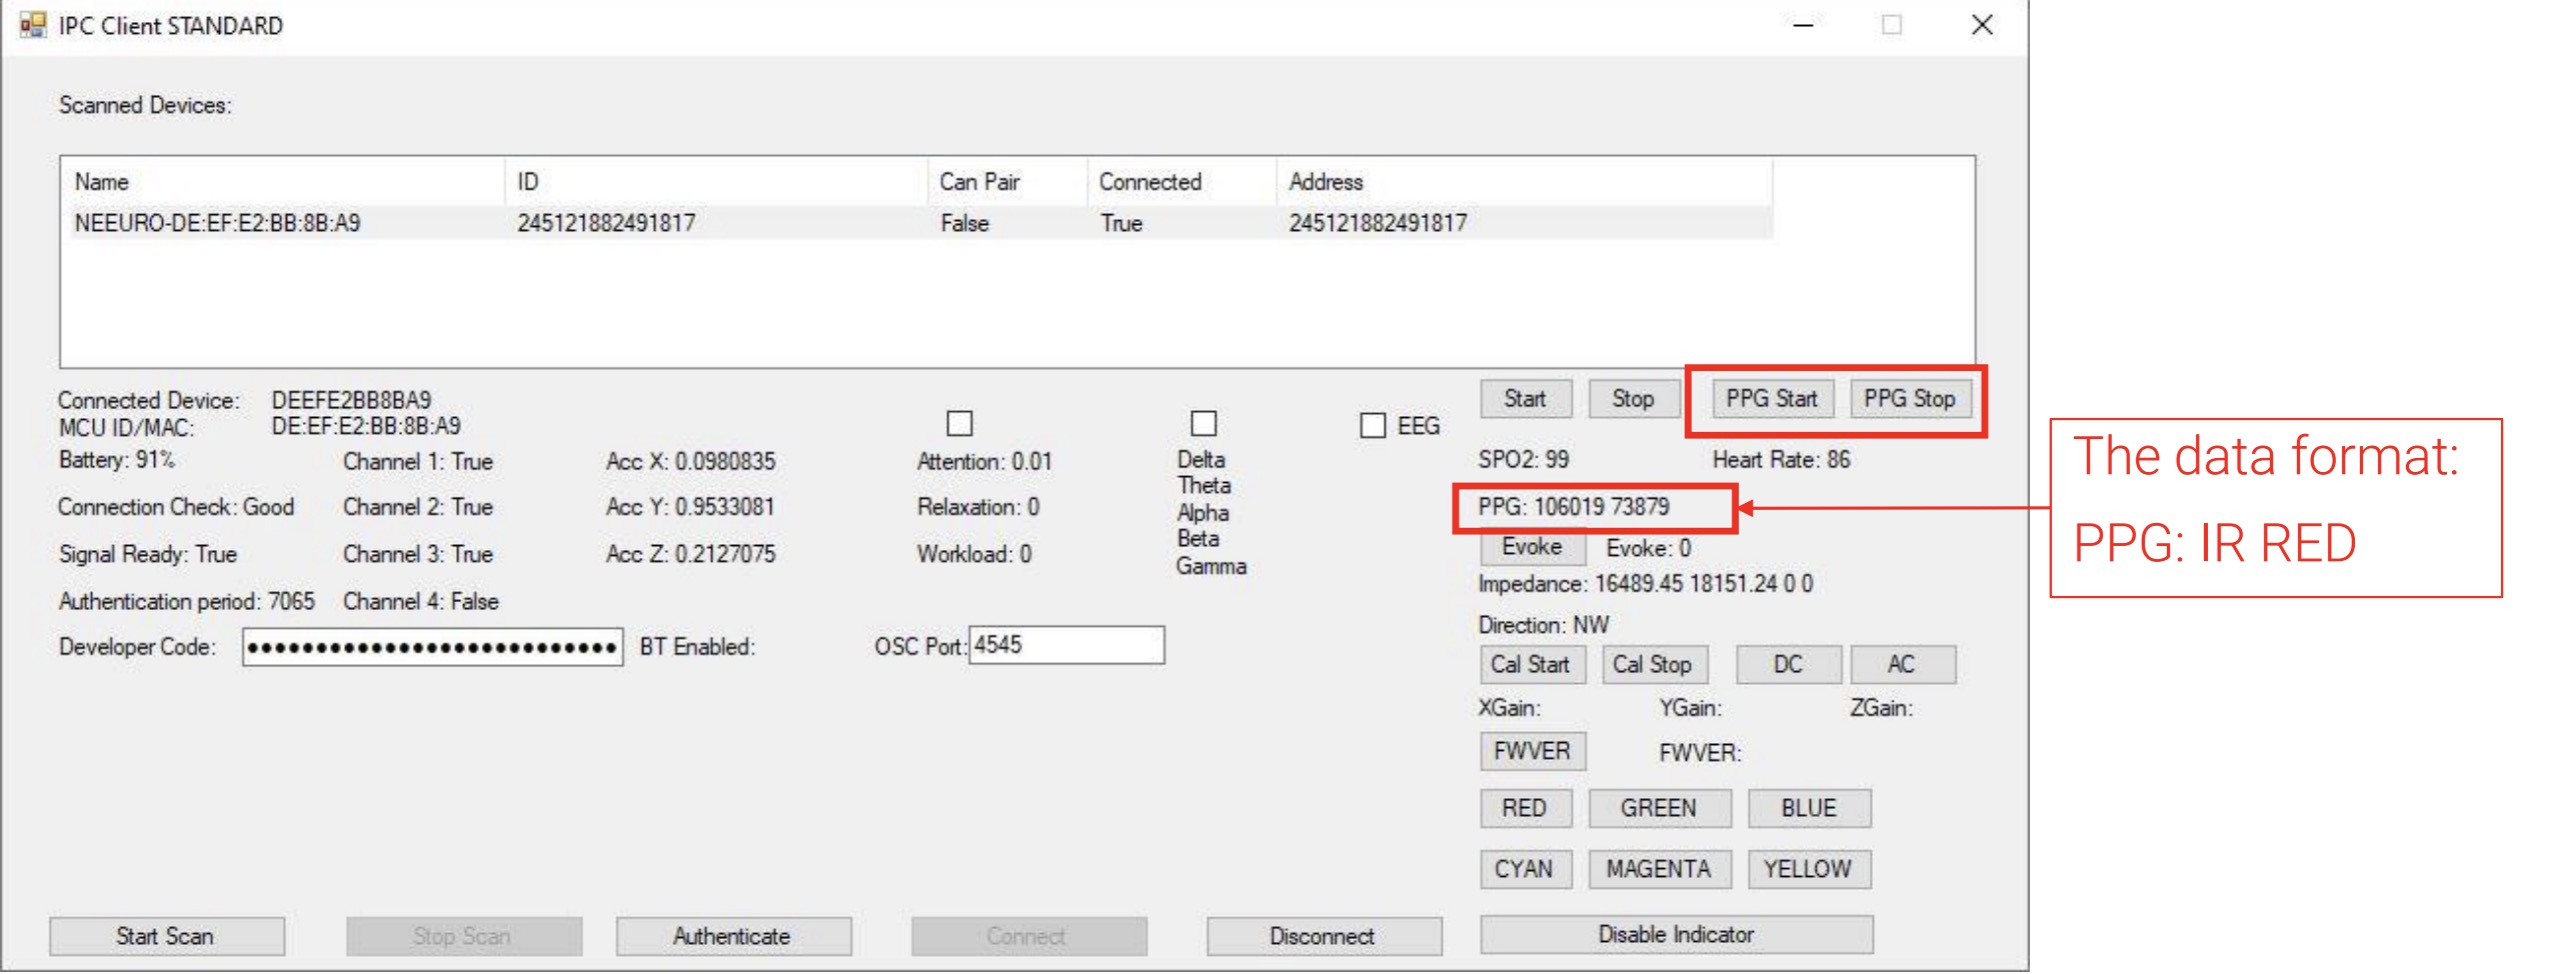
Activity LED
- The Activity LED can be controlled using the RED, GREEN, BLUE, CYAN, MAGENTA, YELLOW buttons.
- There are 6 colours of LED, allowing each to be representative of their a different state, or a paticular shop.
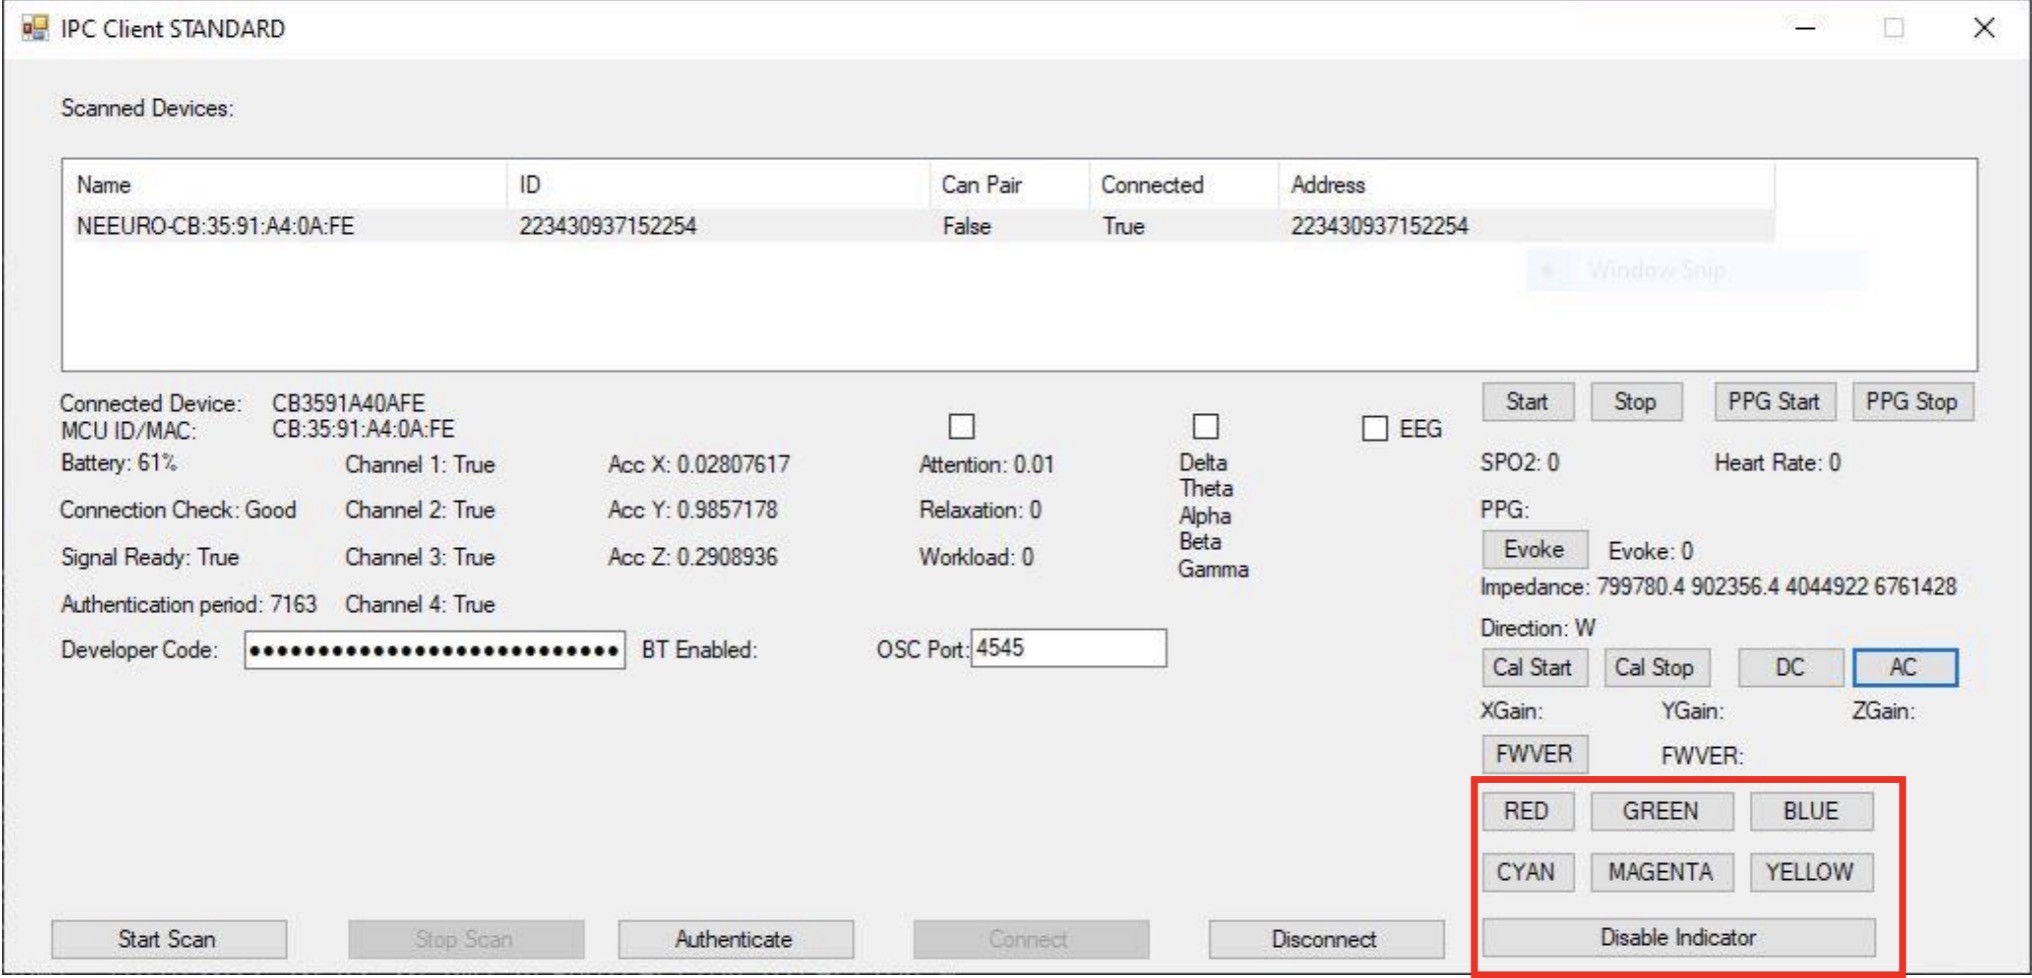
Windows Defender is blocking the SDK App
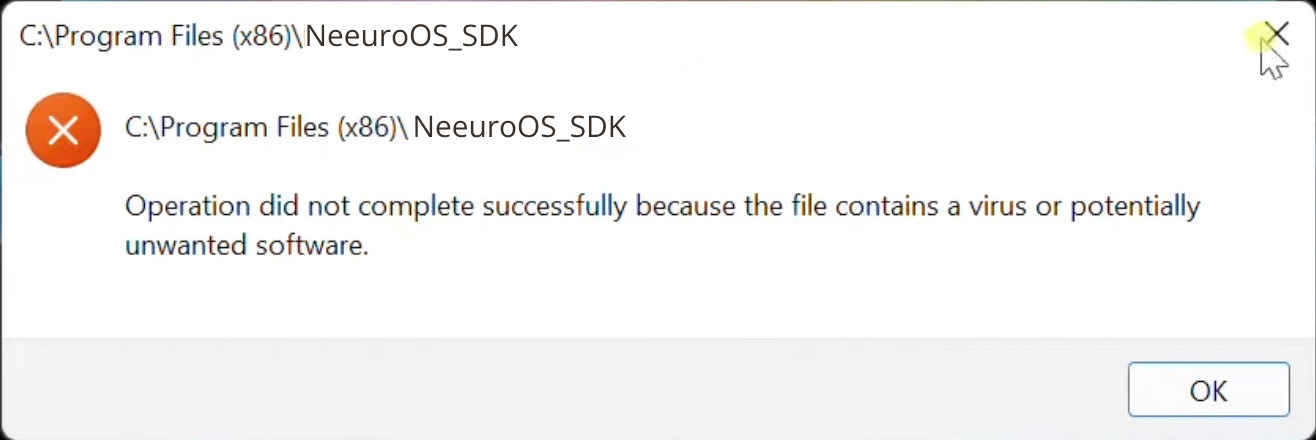
Access Windows Security from the taskbar
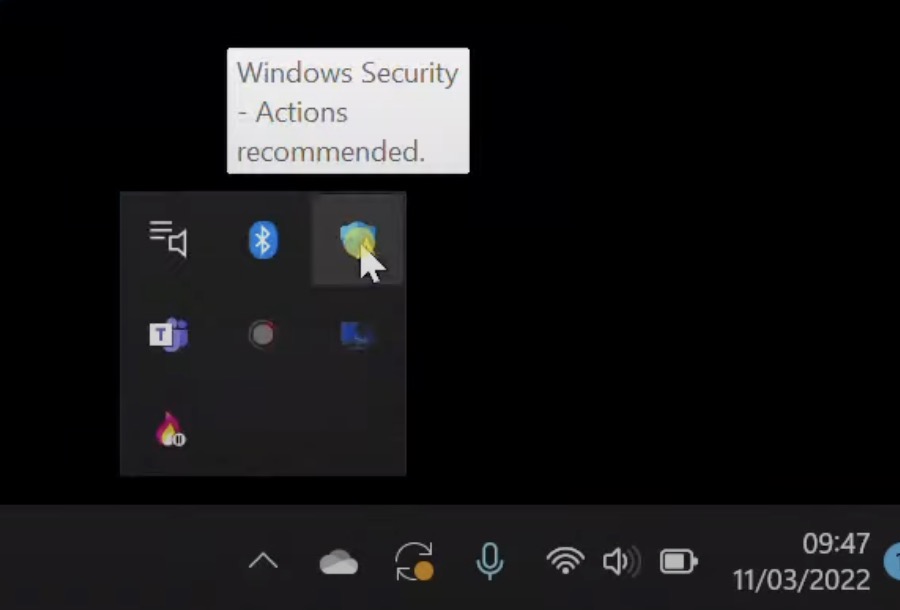
Click on Virus and Threat Protection
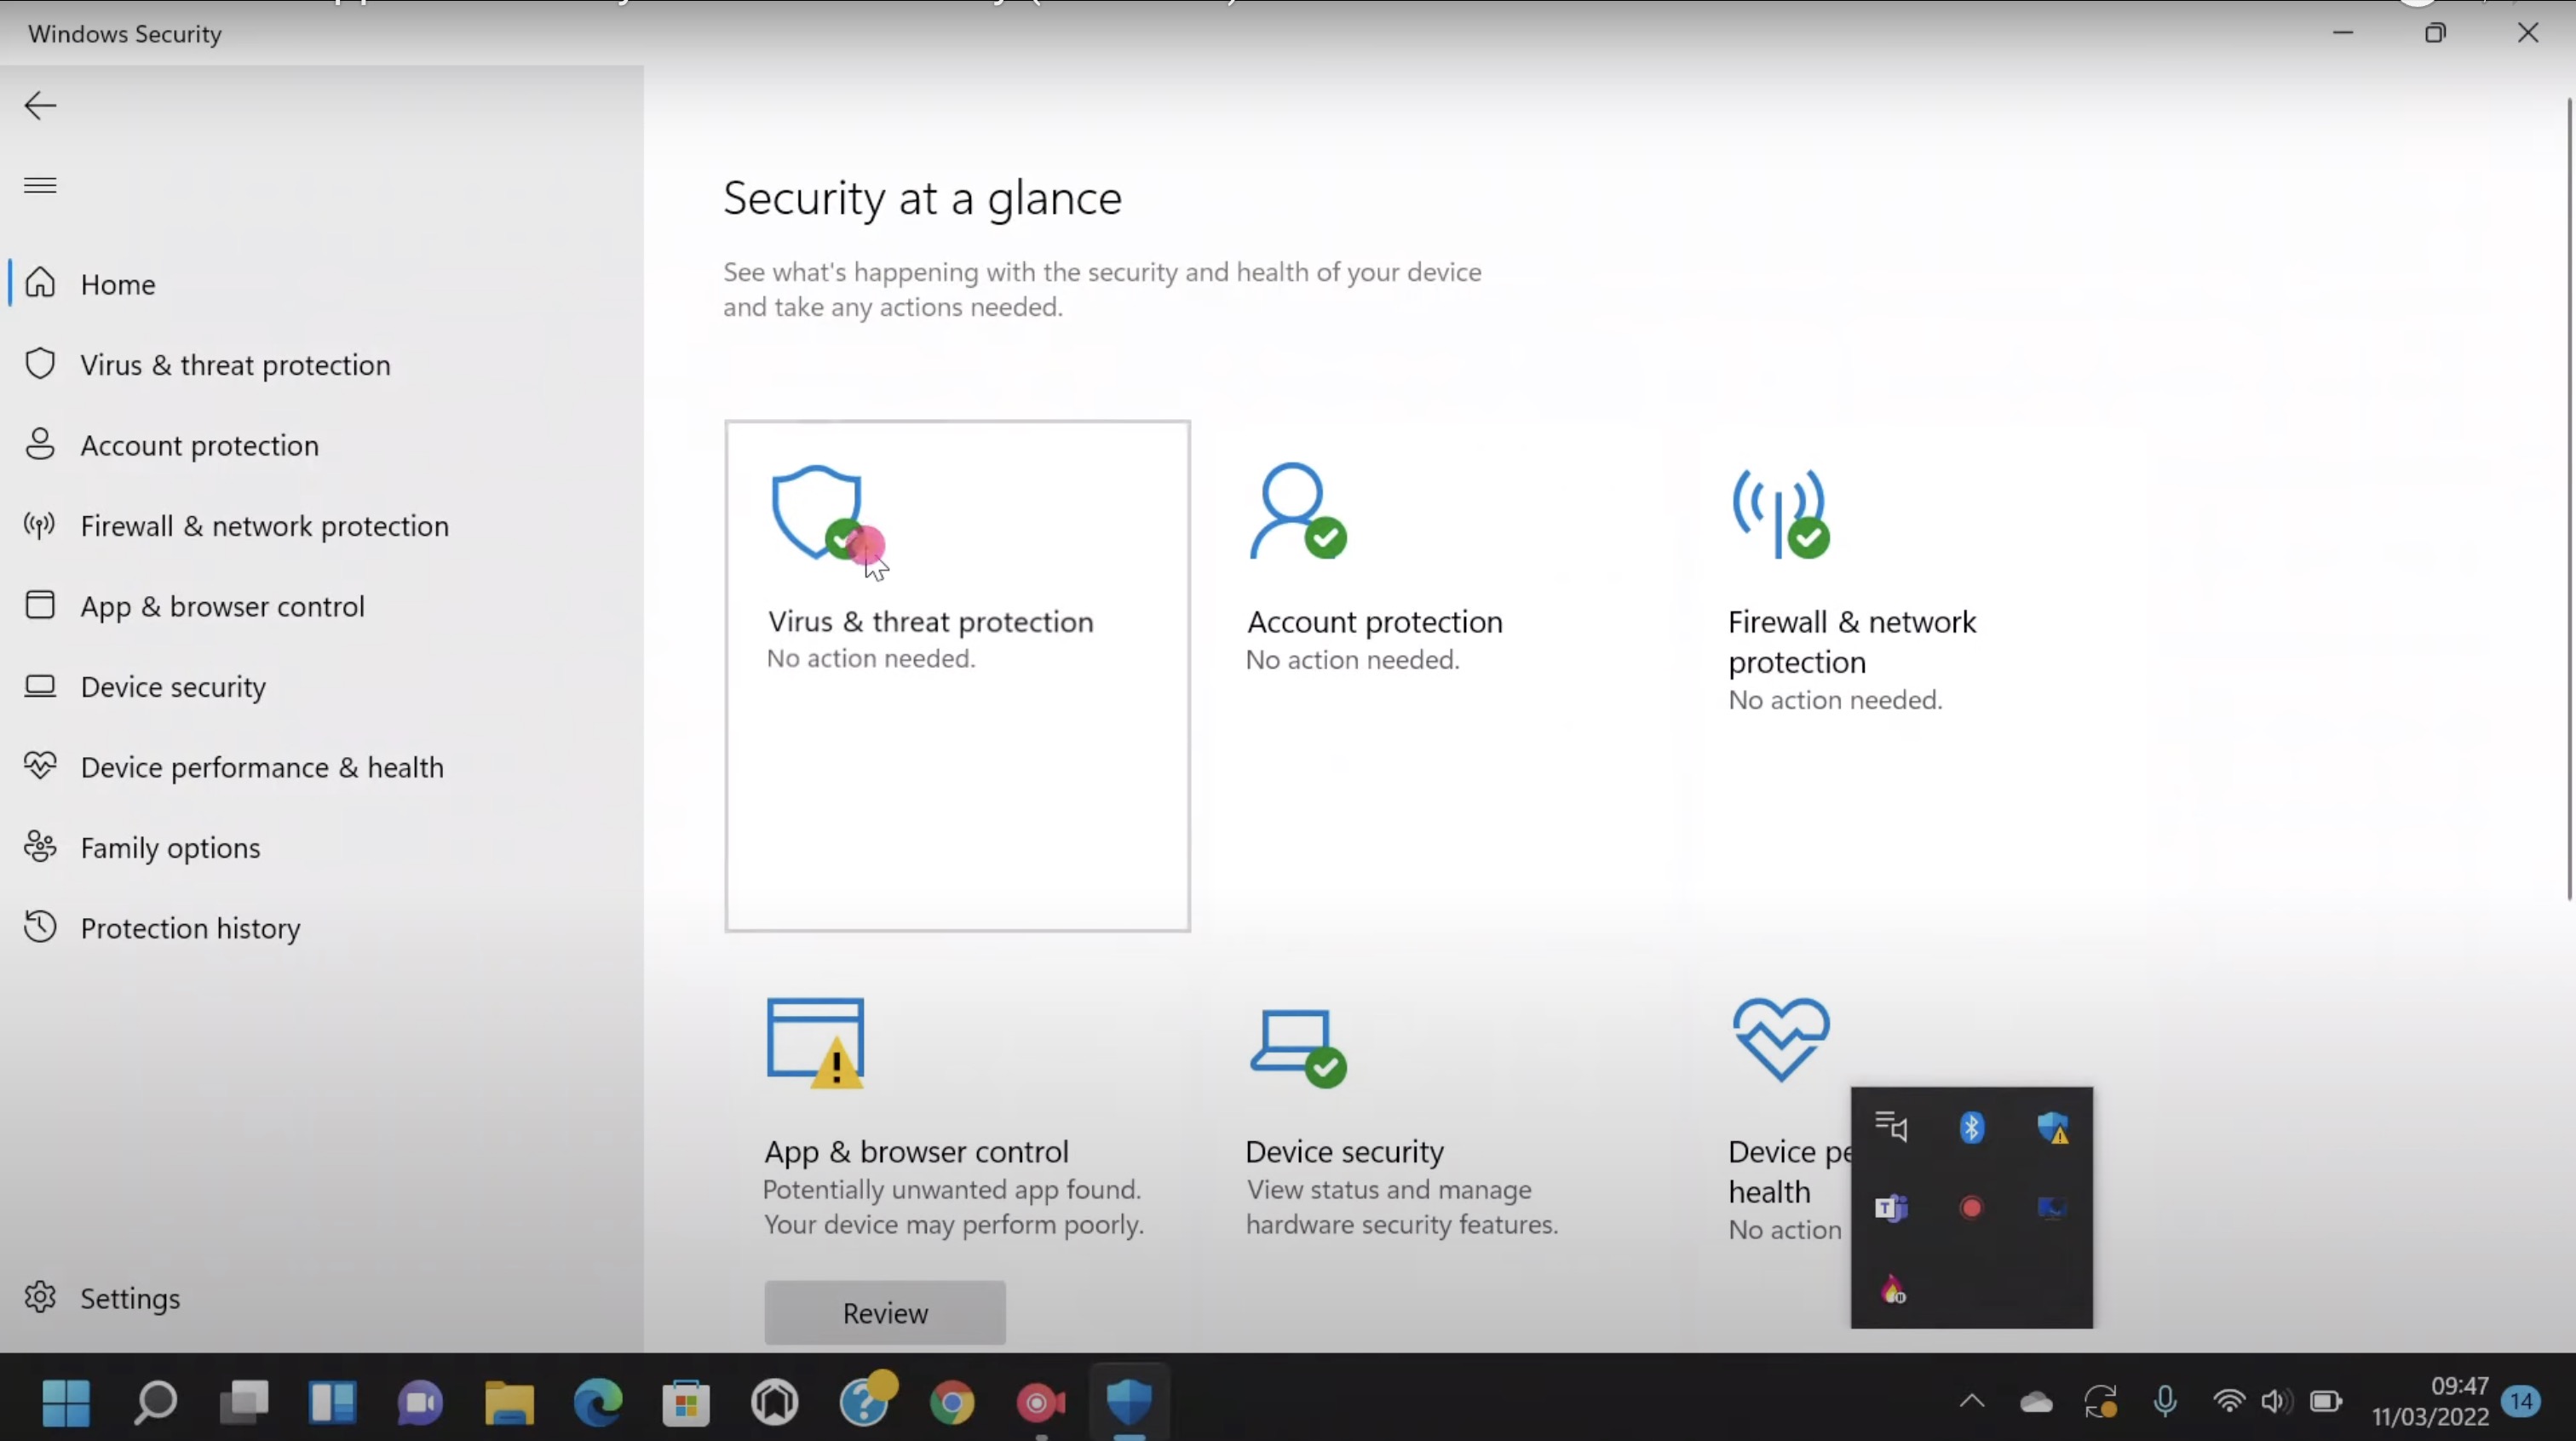
Select Manage Settings
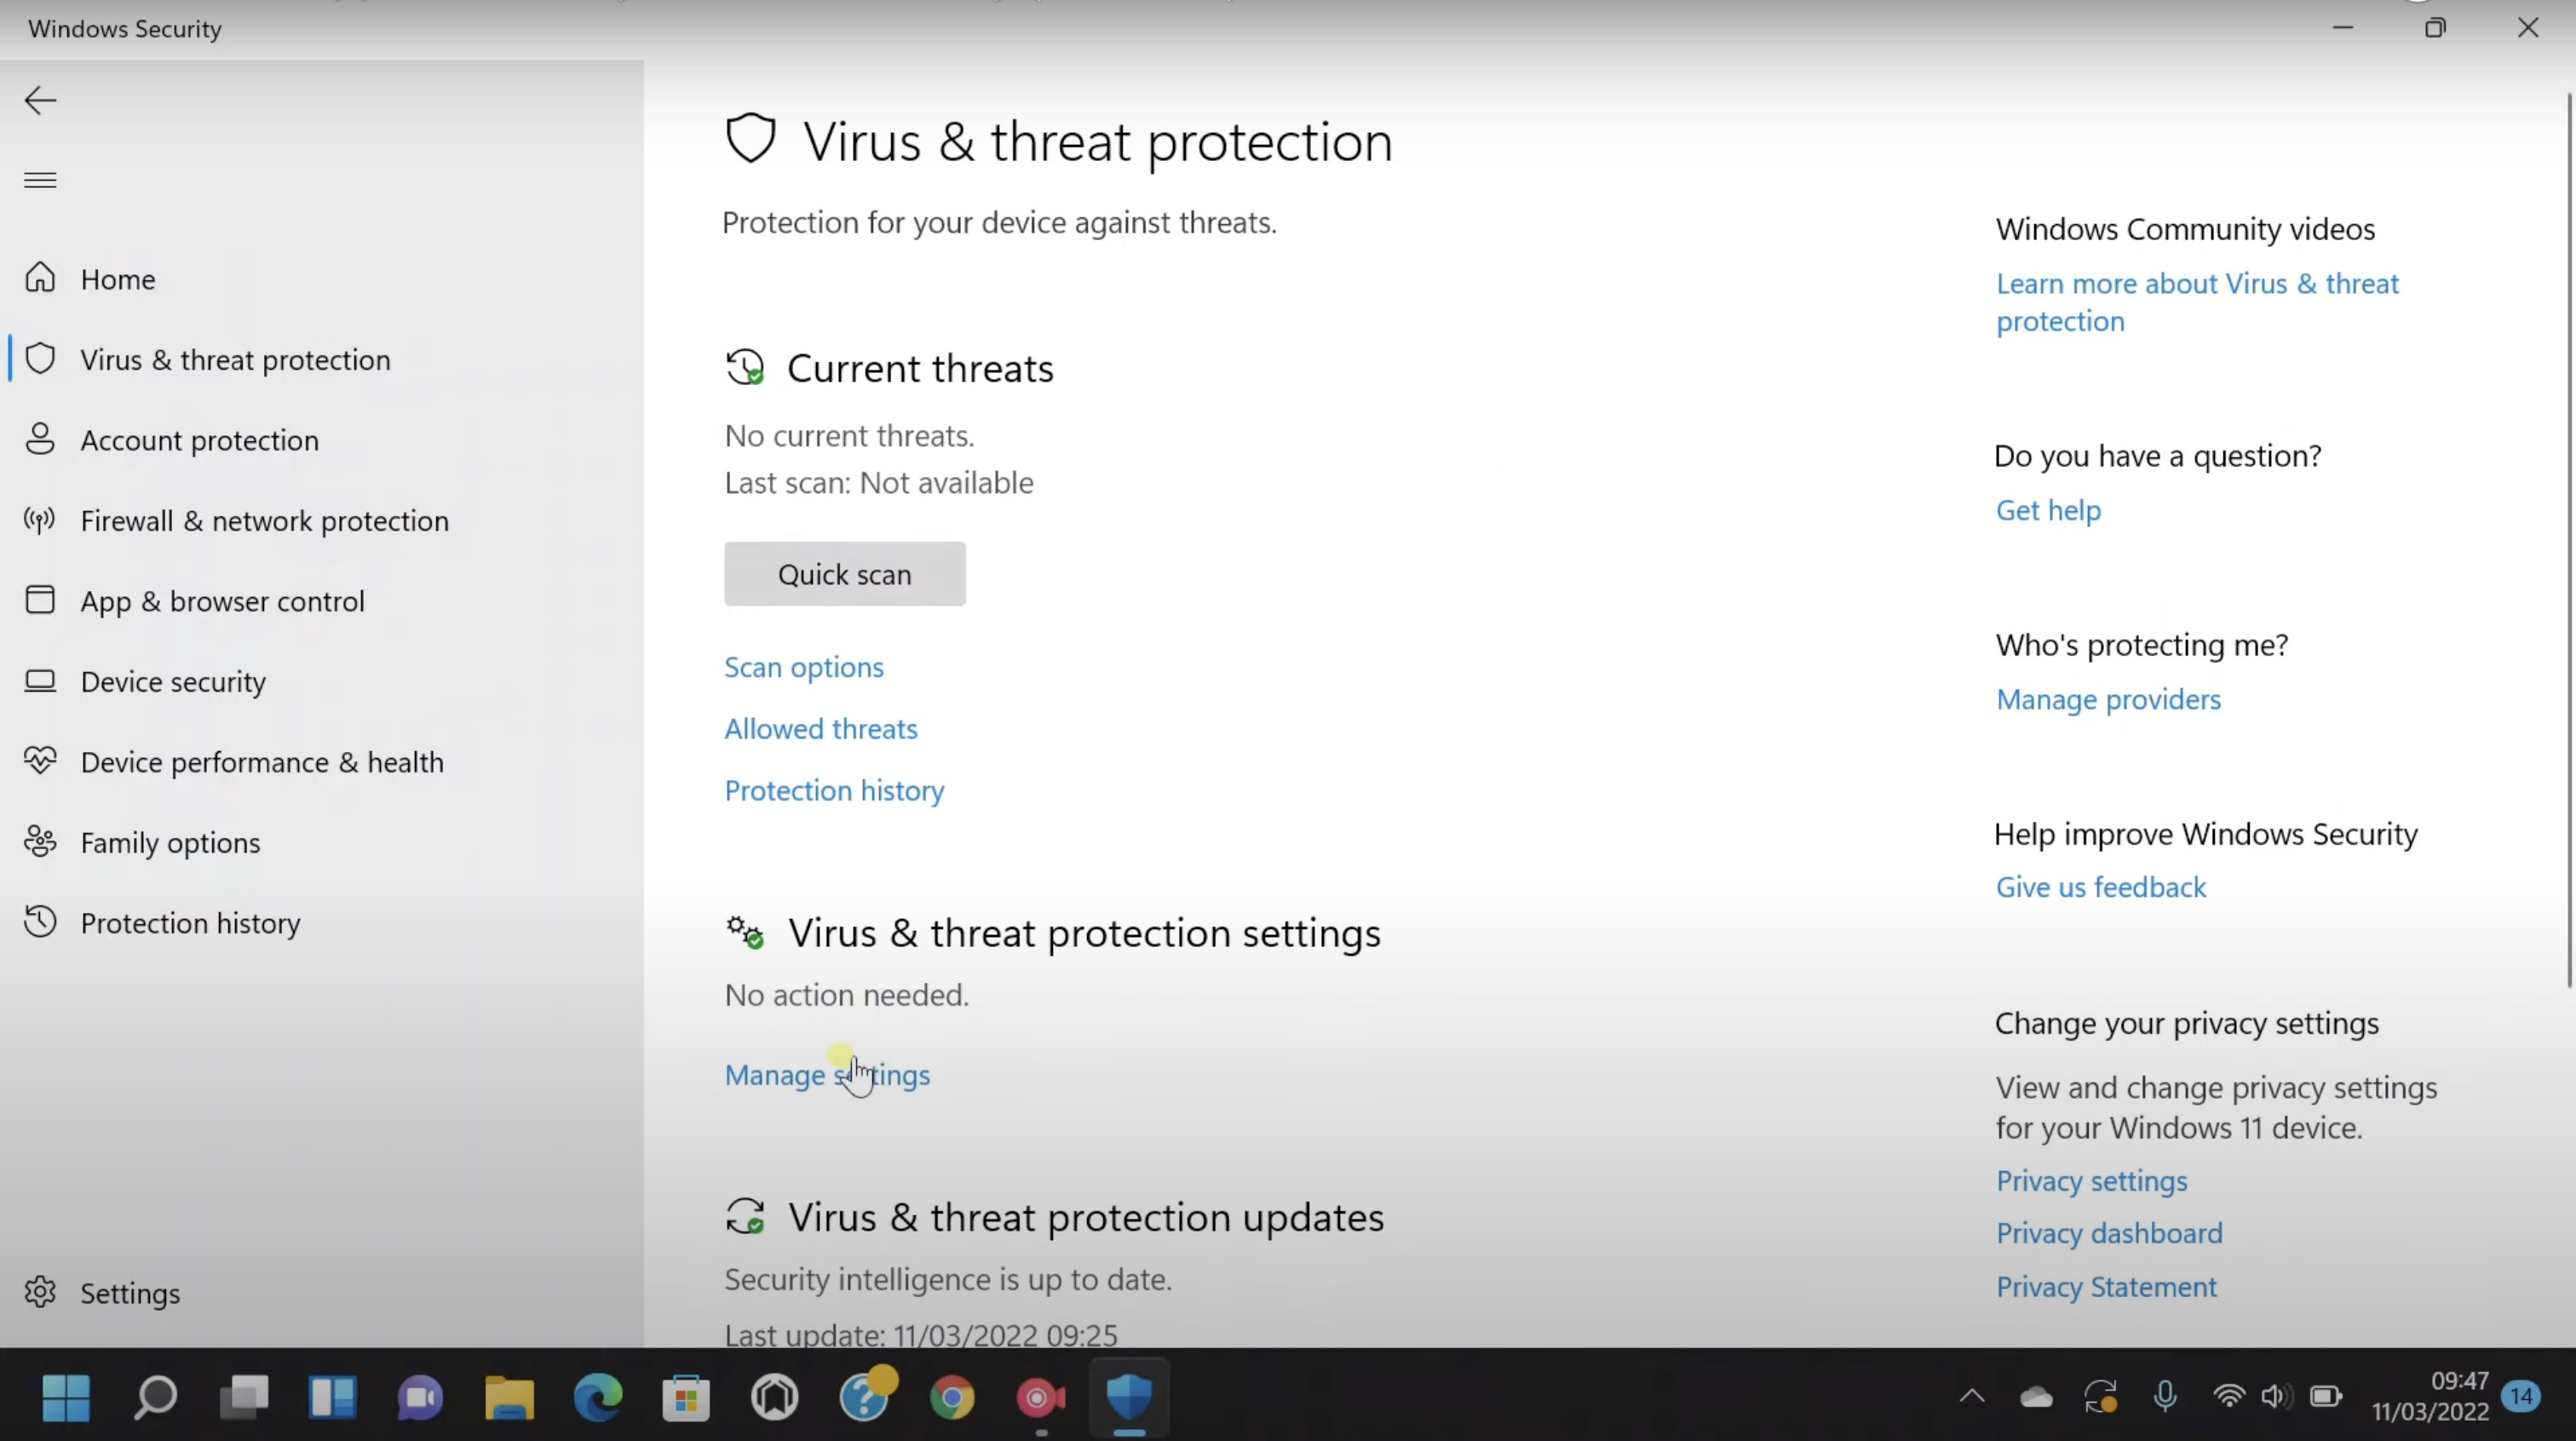
Scroll down and then select 'Manage exclusions'
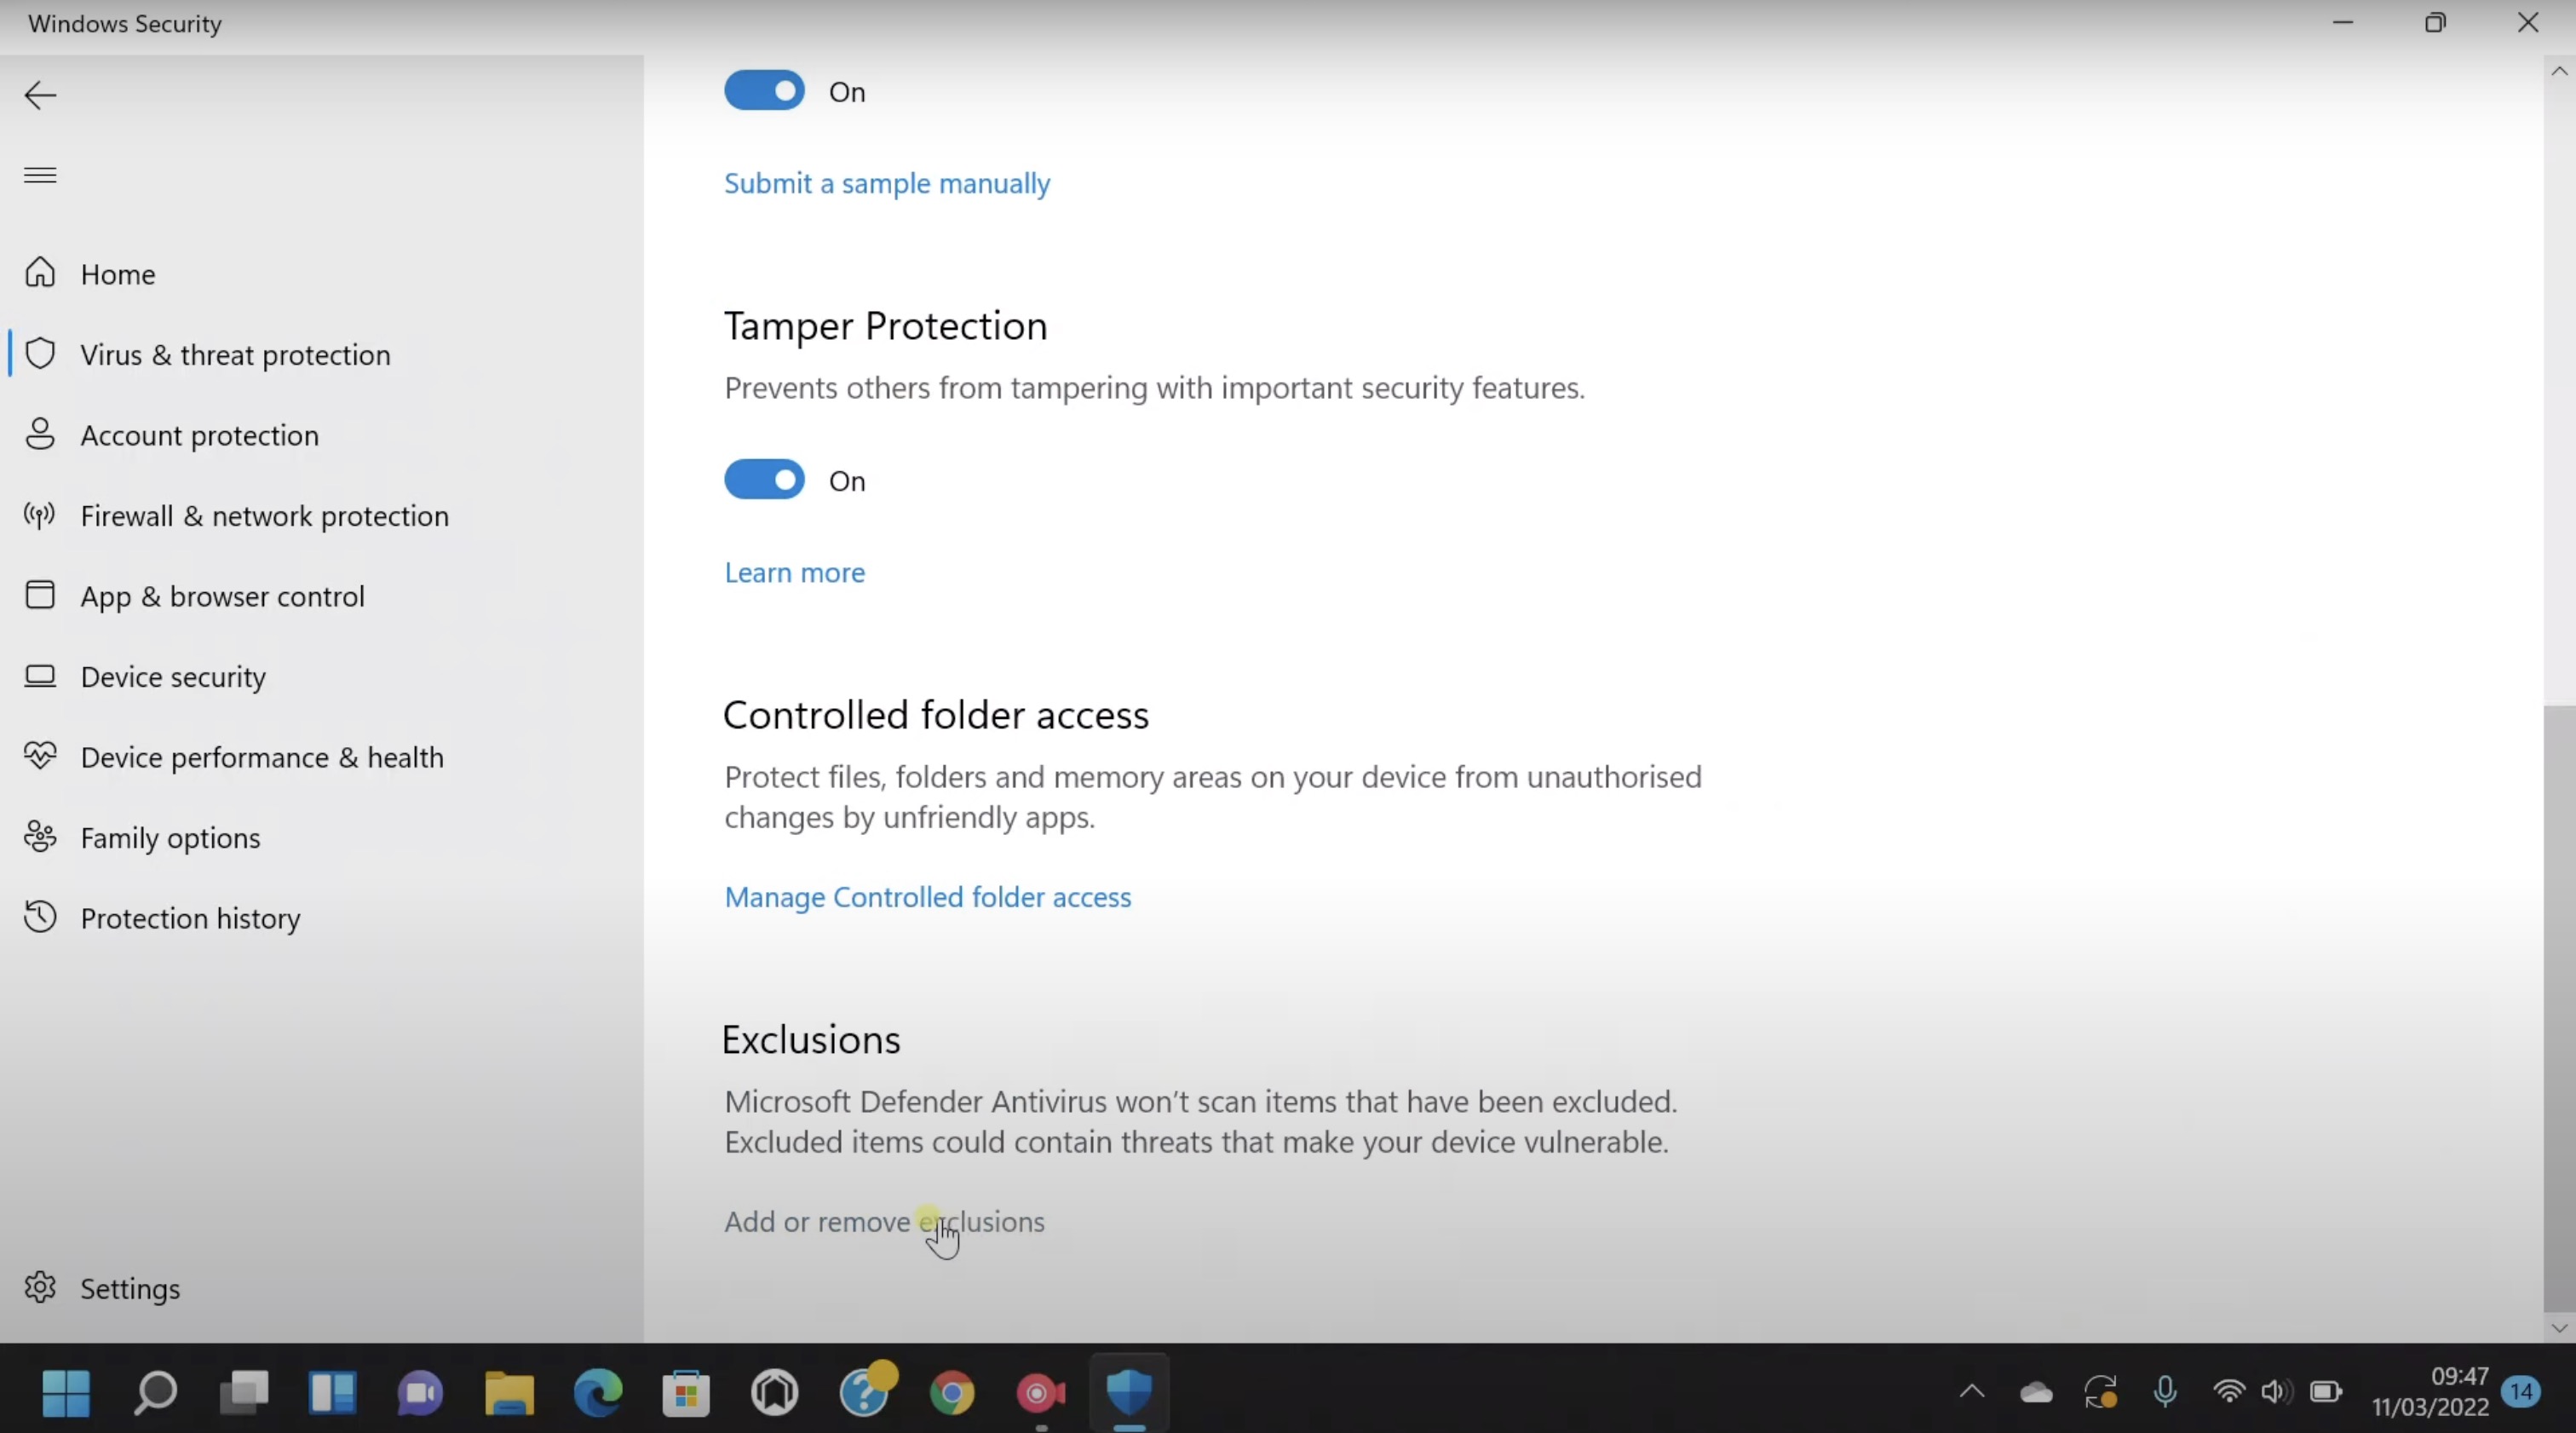
Click on add an exclusion
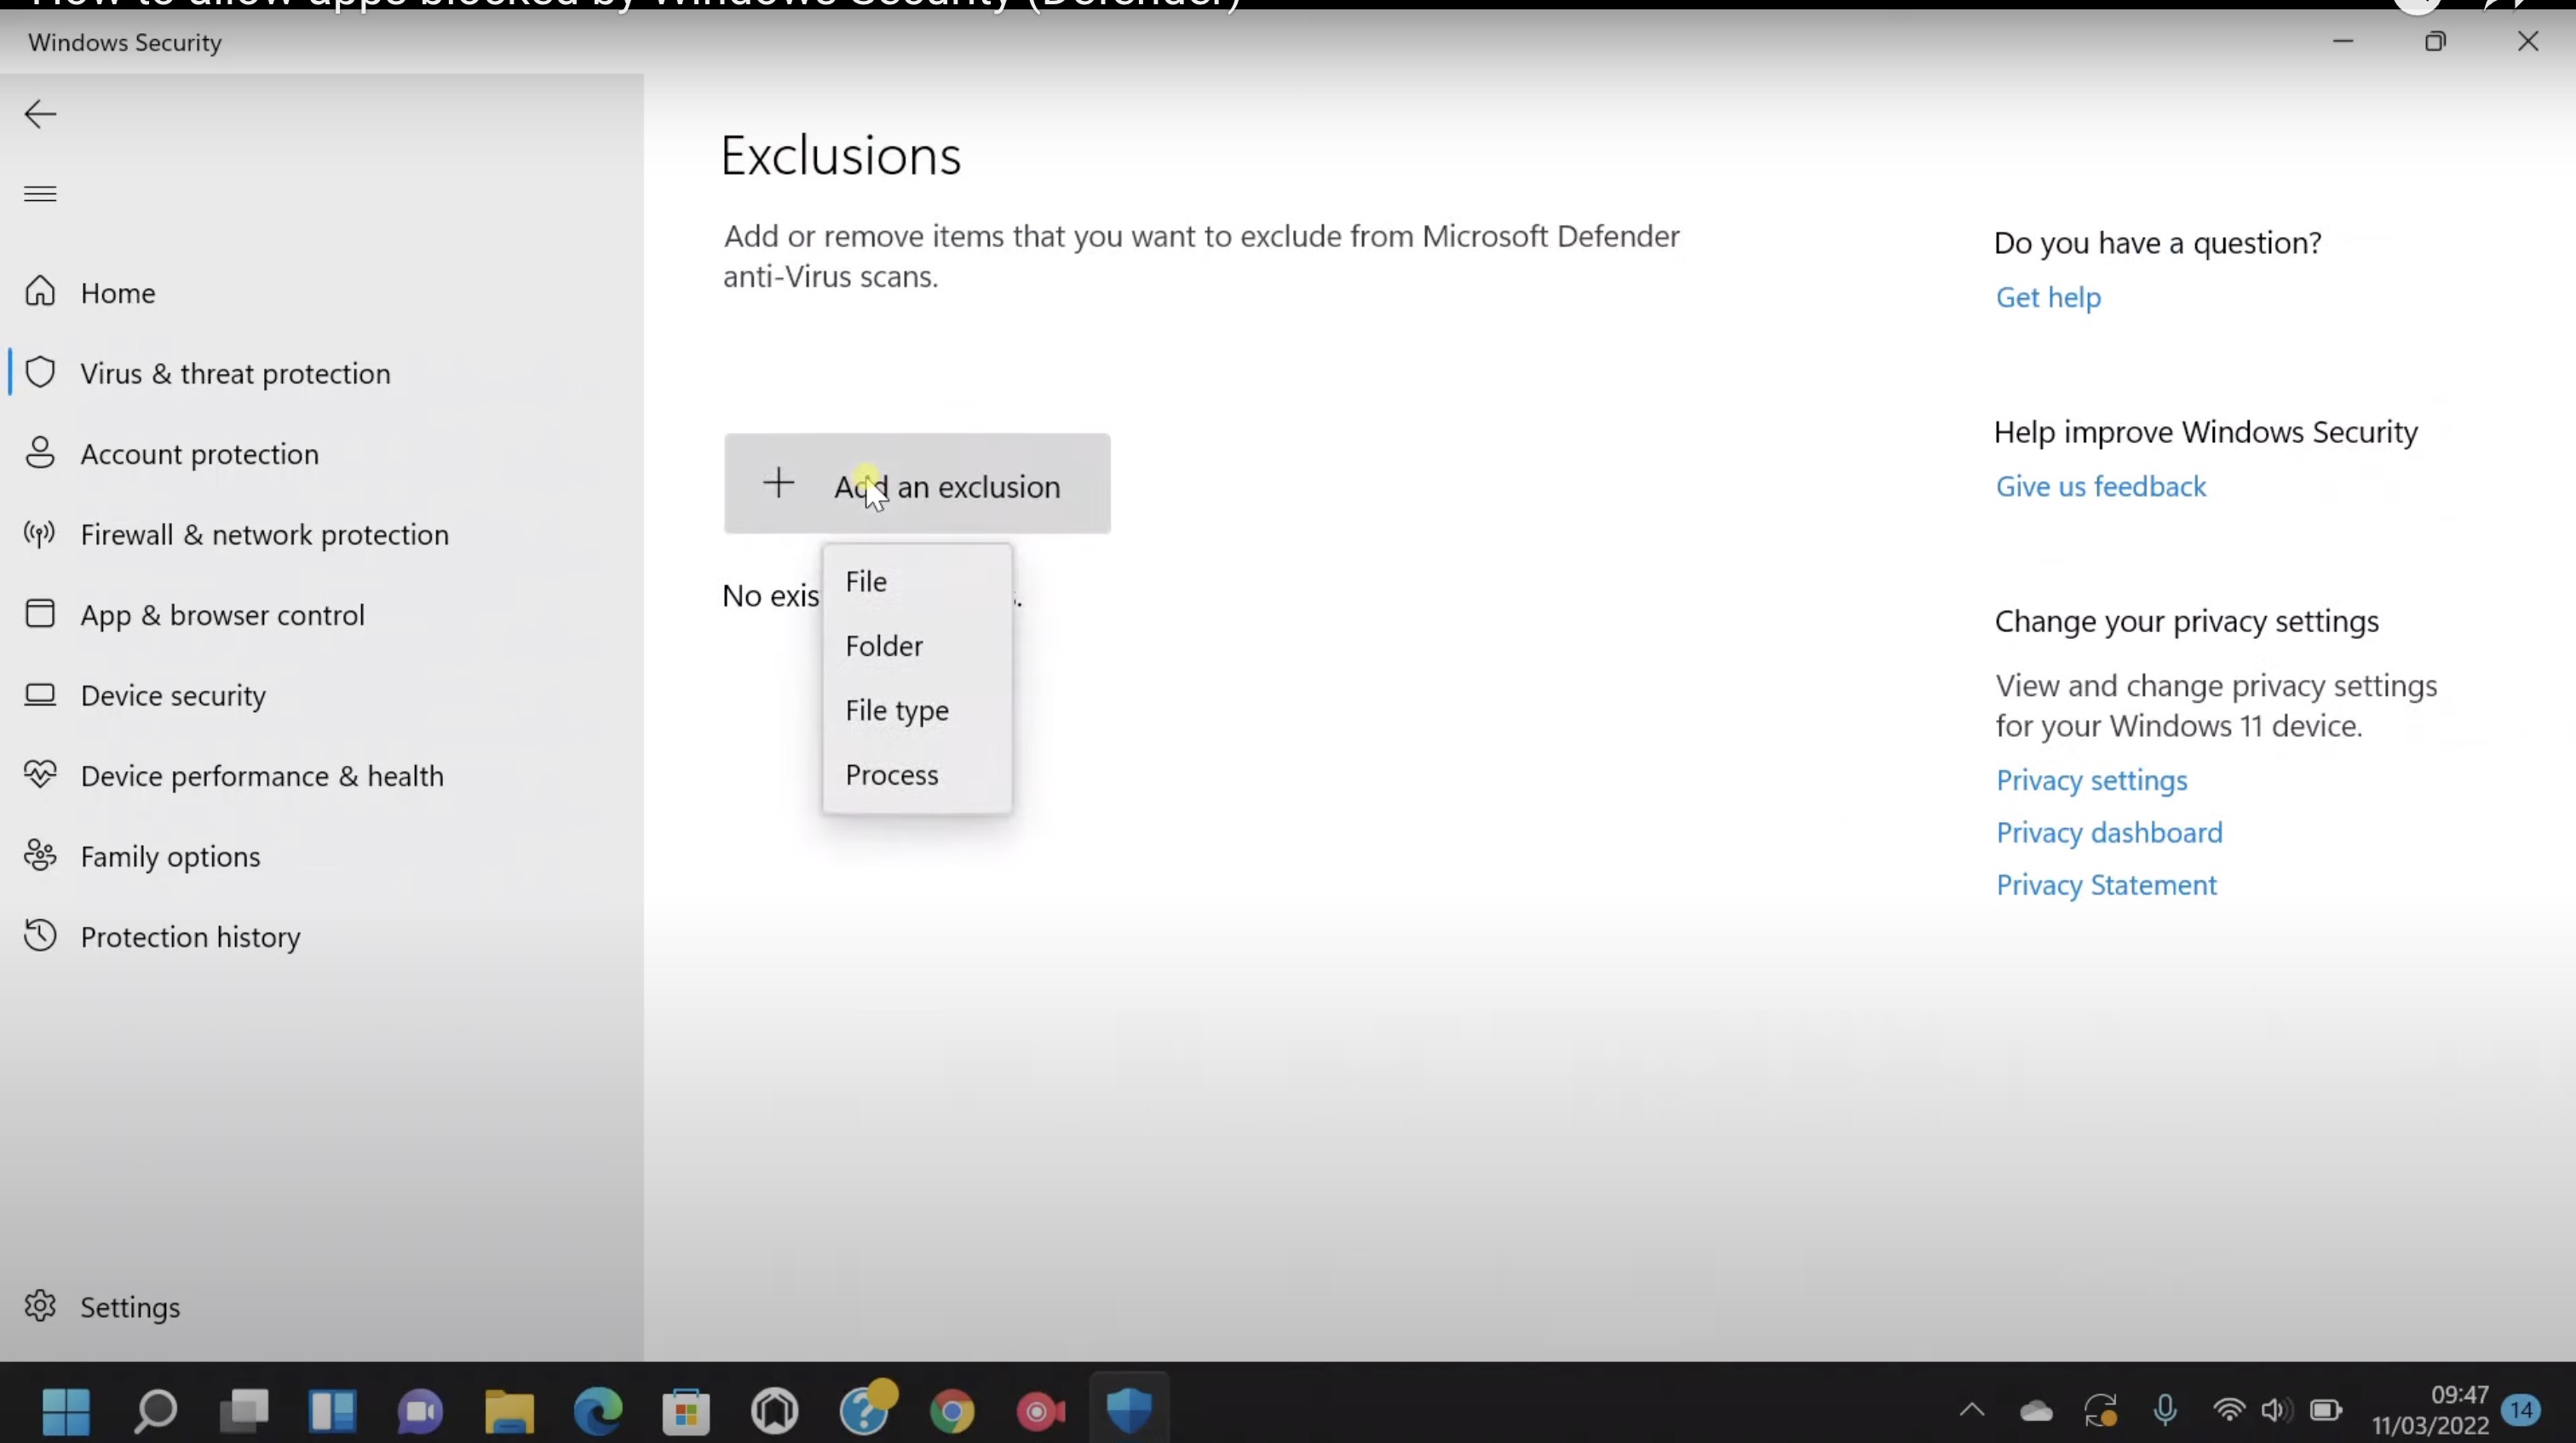
Select the NeeuroOS SDK
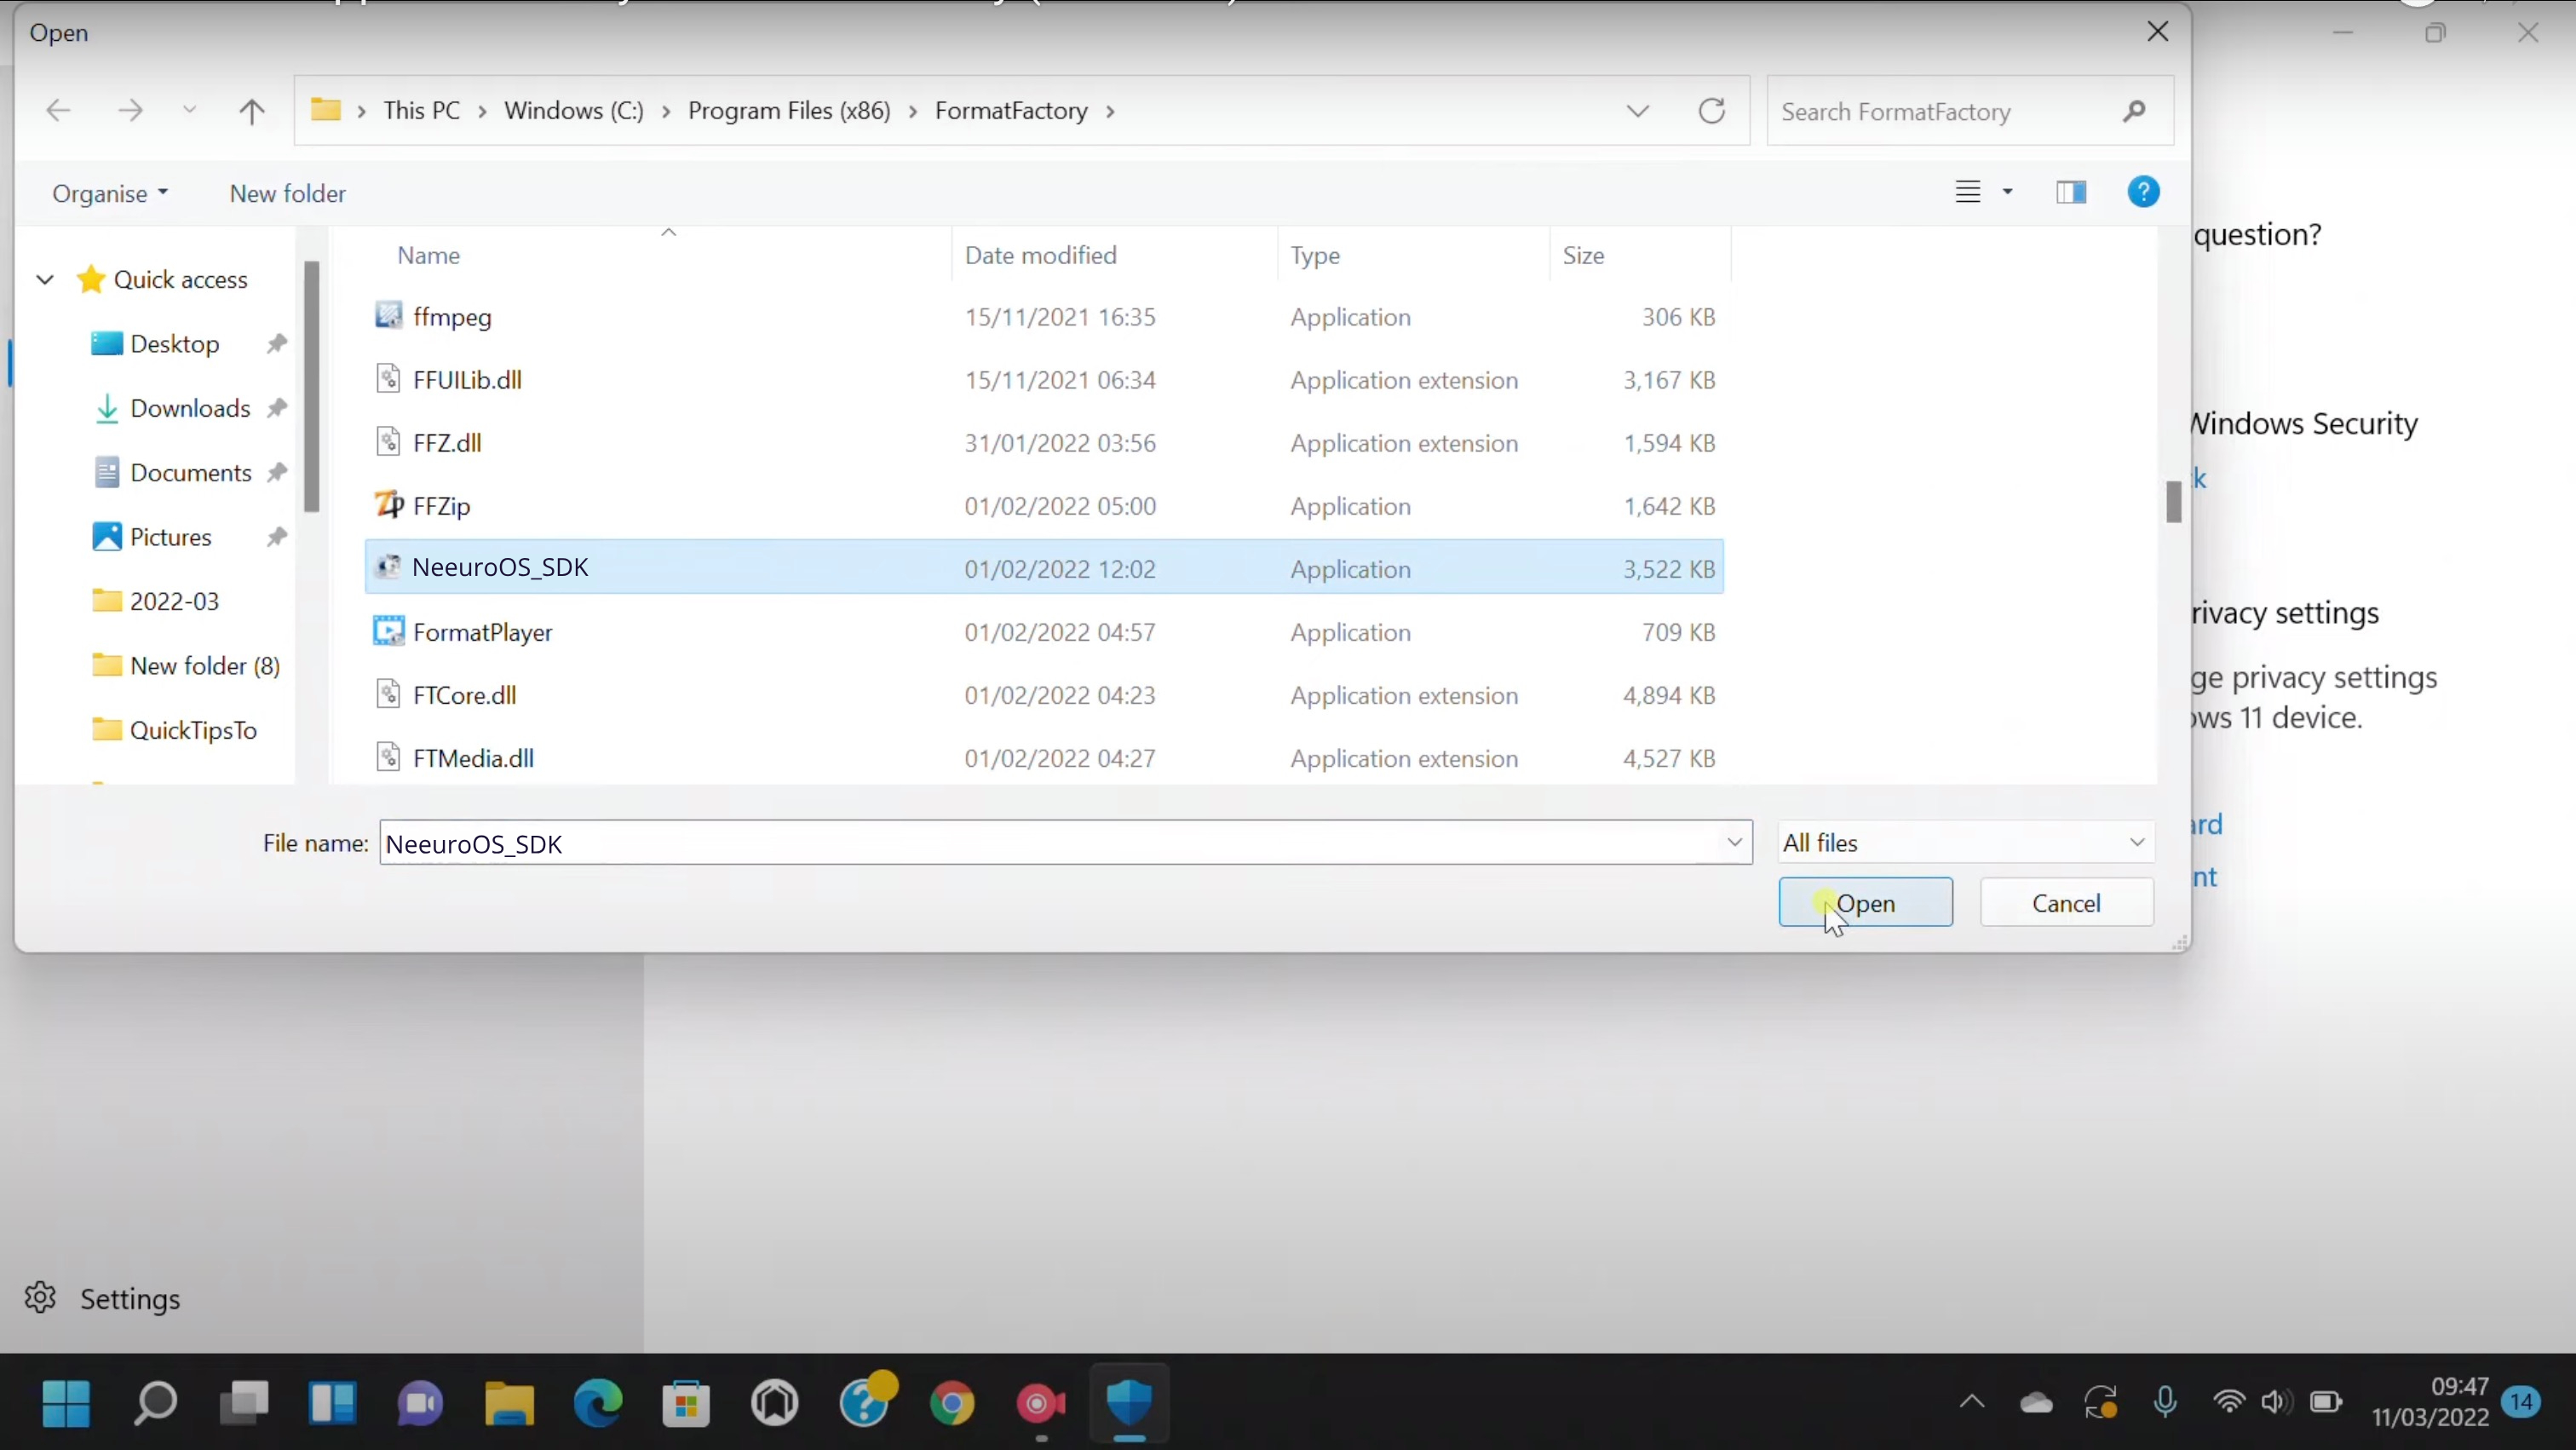
You should now be able to open the NeeuroOS SDK App.
The following table includes links to supplemental documentation that will help you use and understand the SenzeBand 2.
| Name | Notes |
|---|---|
| SenzeBand 2: How it works | How the SenzeBand 2 works |
| SenzeBand 2: Features | Features of the SenzeBand 2 |
| SenzeBand 2: Solutions | Existing SenzeBand 2 solutions |
| SenzeBand 2: Documentation | SenzeBand 2 usage documentation |
| SenzeBand 2: Product catalogue | SenzeBand 2 product catalogue |
For more information, please contact us at contact@neeuro.com.
Disclaimer: Neeuro products are not medical solutions and should not be used to diagnose or treat any medical condition. Individual results may vary.